AI UGC:
The Ultimate
Playbook
Master AI-generated User Generated Content — from realistic models to talking videos, product ads, and beyond.
What Is AI Image Generation?
AI image generation is the process of turning a text description into a visual. You write what you want to see, and the model produces an image based on your input. It sounds simple, and at its core it is, but the part most beginners get wrong is expecting the result to be perfect on the first try. That is not how this works. Your role is not to write one magical sentence and get a flawless output. Your role is to guide the model, step by step, until the result matches what you had in mind. Think of it less like typing a search query and more like directing a creative partner who is incredibly fast but needs clear instructions.
How It Actually Works
When you type a prompt, the model does not "draw" the way a human would. What actually happens is a multi step process. First, your prompt gets broken down into concepts like subject, style, lighting, mood, and composition. Then the model starts from random visual noise and begins predicting what the image should look like, pixel by pixel, refining the picture over many tiny steps until a final image appears.
There are two things worth keeping in mind from the start. The model does not "understand" your words the way a person would. It predicts visual outcomes based on patterns it learned from massive amounts of training data. And because of that, results are probabilistic. The same prompt can give you different outputs every time. That is completely normal and expected.
Your prompt is parsed into concepts (subject, style, lighting, mood, composition)
The model begins from random visual noise
It predicts pixels step by step
The picture becomes clearer over many tiny refinement steps
A final image appears
Why Your Results Keep Changing
One of the most common frustrations beginners have is that the same prompt can produce completely different images each time. If you are used to tools like Google, where the same input always gives the same output, this feels broken. But AI image generation does not work like a search engine. It works more like a creative assistant. You give it a direction, it interprets that direction in its own way, you look at the result, adjust your instructions, and try again. The randomness you see is not a flaw in the system. It is a fundamental part of how these models operate. Once you accept that, you stop chasing the perfect first result and start focusing on what actually matters: learning to iterate quickly and making small, deliberate adjustments between generations.
The Core Workflow
No matter which tool you end up using, the underlying workflow is always the same. You write a prompt, generate the image, evaluate what came out, adjust your prompt based on what you liked or did not like, and generate again. That loop is the entire process. If you internalize this cycle early on, switching between tools later becomes easy because the thinking behind it never changes. The tool is just the surface. The workflow is the skill.
Tools: 3 Categories That Explain Everything
There are a lot of AI tools out there and the number keeps growing. But if you zoom out, almost all of them fall into three categories. Understanding these three buckets will save you from confusion and help you know exactly what each tool is for.
1) Image Models
Image models generate still images from a text prompt or from an image you provide as a reference. Examples include Nano Banana (Nano Banana 2 and Nano Banana Pro), GPT Image (sometimes listed as GPT img), Midjourney, and Seedream (4.0 and newer). Each model has its own visual style and strengths, so results will look different depending on which one you use. But the core workflow stays the same no matter which model you pick.
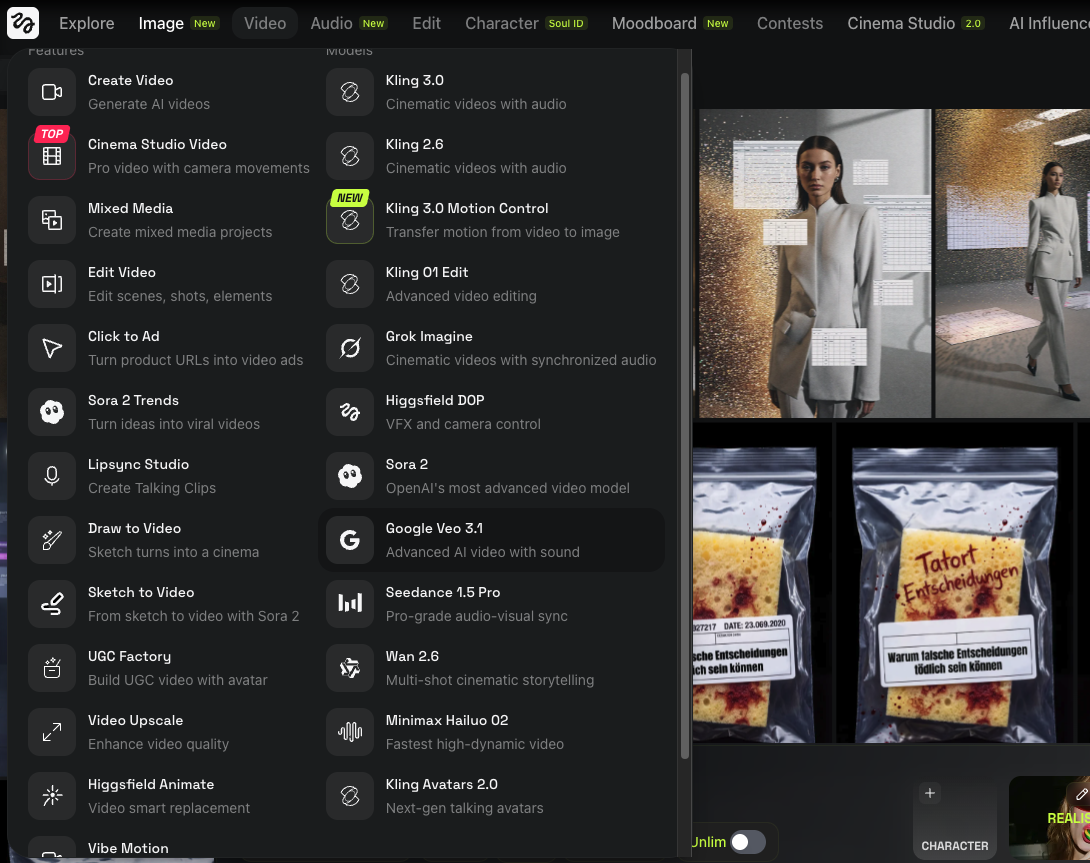
2) Video Models
Video models generate short video clips from text, images, or a combination of both. Examples include Kling, Veo, Sora, Wan, and Seedance. Video models vary a lot in how they handle motion, consistency, and visual quality. The best way to learn any video model is to start with short, simple tests so you get a feel for how it moves before trying anything complex.
3) Platforms
Platforms are workspaces where you can access multiple models in one place. They often come with extra features like galleries, workflow tools, and side by side comparisons. Examples include Higgsfield, ImagineArt, Weavy (also known as Figma Weave after acquisition), and FLORA. The biggest advantage of platforms is convenience. You can test and compare different models without jumping between apps, which makes iteration much faster.
Beginner Rule (So You Don’t Tool Hop)
There is no legitimate tool that gives you unlimited generations for free. If you want to experiment seriously, a paid plan is almost always necessary. So keep it simple and pick one platform first. It is cheaper, more convenient, and it helps you learn faster because everything stays in one place. In this book we use Higgsfield, and it is the platform I recommend. If you want to follow along with every workflow and run your own experiments, I suggest getting the Pro subscription.
What Makes a Good Beginner Prompt
A beginner prompt should be:
- Simple
- Specific
- Easy to edit
Use this structure:
Example:
That is enough to start.
Try making one now!
Open Nano Banana in Higgsfield
Go to higgsfield.ai and select Image → Nano Banana Pro (or Nano Banana 2).

Paste this prompt
Set your first settings
- Aspect ratio: 1:1
- Quality: 2K
- Outputs: 4 images
- Click Generate

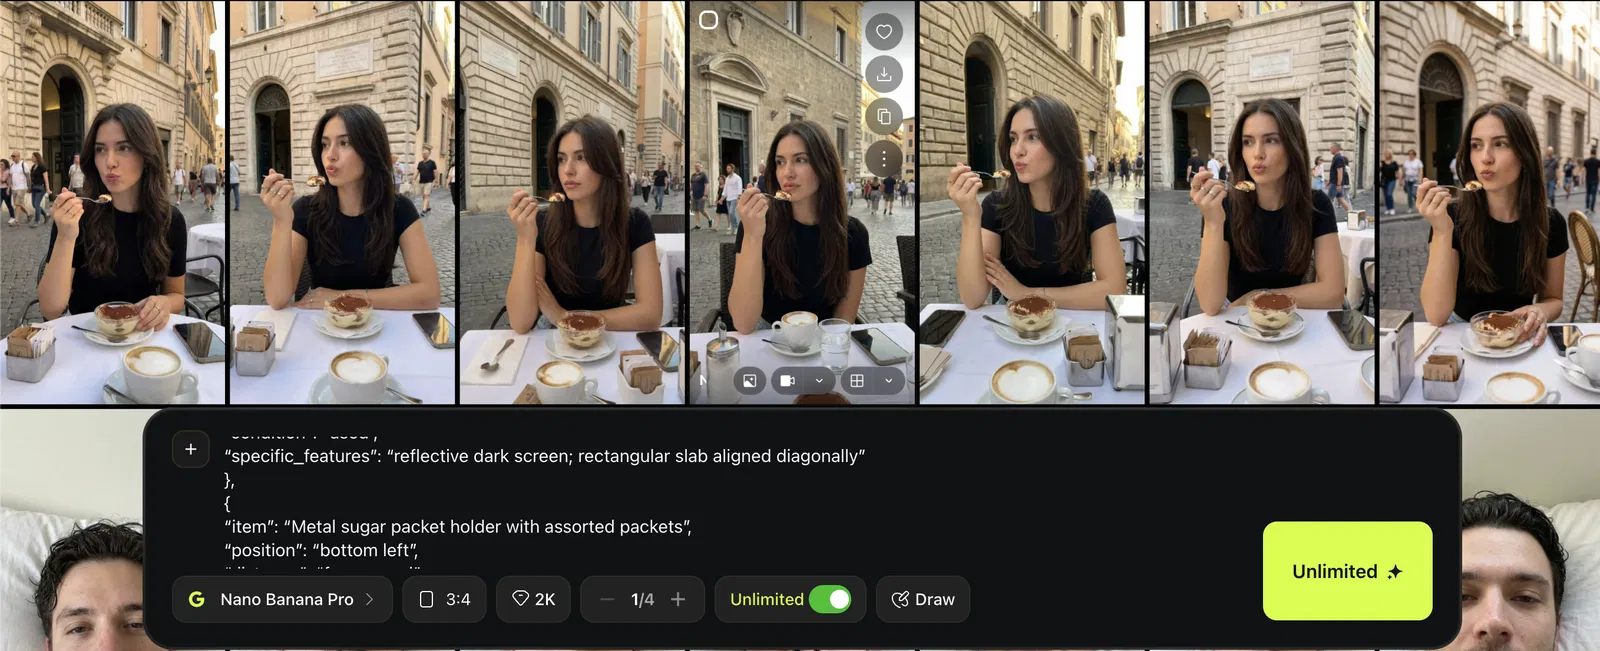
You’ll get four different images even though the prompt is identical.

That variation is normal. It comes from the model’s randomness and the prompt still being a little broad, which gives the AI room to interpret details.
And that’s a win.
Congrats, you just generated your first AI images.
The One Skill That Makes You Good Fast
The single most important skill in AI image generation is iteration. After every generation, ask yourself three questions. What do I like about this result? What is wrong with it? And what is the smallest change I can try next? Small edits between generations will always beat big rewrites because they help you understand exactly what changed and why. This is how you build real control over your outputs.
Common Beginner Mistakes
Most beginners make the same mistakes early on. They try to force perfection on the very first generation. They copy complex prompts from the internet without understanding what each part does. They blame the tool and switch to a new one when the real issue is the prompt. And they change ten things at once, then have no idea which change actually made a difference. If you can avoid these habits from the start, you will improve much faster than most people.
What Is AI Video Generation?
AI video generation follows the same core idea as image generation, but with one extra challenge: time. Instead of producing a single still frame, the model has to generate many frames in sequence that all feel like they belong to the same scene. Every frame needs to stay consistent with the one before it, which makes video significantly harder for AI to get right. That is also why video results tend to be less predictable than images, and why learning to work with video takes a bit more patience.
How It Works
Most video models follow this logic:
Read your input (text, image, or both)
Decide what the scene should look like
Predict what should happen next over time
Generate frames in sequence
Stitch those frames into a short video
1. AI does not “record” motion. It predicts motion.
2. Video is even more probabilistic than images. Small changes can cause big differences.
That is why iteration is not optional. It is the workflow.
Three Video Modes You’ll See Everywhere
Most AI video tools work in one of three modes. Understanding the difference early will help you pick the right approach for each project.
Image to Video is where you start from a still image and the model animates it. This is the best option when you want realism, consistent identity, and controlled results.
Text to Video generates the entire scene from scratch using only a text prompt. This is great for testing concepts and fast ideation, but the tradeoff is that results are less predictable and faces or fine details can drift between frames.
Talking or Audio Driven Video is where you provide speech or audio and the character lip syncs and emotes to match. This mode is ideal for UGC style clips, dialogue scenes, and talking head content.
The Quality Tradeoff (Know This Early)
In video generation, you are almost always trading one thing for another. Understanding this tradeoff early will save you a lot of frustration.
| More Realism | Cheaper and Faster | |
|---|---|---|
| Cost | Higher | Lower |
| Generation time | Longer | Shorter |
| Detail level | Rich and accurate | Less refined |
| Face accuracy | Strong | Can drift or distort |
| Visual artifacts | Fewer | More common |
| Reruns needed | More | Fewer |
This is not a limitation of any specific tool. It is how video generation works right now across the board. Once you accept that, you stop fighting the system and start making smarter decisions about when to prioritize quality and when speed is good enough.
The Video Prompt Formula
The biggest difference between an image prompt and a video prompt is that video needs to describe change over time, not just a static scene. A good video prompt tells the model what is happening, not just what things look like.
A simple structure that works across most tools:
Keep the motion simple at first. You can always add complexity later once you are getting clean results. For example:
That is enough to get started. Notice how the prompt does not ask for anything dramatic. No spinning camera, no complex choreography. Simple motion is the fastest way to get believable output, especially when you are still learning how a model handles movement.
Try Making One Now
We’ll do a simple Image to Video test using the image you generated in the previous chapter.
Open Higgsfield
Go to higgsfield.ai and select Video then choose a model (this time Kling 2.6).
Kling 2.6 is not the best model but it is good for quick testing.
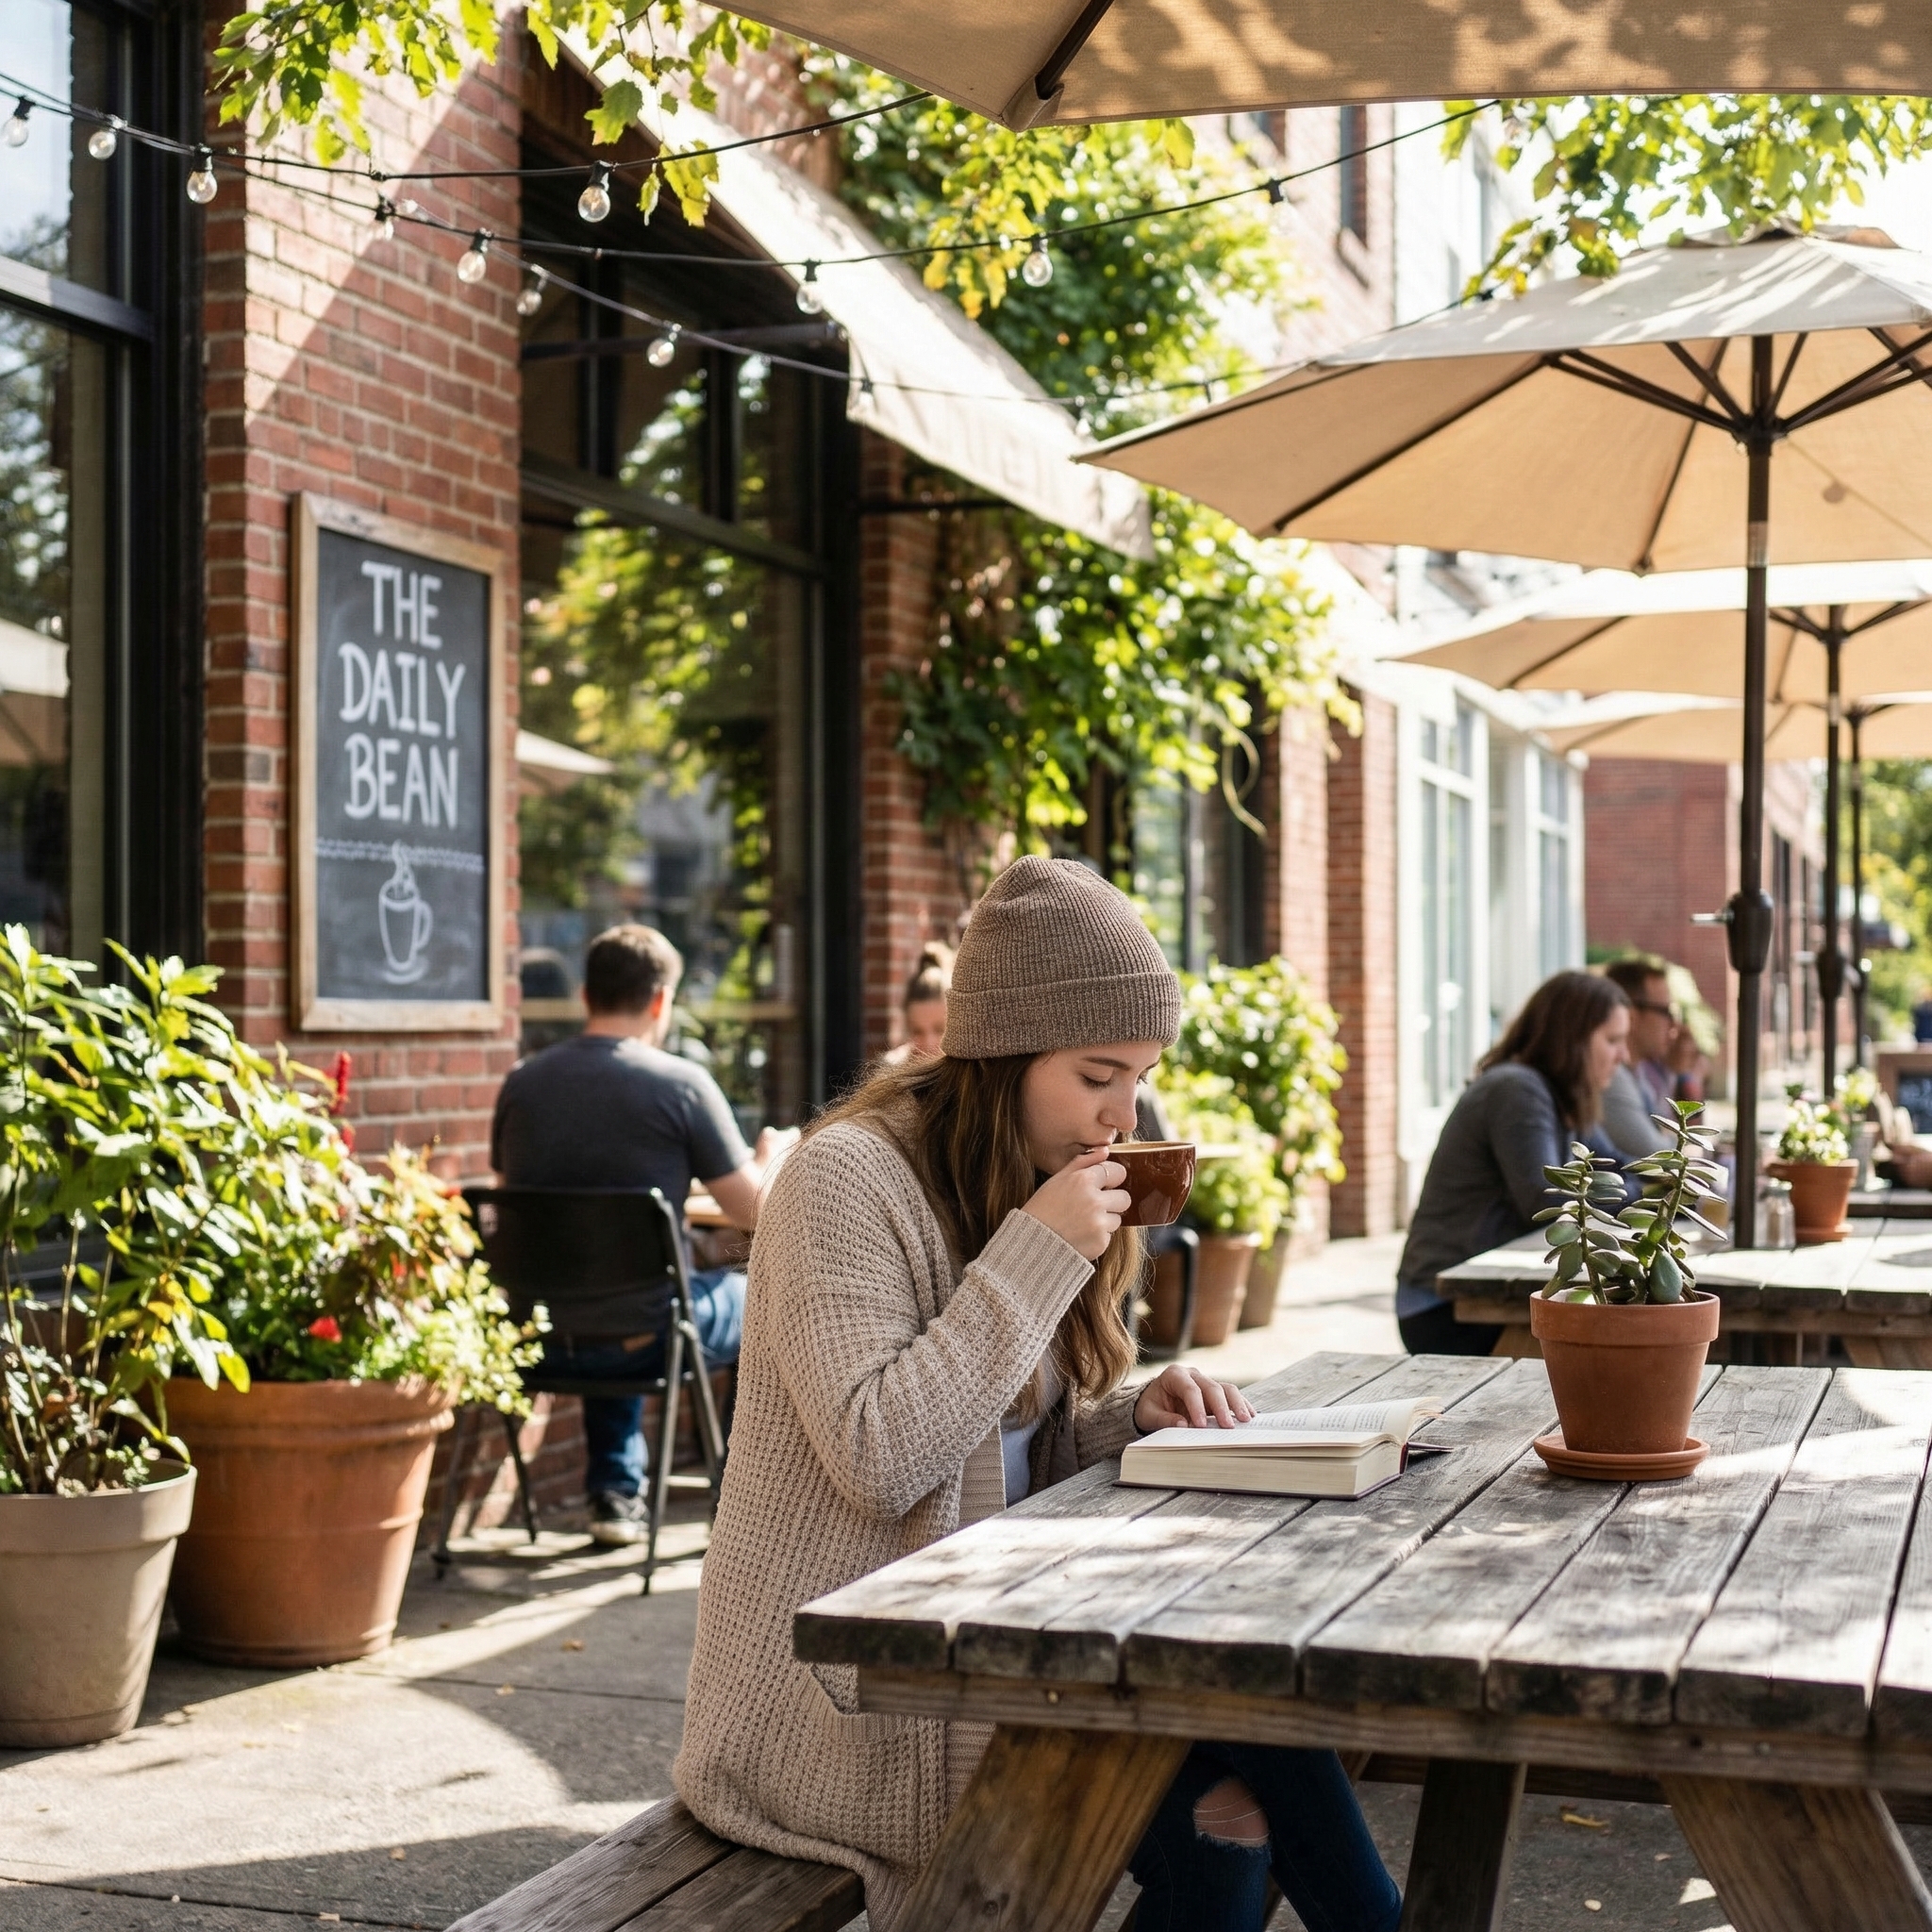
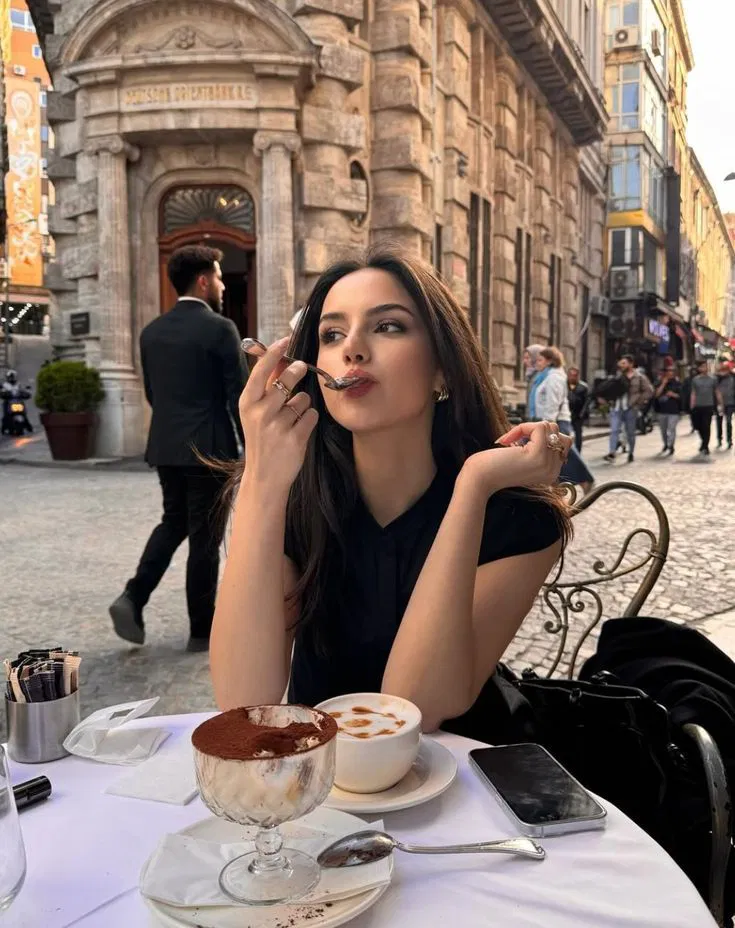
Upload your image
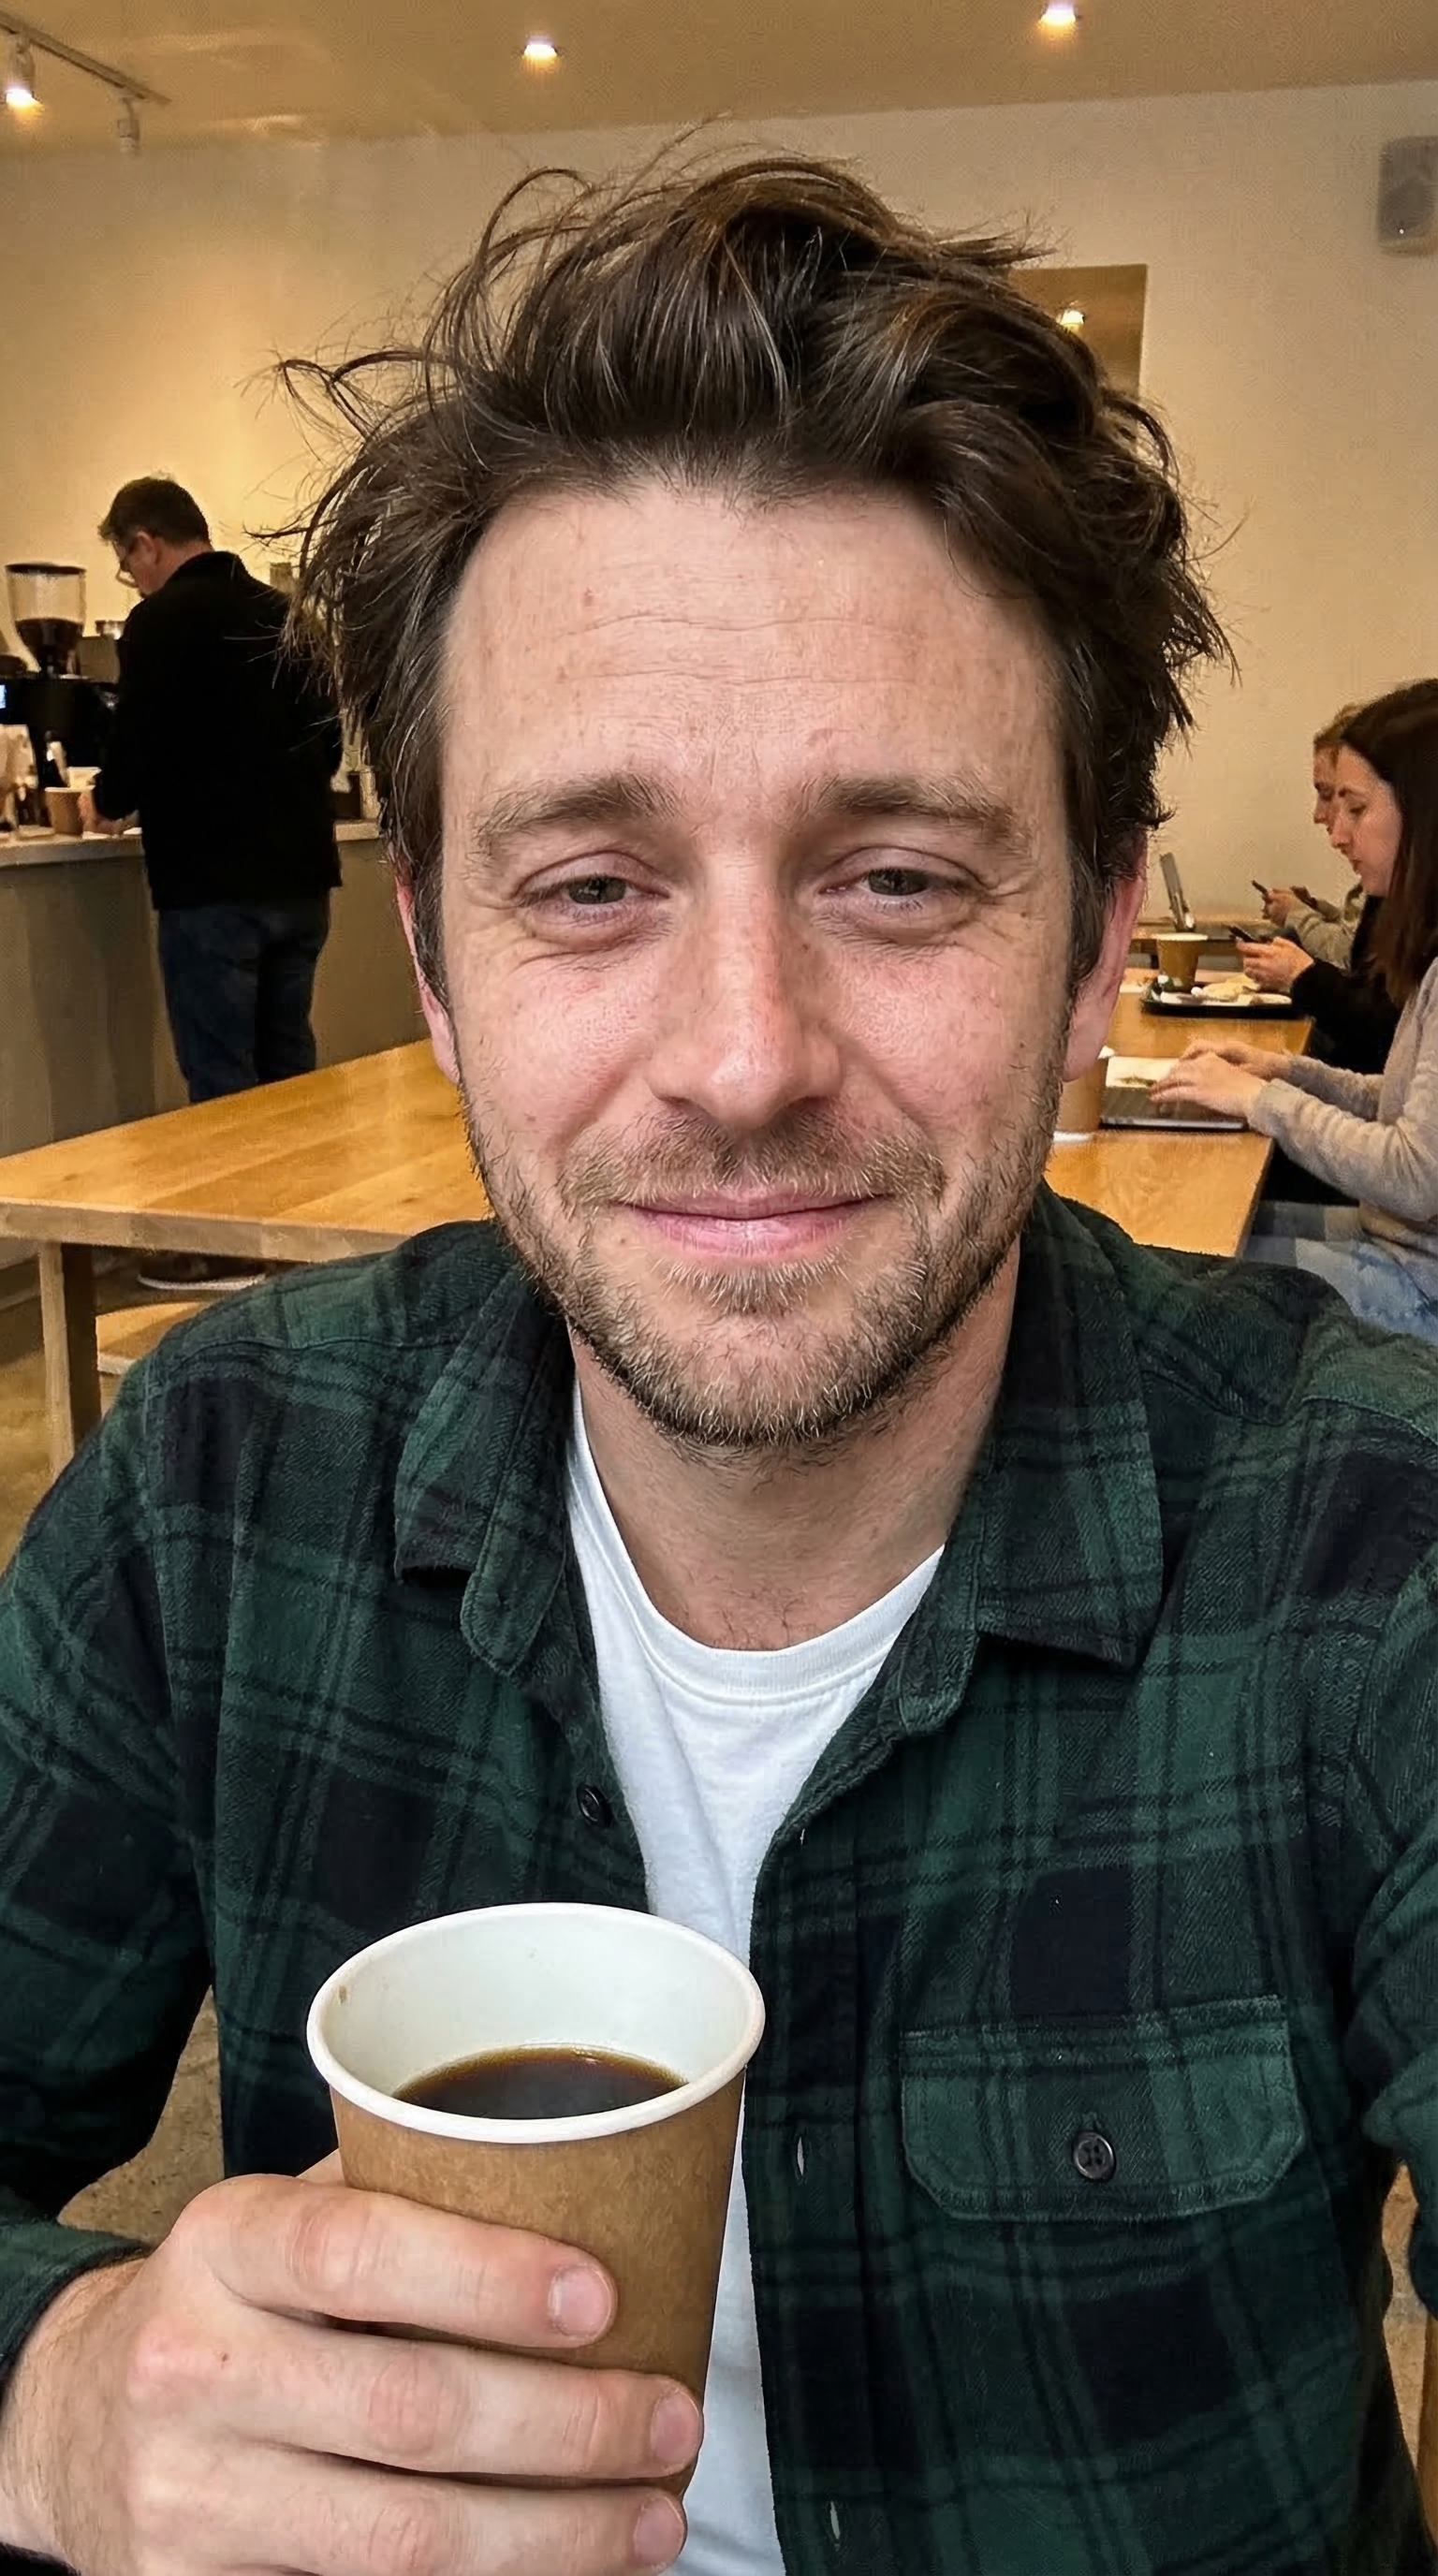
Use one of your cafe images from the AI Image Basics chapter.
You can simply download the image, drag and drop into the first frame.
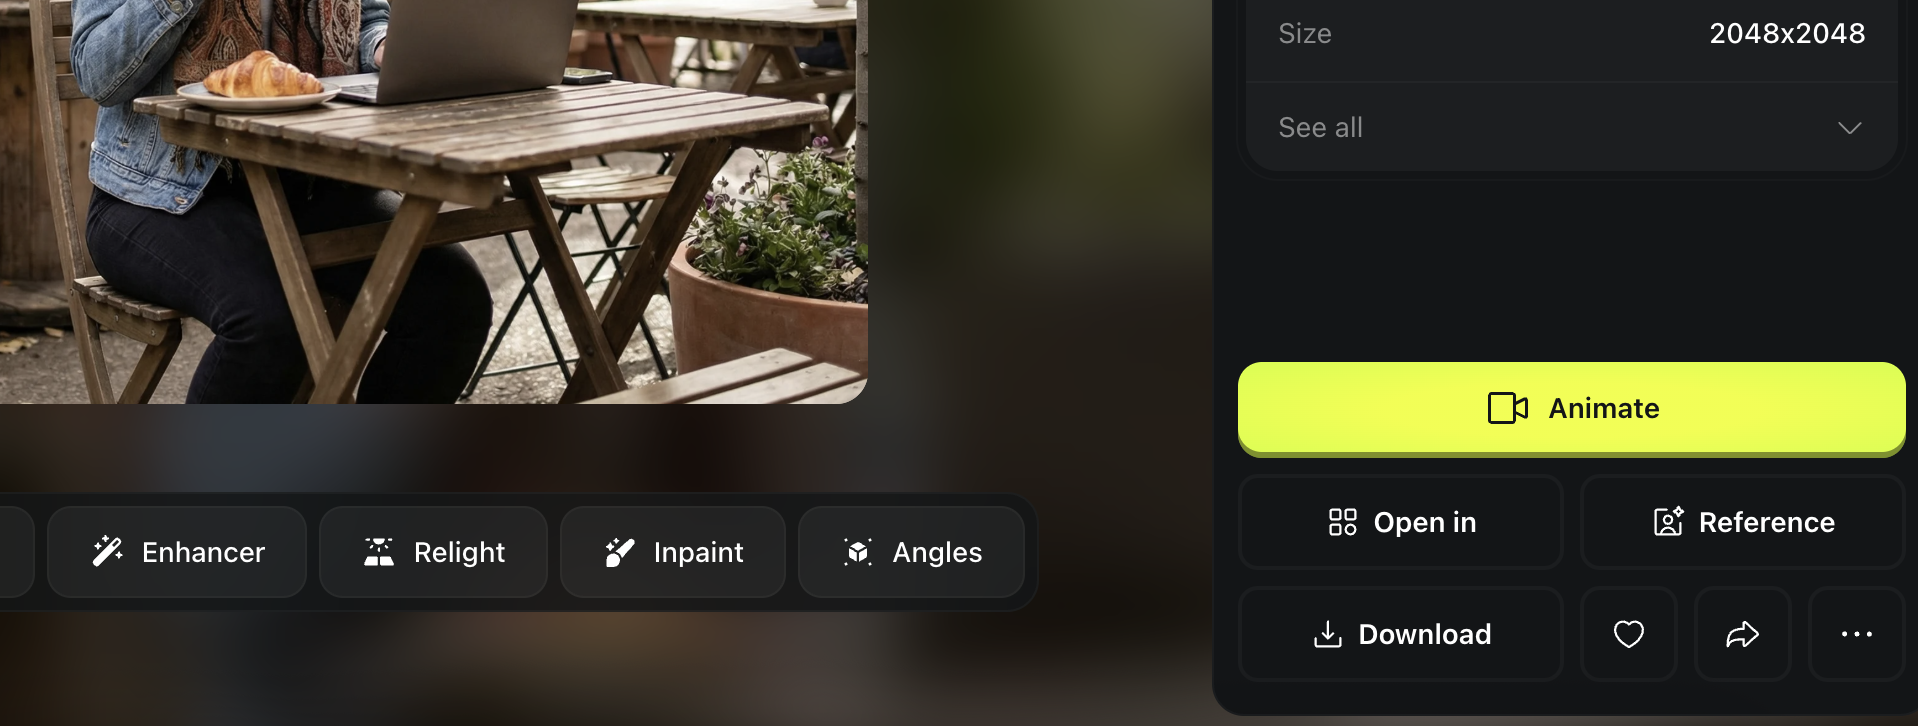
And insert this prompt in the prompt box. ”In a cafe, a person is sitting naturally. Static camera, natural mood..”
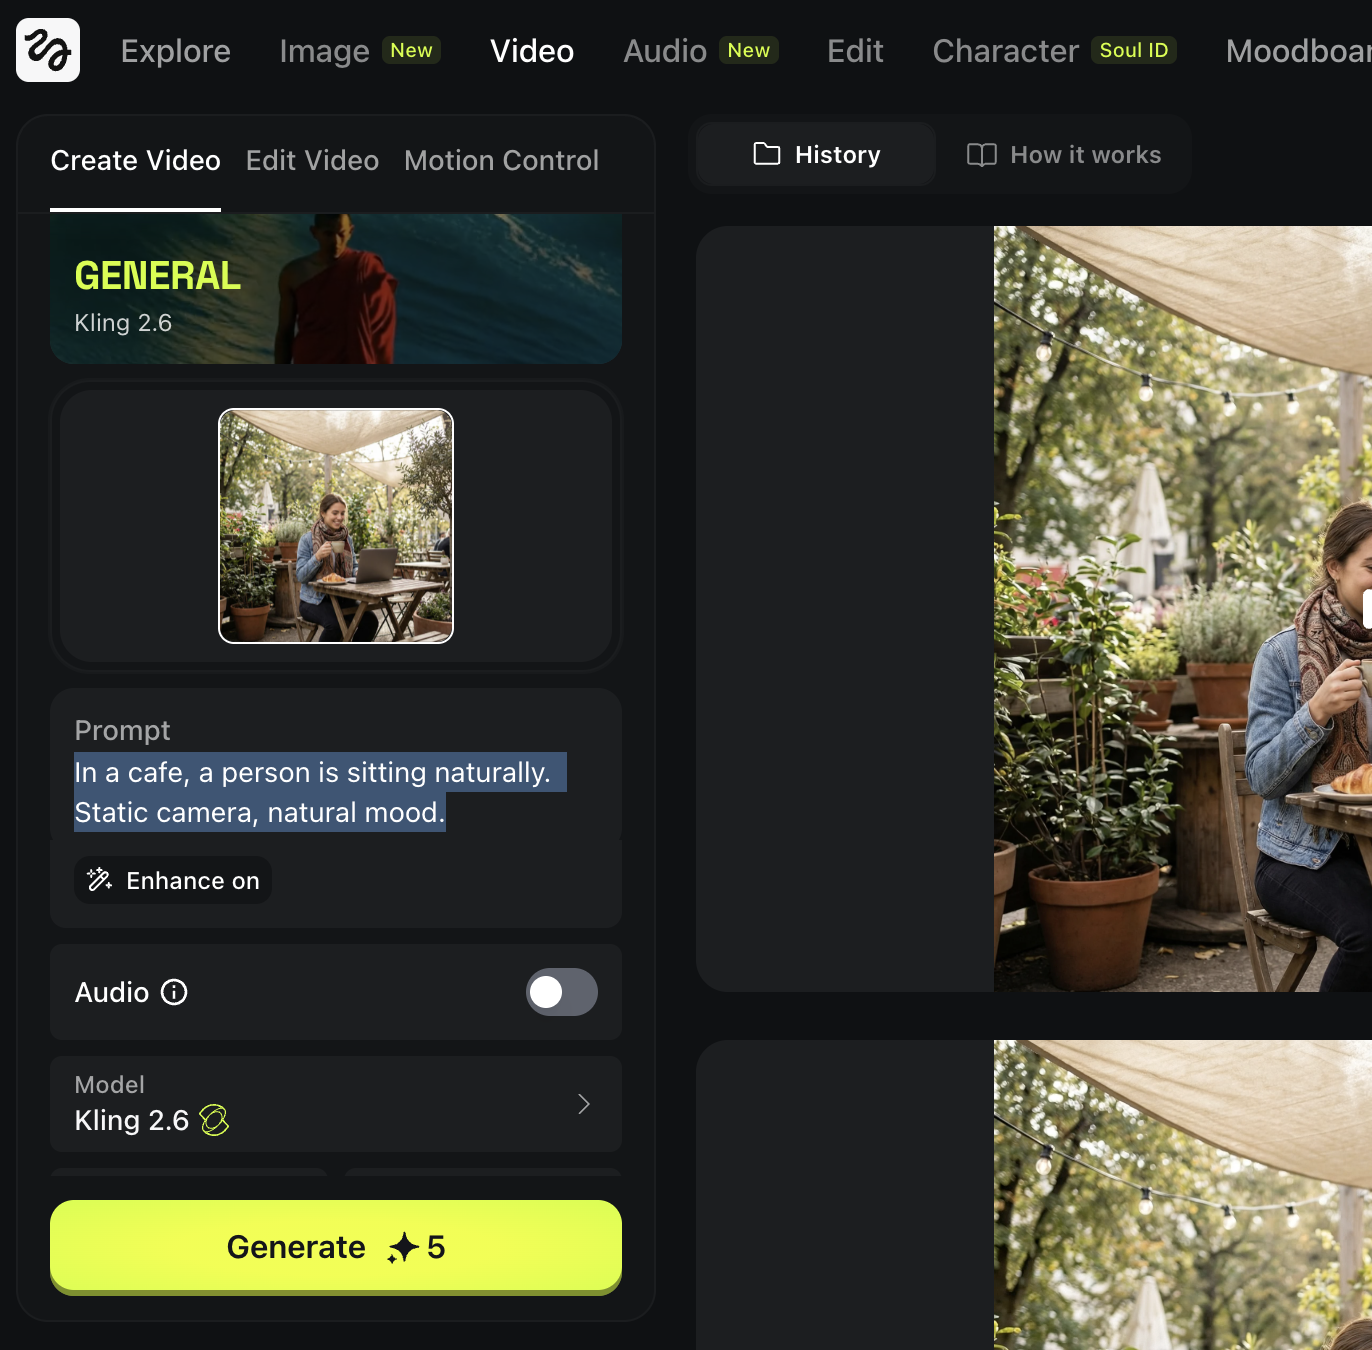
Set the time 5s, quality 1080p and hit generate.
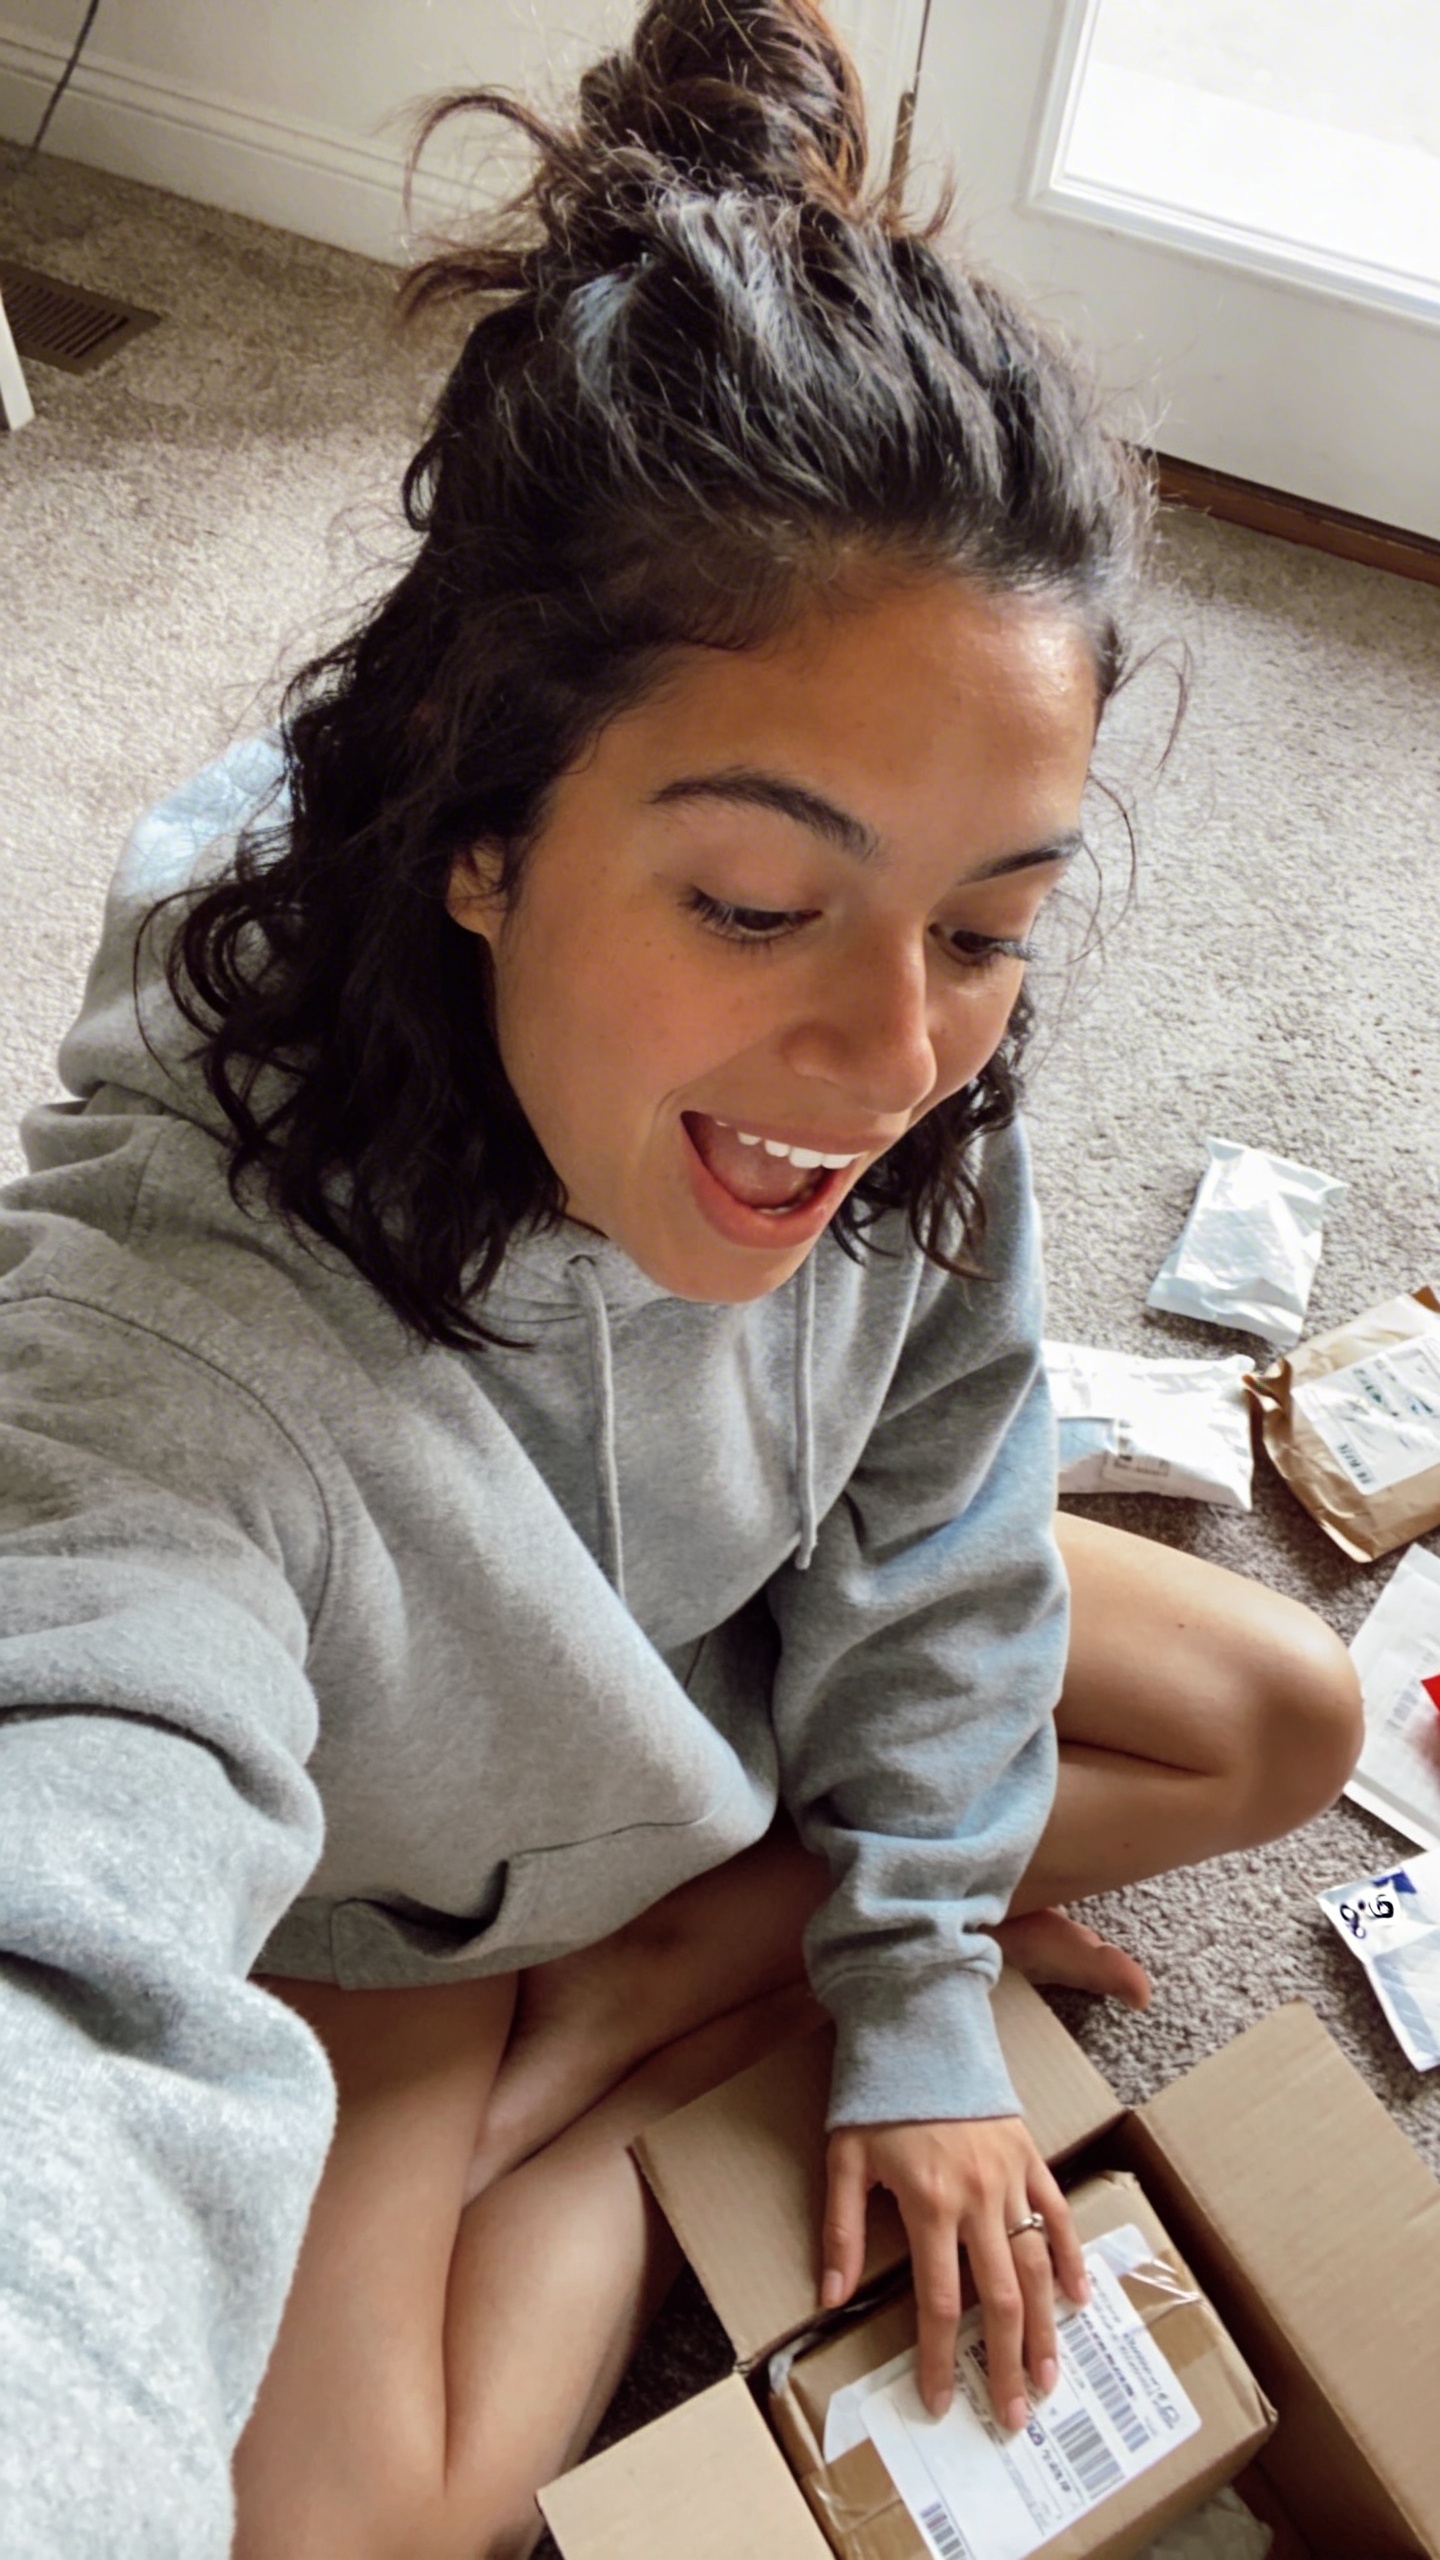
If your output looks like this, that’s a success!
How to Evaluate Your Result
After every generation, run through this quick checklist before deciding whether to keep or redo the output.
- Does the motion feel natural?
- Does the face stay consistent throughout the clip?
- Does the camera movement feel believable?
If something looks off, do not start rewriting your entire prompt. Try these fixes first:
- Reduce the amount of motion
- Remove any fancy camera moves
- Regenerate a few more variations with the same prompt
Most early problems come from asking the model to do too much at once. Simple motion is the fastest way to get clean, believable results.
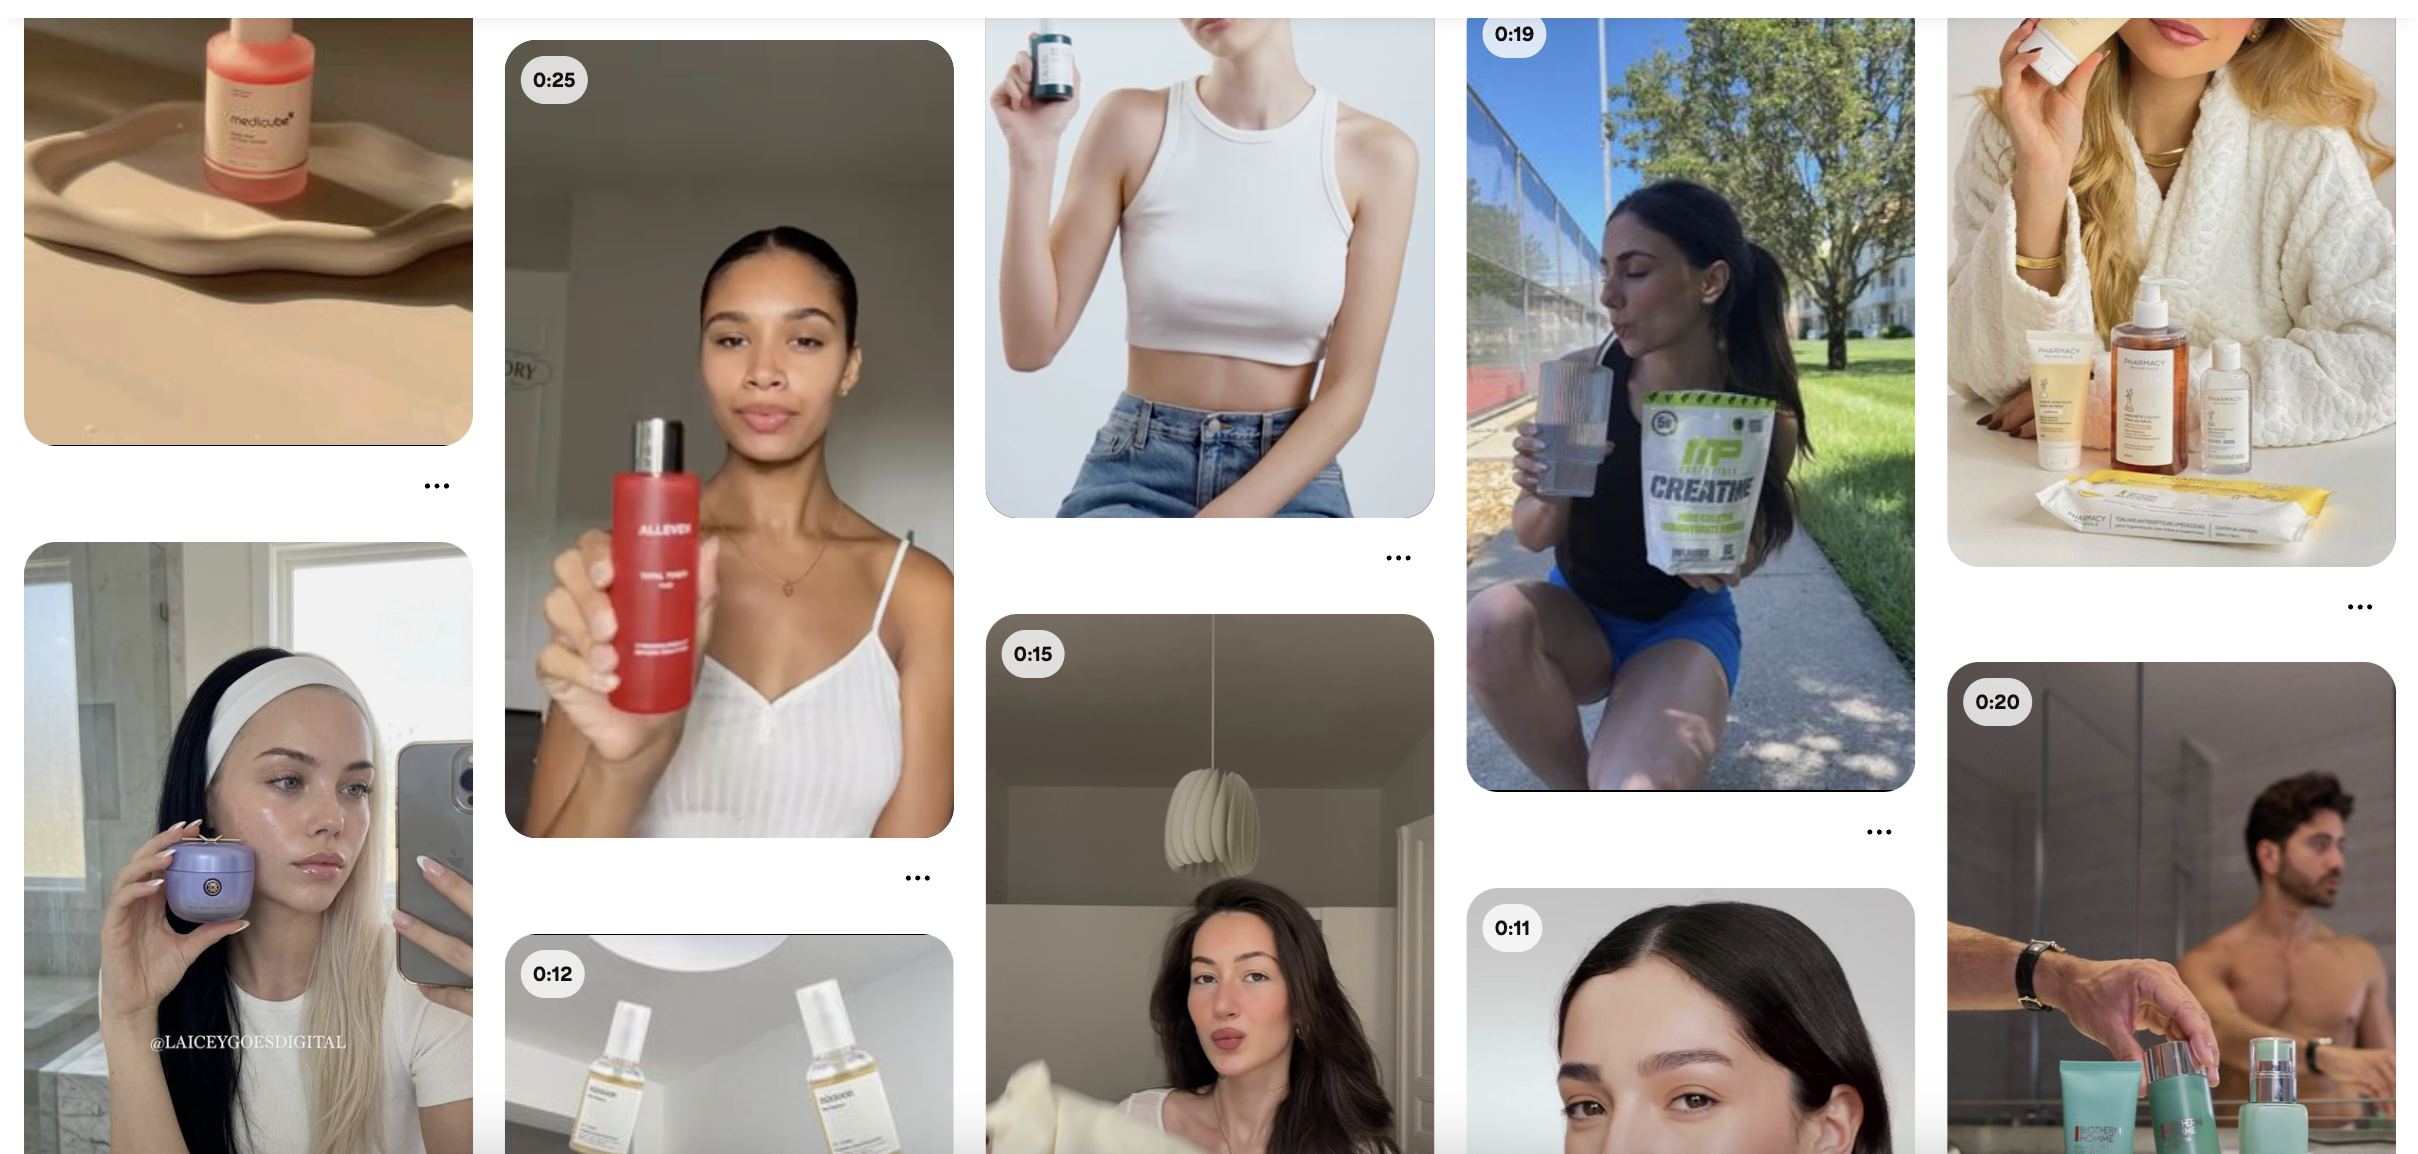
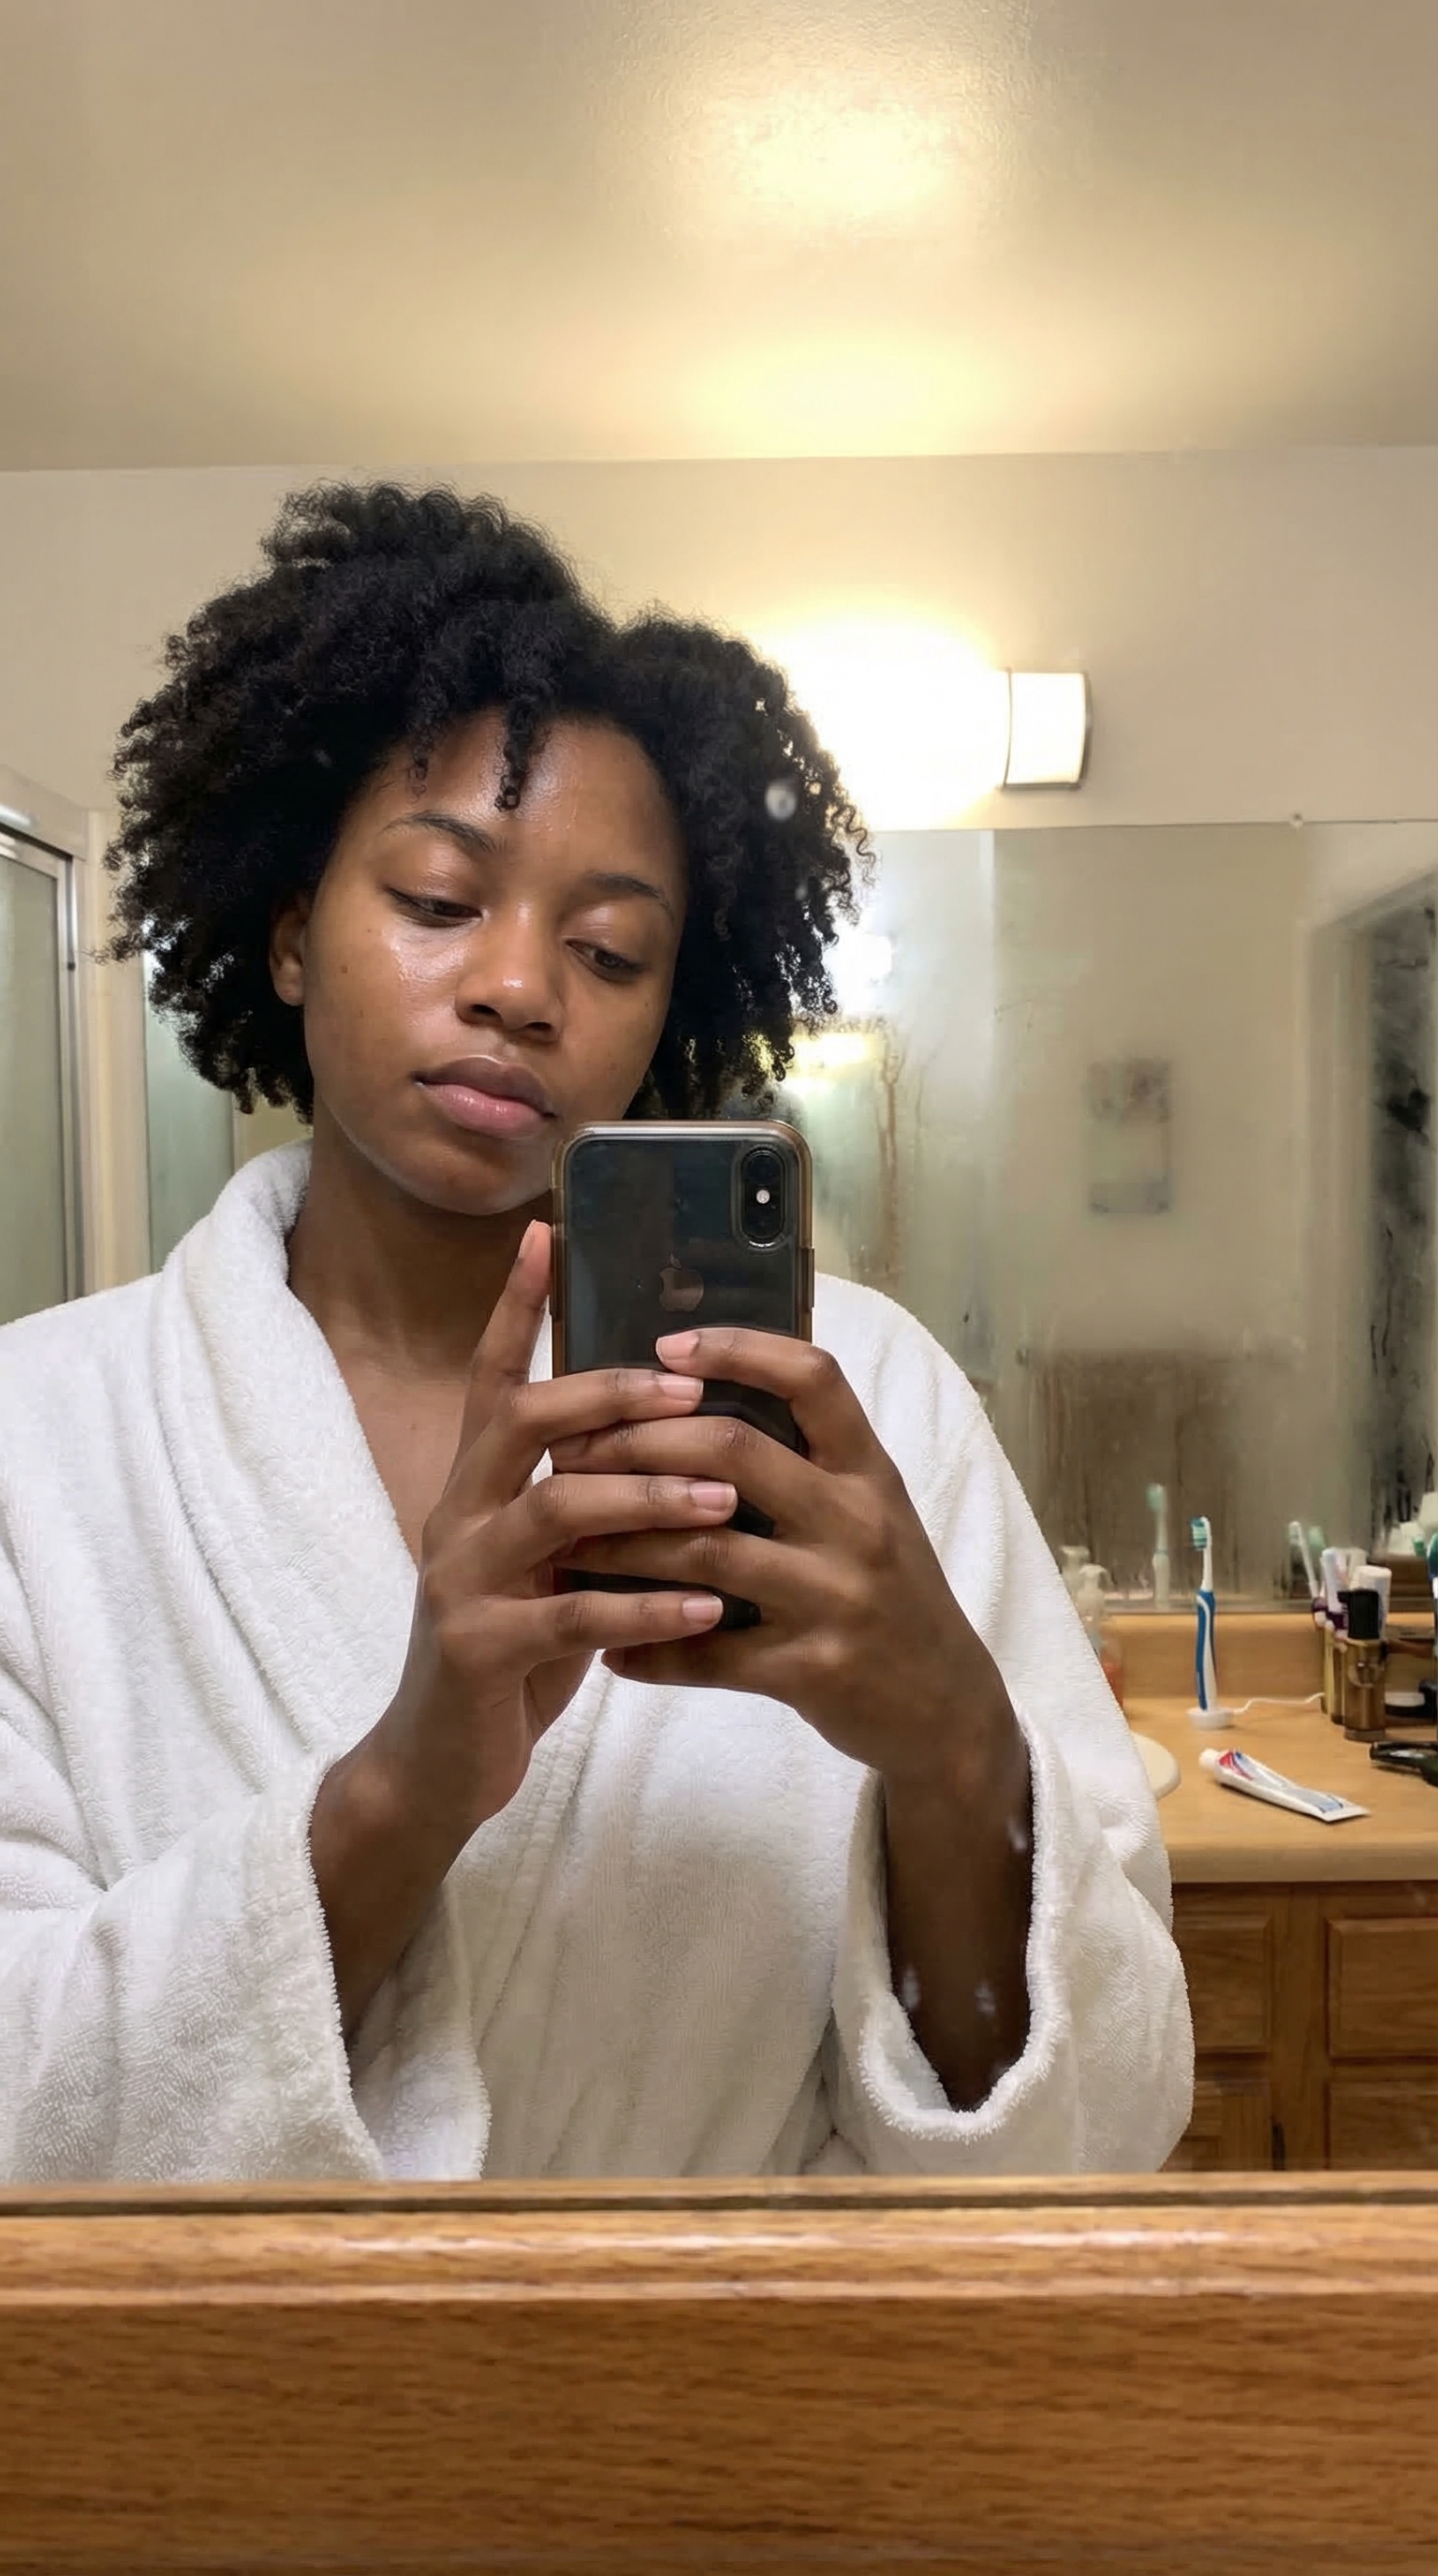
What “UGC” Means
UGC stands for User Generated Content. In marketing, UGC is content that feels like it was made by a normal person rather than a brand or production team. It is the kind of content you scroll past on TikTok or Instagram and think someone just filmed it on their phone because they genuinely wanted to share something. That casual, unpolished, honest feeling is exactly what makes it work.
| UGC Feels Like | UGC Does Not Feel Like |
|---|---|
| Casual and spontaneous | Scripted and rehearsed |
| Slightly imperfect | Perfectly polished |
| Shot on a phone | Shot in a studio |
| Honest and relatable | Salesy and branded |
| Everyday life moments | High production commercials |
| A friend recommending something | A company selling something |
UGC vs Influencer Content
UGC and influencer content might look similar at first glance, but they create very different feelings in the viewer. Influencer content tends to feel polished and intentional, while UGC feels closer to a real customer sharing a genuine experience. That difference matters because people trust content that feels authentic, which is why UGC often outperforms influencer content in ads.
| UGC | Influencer Content | |
|---|---|---|
| Tone | Casual, unscripted | Polished, intentional |
| Who it feels like | A real customer | A paid promotion |
| Production quality | Low, phone style | High, curated |
| Trust level | Higher | Lower |
| Viewer reaction | "This feels real" | "This is an ad" |
| Best for | Conversions and trust | Awareness and reach |
| Best for | Conversions and trust | Awareness and reach |
So What Is AI UGC?
AI UGC is content that has the look and feel of traditional user generated content, but is created or assisted by AI. The goal is not to make content that looks like AI made it. The goal is the exact opposite. You want content where the person feels real, the moment feels real, and a viewer scrolling past would genuinely believe this could be a real video filmed by a real person on their phone. If someone watches it and thinks "this is AI," you have not reached the standard yet. The entire point of AI UGC is that it is indistinguishable from the real thing.
The Core Risk
If your AI UGC looks AI generated, it can actively hurt you. UGC works because of trust. The moment a viewer feels like something is fake, the effect flips. Instead of building trust, it destroys it. Instead of driving interest, it creates suspicion. Instead of converting, it pushes people away. That is why realism is not a nice bonus or something you optimize for later. Realism is the entire game. Every technique in this book exists to get you closer to that standard.
| Risks (If It Looks AI) | Opportunities (If It Looks Real) |
|---|---|
| Viewers lose trust immediately | Builds instant credibility with the audience |
| Content feels deceptive and manipulative | Feels authentic and relatable |
| Lower engagement and conversions | Higher engagement and click through rates |
| Brand reputation damage | Scalable content without hiring creators |
| Wasted time and ad spend | Faster production at a fraction of the cost |
| Comments calling out "this is AI" | Content that blends seamlessly into feeds |
| Comments calling out "this is AI" | Content that blends seamlessly into feeds |
What “Ultra Realism” Means in AI UGC
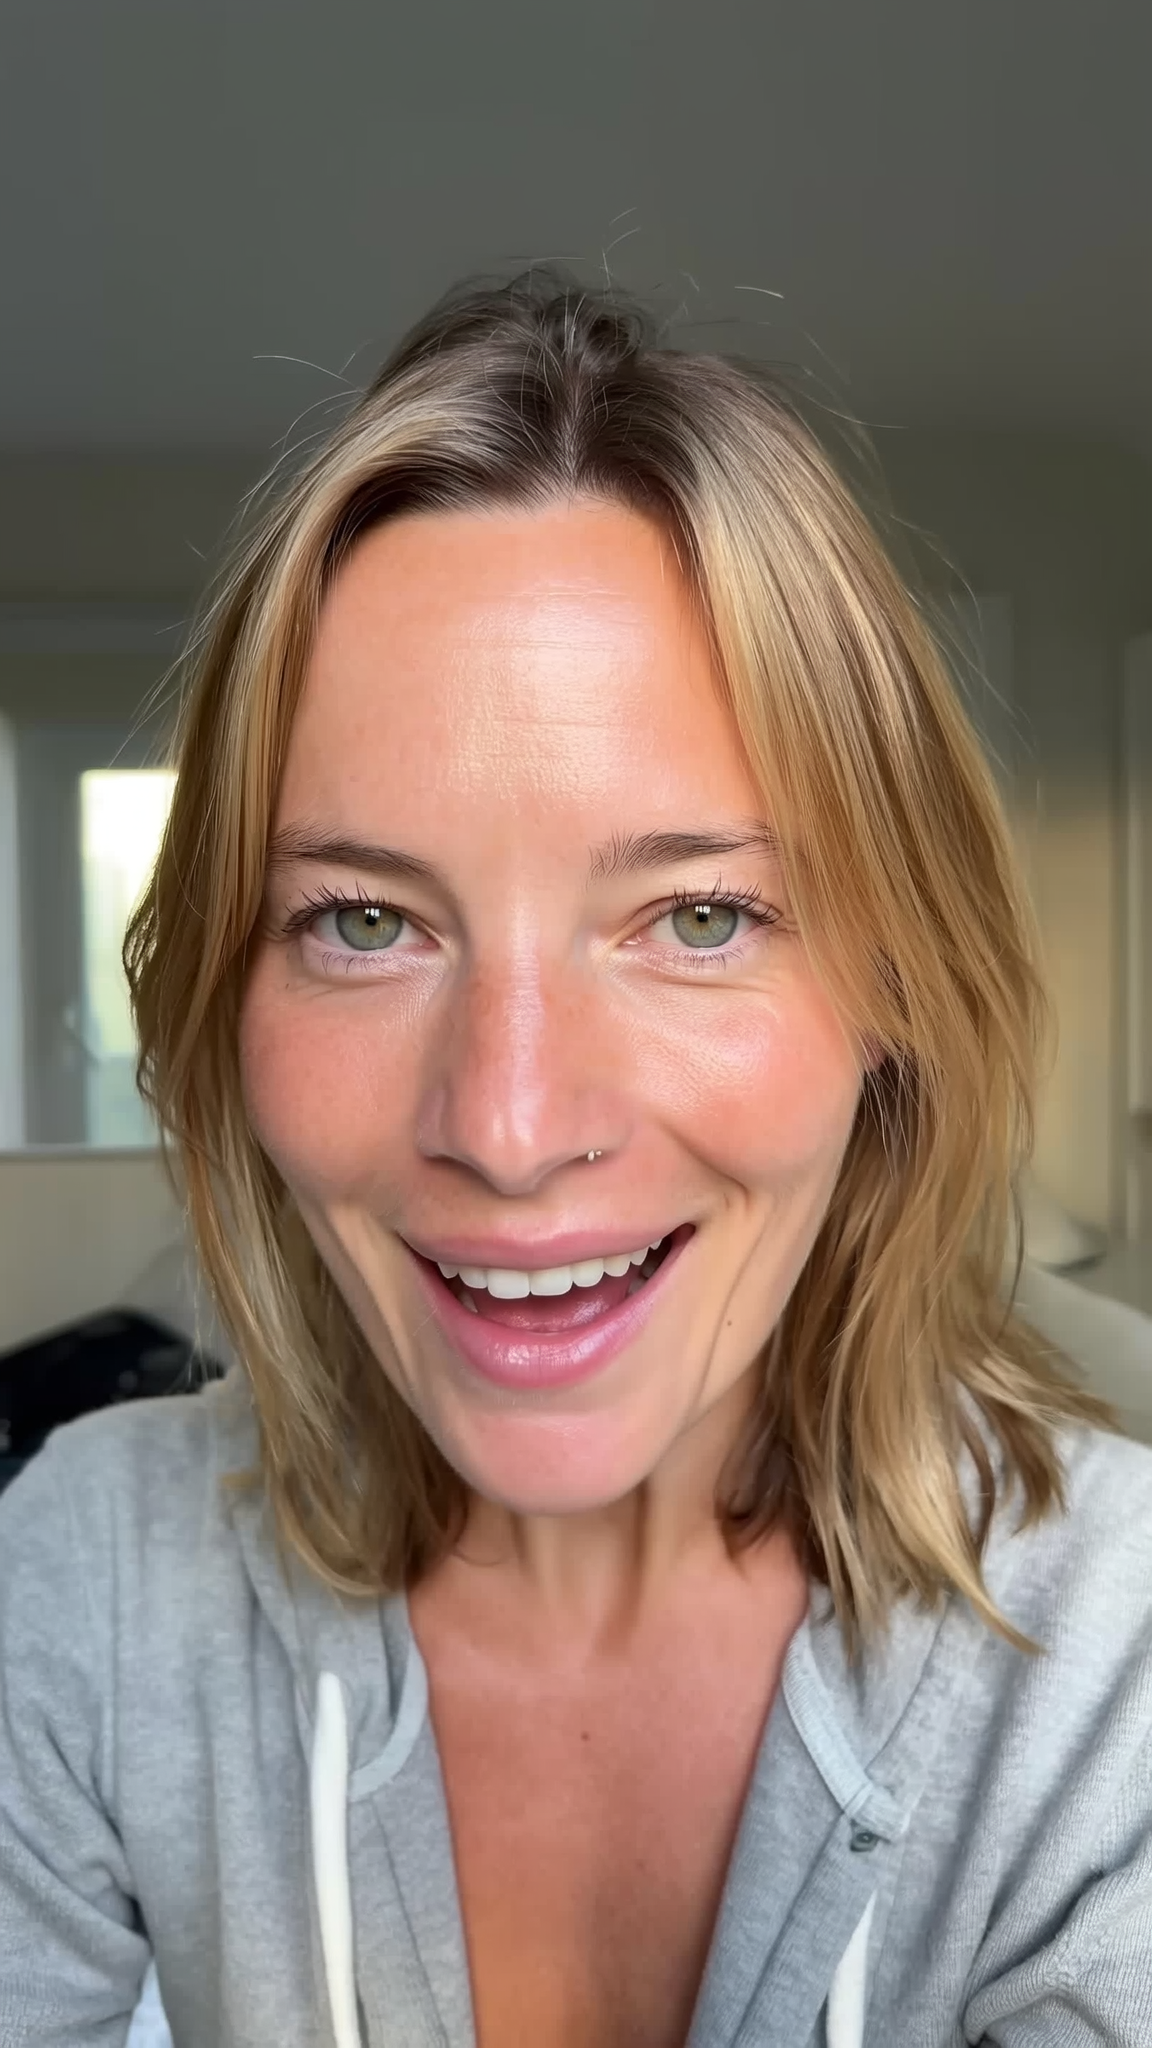
Ultra realism means the output has photographic credibility. When someone looks at it, their first instinct should be that a real camera captured this moment. It is not about making something that looks "pretty" or "high quality" in an artistic sense. It is about making something that looks like it actually happened in the real world.
Ultra realistic results usually include:
- Natural skin texture with visible pores and subtle imperfections
- Believable lighting that matches a real environment
- Correct facial proportions and slight asymmetry
- Real world details like tiny shadows, skin blemishes, and uneven tones
A simple way to check your output is to ask what it should not look like. If the skin feels overly smooth, it is not there yet. If the image looks stylized or artistic, it is not there yet. If the person looks plastic or too perfect, it is not there yet. Real people are not flawless, and your AI output should not be either.
The Simple Test
The easiest way to judge your AI UGC is to imagine someone scrolling through their feed and seeing your content for a split second. If their gut reaction is "this could be a real photo or video," you have hit the standard. If anything makes them pause and think "this looks AI generated," you are not there yet. That quick gut reaction is the benchmark for everything you create from this point forward.
Why This Matters for Everything Later
Every workflow you will learn in this book builds on top of realism. Product holding shots only work if the person looks real. Talking head videos only convert if the viewer believes someone is actually speaking. Ads only perform if the audience trusts what they are seeing. Consistent characters only matter if they look like real people in the first place. None of the advanced techniques later in this book will work if the foundation is not there. Get realism right first. Everything else follows from that.
Too Many Tools Is the Fastest Way to Get Stuck
There are more AI tools available now than anyone could reasonably try, and new ones launch every week. But for beginners, more tools almost always means more confusion, slower progress, and less actual skill building. You end up spending your time comparing tools instead of learning how to use any of them well. That is why this book limits the stack on purpose. We use a small, focused set of tools that cover everything you need. You can always explore more later once you have the fundamentals down. But first, build your skills with a simple setup that lets you focus on what actually matters.
The Core Stack We Use in This Book
Platform: Higgsfield
This is the main workspace where you can access models in one place.
Why we use it:
- Less switching between sites
- Easier to test and compare
- Faster iteration
Image Generation model: Nano Banana
This is our default image model that you can use within Higgsfield.
Why we use it:
- Great for realistic images
- Strong results with editing capability
- Good base for later video workflows
Video Generation: Veo and Kling
We use two video models because video has different strengths depending on the goal.
Why we use them:
- High quality motion and realism with audio
- Useful for both subtle animation and cinematic movement
- Widely used by serious creators
Prompting and Planning: ChatGPT
ChatGPT is not the image model. You could also use other LLM like Gemini but ChatGPT thinking mode is my favorite so far.
It is your prompt builder and thinking partner.
Why we use it:
- Helps you write clear prompts fast
- Helps you simplify when results fail
- Helps you iterate logically instead of guessing
Beginner Rule
Start with one platform, one image model, one or two video models, and ChatGPT for prompt writing. That is your entire stack. Resist the urge to add more until you can consistently get good results with this setup. Once you reach that point, you will have enough understanding to evaluate new tools properly and actually know whether they improve your workflow. Until then, keeping it simple is the fastest path forward.
What Aspect Ratio Means
Aspect ratio is the shape of your image or video.
It controls how wide or tall the frame is.
Same prompt, same model, different aspect ratio can change:
- composition
- cropping
- how “UGC like” it feels
The 3 Most Useful Ratios
1:1
Square
- Instagram feed posts
- Carousel thumbnails
- Simple product shots
9:16
Vertical
- TikTok
- Instagram Reels
- YouTube Shorts
- Most UGC ads
16:9
Horizontal
- YouTube videos
- Website heroes
- Cinematic scenes
- Landscape shots
If you are making AI UGC, 9:16 is your default most of the time.
Why It Matters for AI UGC
UGC is designed to feel like it was filmed on a phone, and phones are vertical. That means the aspect ratio you choose has a direct impact on how authentic your content feels. If you generate UGC style content in 16:9, it can instantly feel like a production shoot instead of a casual phone clip, even if everything else looks perfect. As a rule of thumb, UGC style content should almost always be 9:16 unless you have a strong reason to do otherwise.
Two More Settings You’ll See Everywhere
Quality or Resolution
Higher quality means more detail, but also longer generation time and sometimes higher cost. When you are still experimenting with a prompt, start at mid quality first. Get the prompt working, then increase the resolution for your final output. This saves both time and credits.
Variations
Most tools let you generate multiple outputs at once from the same prompt. Use this. Because generation is probabilistic, there is no single correct result. One variation might look great while another from the exact same prompt looks off. Generate at least four variations whenever you can. It speeds up learning and improves your odds fast.
How AI Understands Visual Language
AI does not simulate a real camera. Instead, it links words to visual patterns it has seen in training data. So when you write things like "cinematic lighting," "35mm look," or "shallow depth of field," the model is not doing physics. It is recalling visual examples that match those phrases. That is why approximate terms work, visual language beats technical precision, and consistency matters more than being "correct."
Director Mindset Beats Camera Mindset
A camera operator thinks in numbers. A director thinks in feeling and visuals. AI responds better to director thinking. Instead of asking "what aperture should I use," think about the feeling you want. Should the background feel soft or sharp? Should this feel intimate or epic? Should this feel like a casual phone clip or a movie scene? This mental shift instantly improves your prompts because you start describing what you want to see instead of trying to configure a virtual camera.
Describing the Scene (Visual Vocabulary)
You can use all of these terms without any real camera knowledge. Think of them as building blocks you mix and match depending on the shot you want.
Shot and Framing
| Term | What It Looks Like | Best For in UGC |
|---|---|---|
| Extreme close up | Eyes, lips, skin texture | Skincare, makeup, emotional moments |
| Close up | Face focused | Talking head videos, selfie style |
| Medium shot | Upper body | Product holding, casual conversation |
| Medium wide | Body plus environment | Lifestyle, outfit reveals |
| Wide shot | Full scene | Room tours, full body fashion |
| Centered framing | Subject in the middle, clean | Direct to camera UGC |
| Off center framing | Subject slightly to one side | Natural, candid feel |
Lighting
| Term | What It Does | UGC Feel |
|---|---|---|
| Natural daylight | Realistic outdoor or window light | Everyday, authentic |
| Soft lighting | Flattering, even, minimal shadows | Clean and approachable |
| Hard lighting | Strong shadows, dramatic contrast | Bold, editorial |
| Backlighting | Light source behind the subject | Dreamy, golden hour |
| Rim light | Glowing edge around the subject | Cinematic but natural |
| High key | Bright, almost no shadows | Commercial, clean |
| Low key | Dark, moody, deep shadows | Nighttime, intimate |
| Diffused light | Soft shadows, even spread | Realistic indoor UGC |
Camera Feel and Motion
For UGC, camera feel is one of the most important details. It is what separates "this looks like a real phone video" from "this looks like a production."
| Term | What It Does | When to Use |
|---|---|---|
| Static shot | No movement at all | Simple product shots |
| Handheld camera | Natural shake, vlog style | Most UGC talking videos |
| Locked off shot | Very stable, no drift | Clean product demos |
| Slow push in | Subtle forward movement | Cinematic moments |
| Micro movements | Tiny natural drift | Realistic selfie footage |
Focus and Depth
| Term | What It Looks Like |
|---|---|
| Shallow depth of field | Subject sharp, background blurry |
| Deep depth of field | Everything in focus |
| Selective focus | Only the subject is sharp |
| Soft background blur | Cinematic bokeh look |
For UGC, shallow depth of field with soft background blur is your default. It mimics how phone portrait mode looks in real life.
Style and Finish
| Term | What It Does |
|---|---|
| Photorealistic | Real world accuracy, no stylization |
| Cinematic color grading | Movie like color tones |
| High contrast | Strong separation between light and dark |
| Low contrast | Soft, muted tones |
| Warm tones | Friendly, emotional, golden |
| Cool tones | Futuristic, dramatic, blue |
| Natural skin texture | Visible pores and real detail |
| Visible imperfections | Blemishes, slight asymmetry |
For UGC, always lean toward photorealistic, natural skin texture, and visible imperfections. If your output looks too polished or too stylized, it stops feeling like UGC.
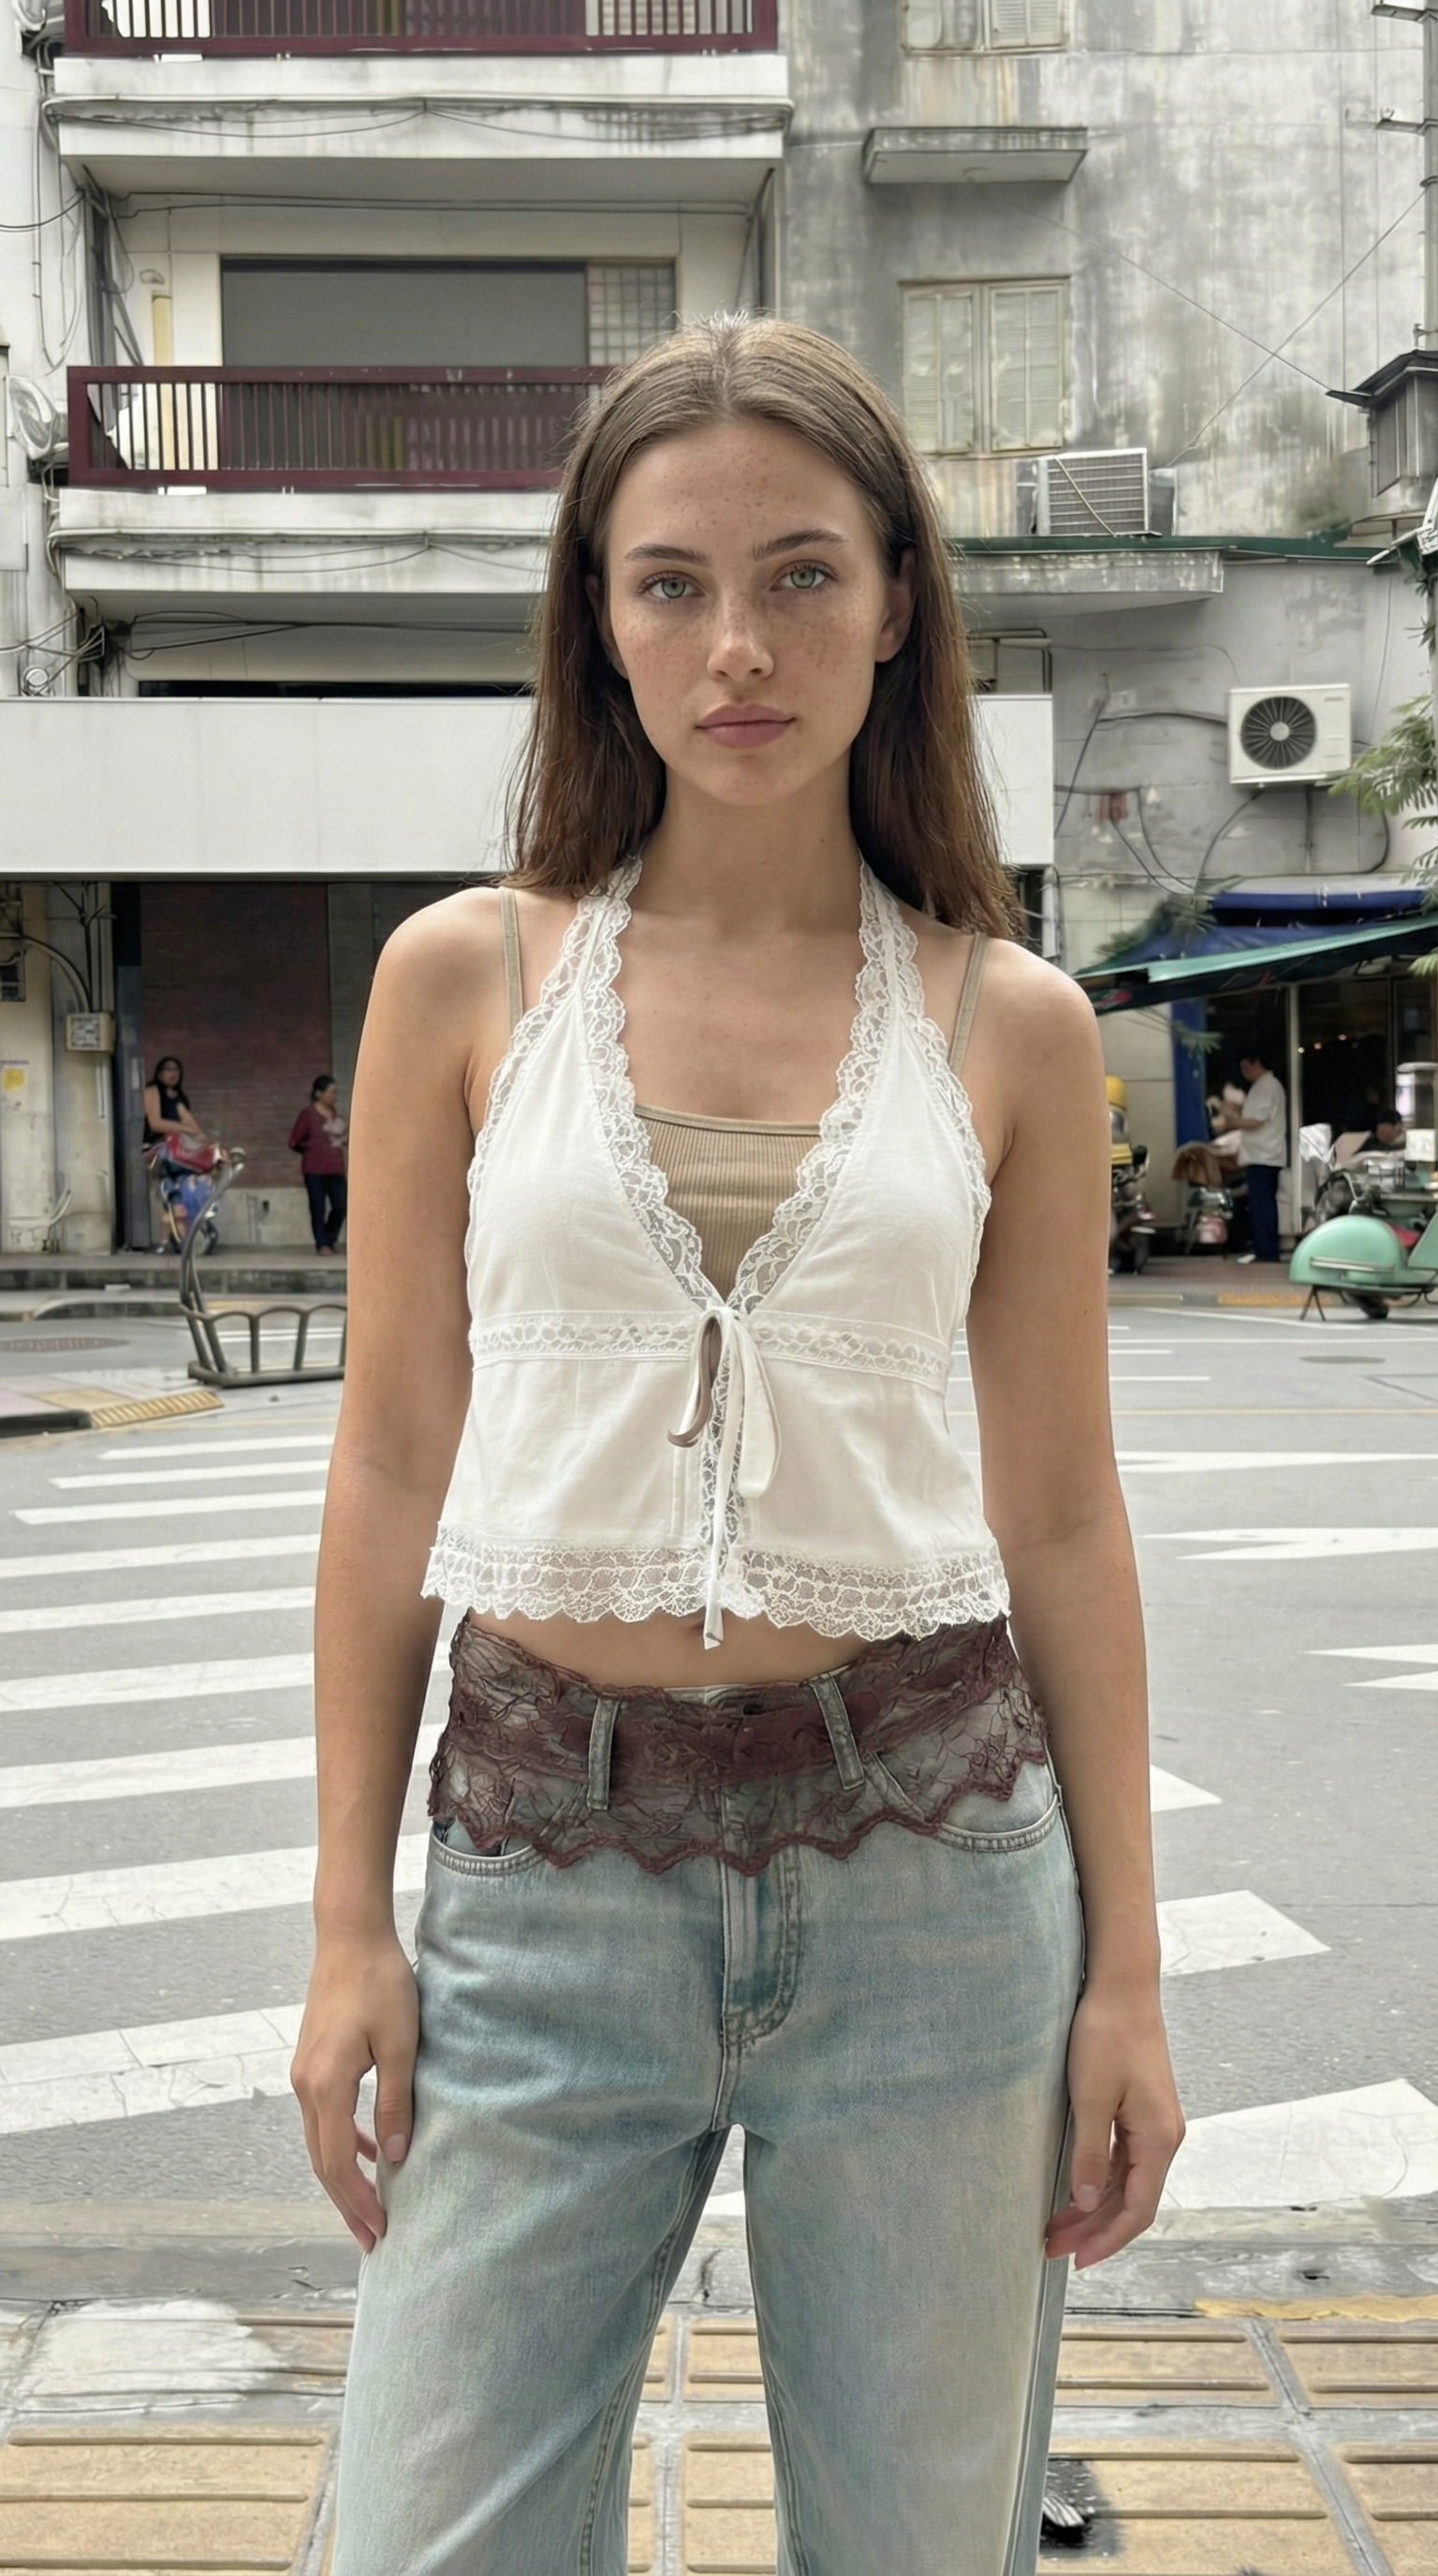
Describing the Person (The Most Important Part)
In UGC, the person is the content. If the person looks wrong, nothing else matters. This section gives you a practical vocabulary for describing every part of your subject so the AI generates someone who looks real, specific, and consistent.
Body Type and Build
Be specific about body type. Vague descriptions give the AI room to default to generic results.
| Term | What It Means |
|---|---|
| Slim | Lean, narrow frame |
| Athletic | Toned, visible muscle definition |
| Average build | Normal everyday body |
| Curvy | Fuller figure with visible curves |
| Stocky | Broad, compact frame |
| Tall and lean | Long limbs, narrow |
| Petite | Small frame, shorter |
Skin
Skin is where realism lives or dies in AI UGC. The more specific you are, the less "AI smooth" your output will look.
| What to Specify | Options |
|---|---|
| Skin tone | Fair, light, medium, olive, tan, brown, dark brown, deep |
| Texture | Visible pores, natural unevenness, subtle shine, matte |
| Imperfections | Freckles, moles, acne scars, redness, under eye circles |
| Finish | Dewy, matte, natural oil sheen, no makeup look |
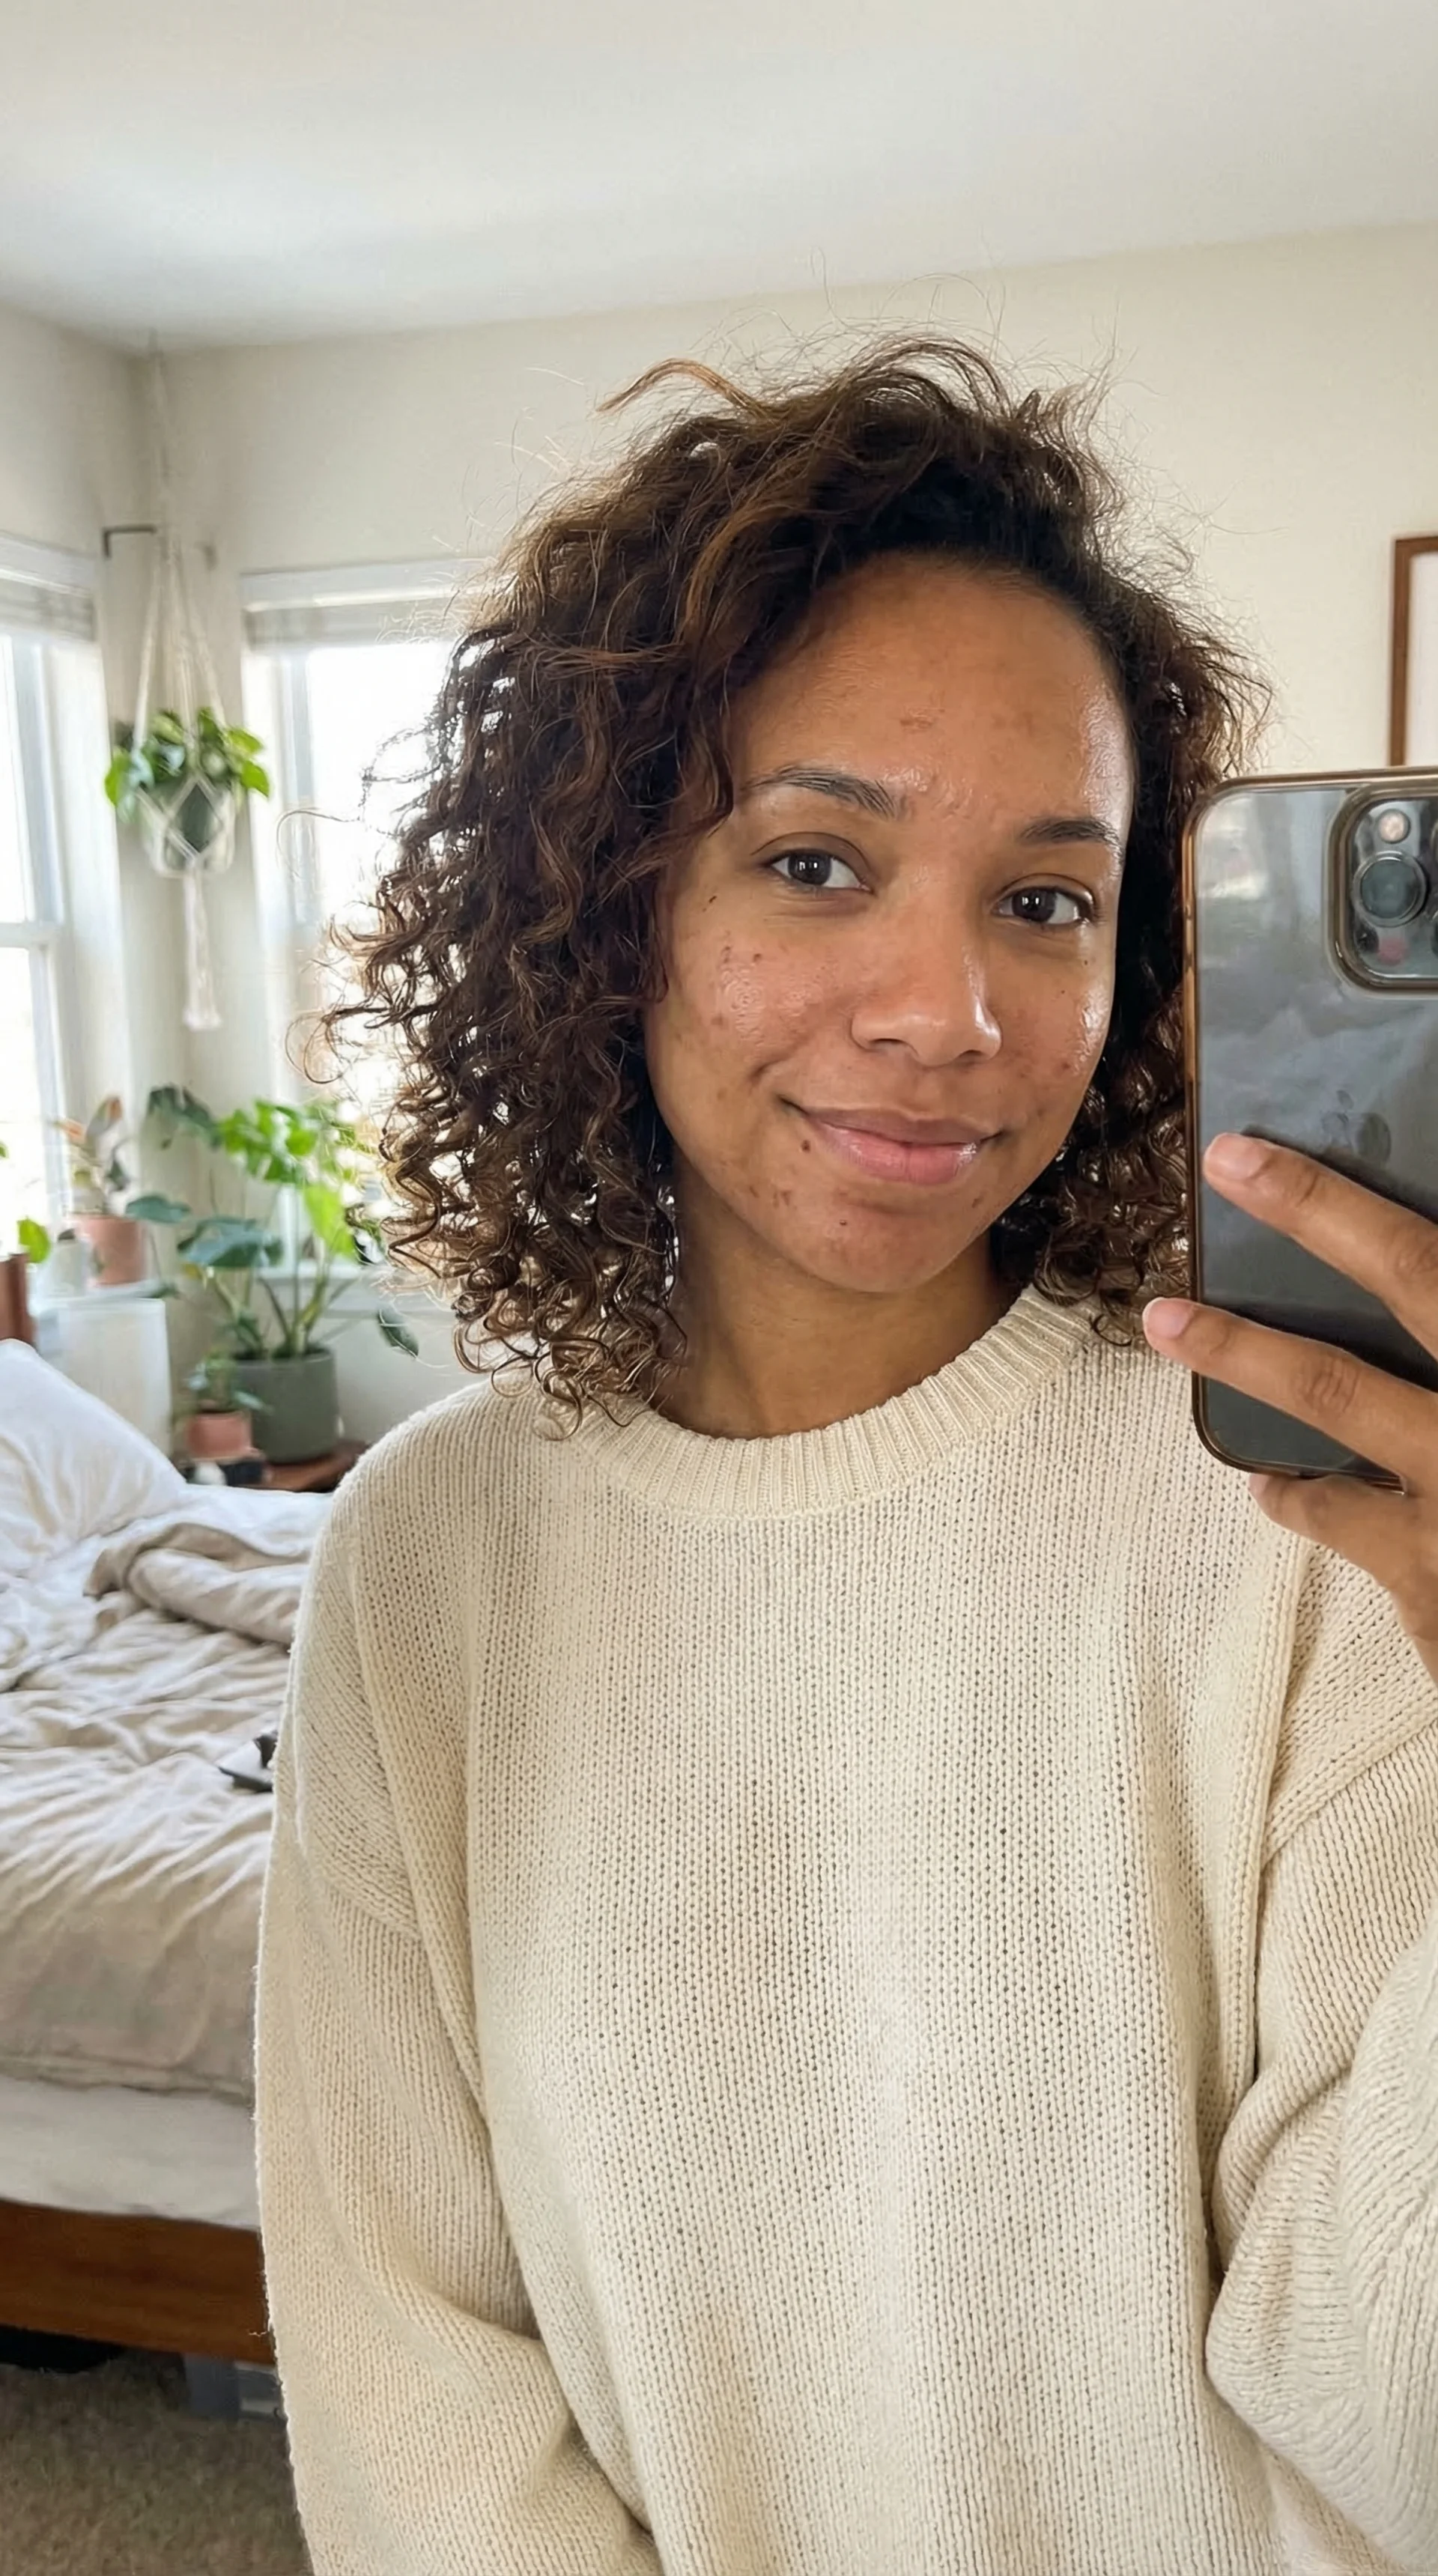
Always add "realistic human skin texture" and "subtle imperfections" to your UGC prompts. This single habit will dramatically improve your results.
Hair
Hair is one of the biggest giveaways of AI content. Perfect, uniform hair looks fake immediately. Describe it with natural variation.
| What to Specify | Options |
|---|---|
| Length | Pixie, short, chin length, shoulder length, mid back, long |
| Texture | Straight, wavy, curly, coily, kinky |
| Style | Loose, tousled, messy bun, ponytail, braided, slicked back, wet look |
| Volume | Flat, moderate, voluminous |
| Part | Center, side, deep side, no part |
| Color | Natural tones, highlights, ombre, roots showing |
| Imperfections | Flyaways, frizz, uneven sections, baby hairs |
Facial Expression
Expression is what makes UGC feel real and human. A blank face or a generic smile will kill the authenticity of any shot.
| What to Specify | Options |
|---|---|
| Overall mood | Happy, serious, contemplative, confident, playful, relaxed |
| Eyes | Direct gaze, looking away, squinting, bright, tired, focused |
| Mouth | Slight smile, open smile, neutral, pursed lips, talking mid sentence |
| Eyebrows | Raised, relaxed, furrowed, arched |
| Authenticity | Genuine, candid, natural, caught mid moment |
For UGC, the best expressions are usually "genuine slight smile with direct eye contact" or "natural expression, caught mid sentence." Avoid anything that feels posed or overly polished.
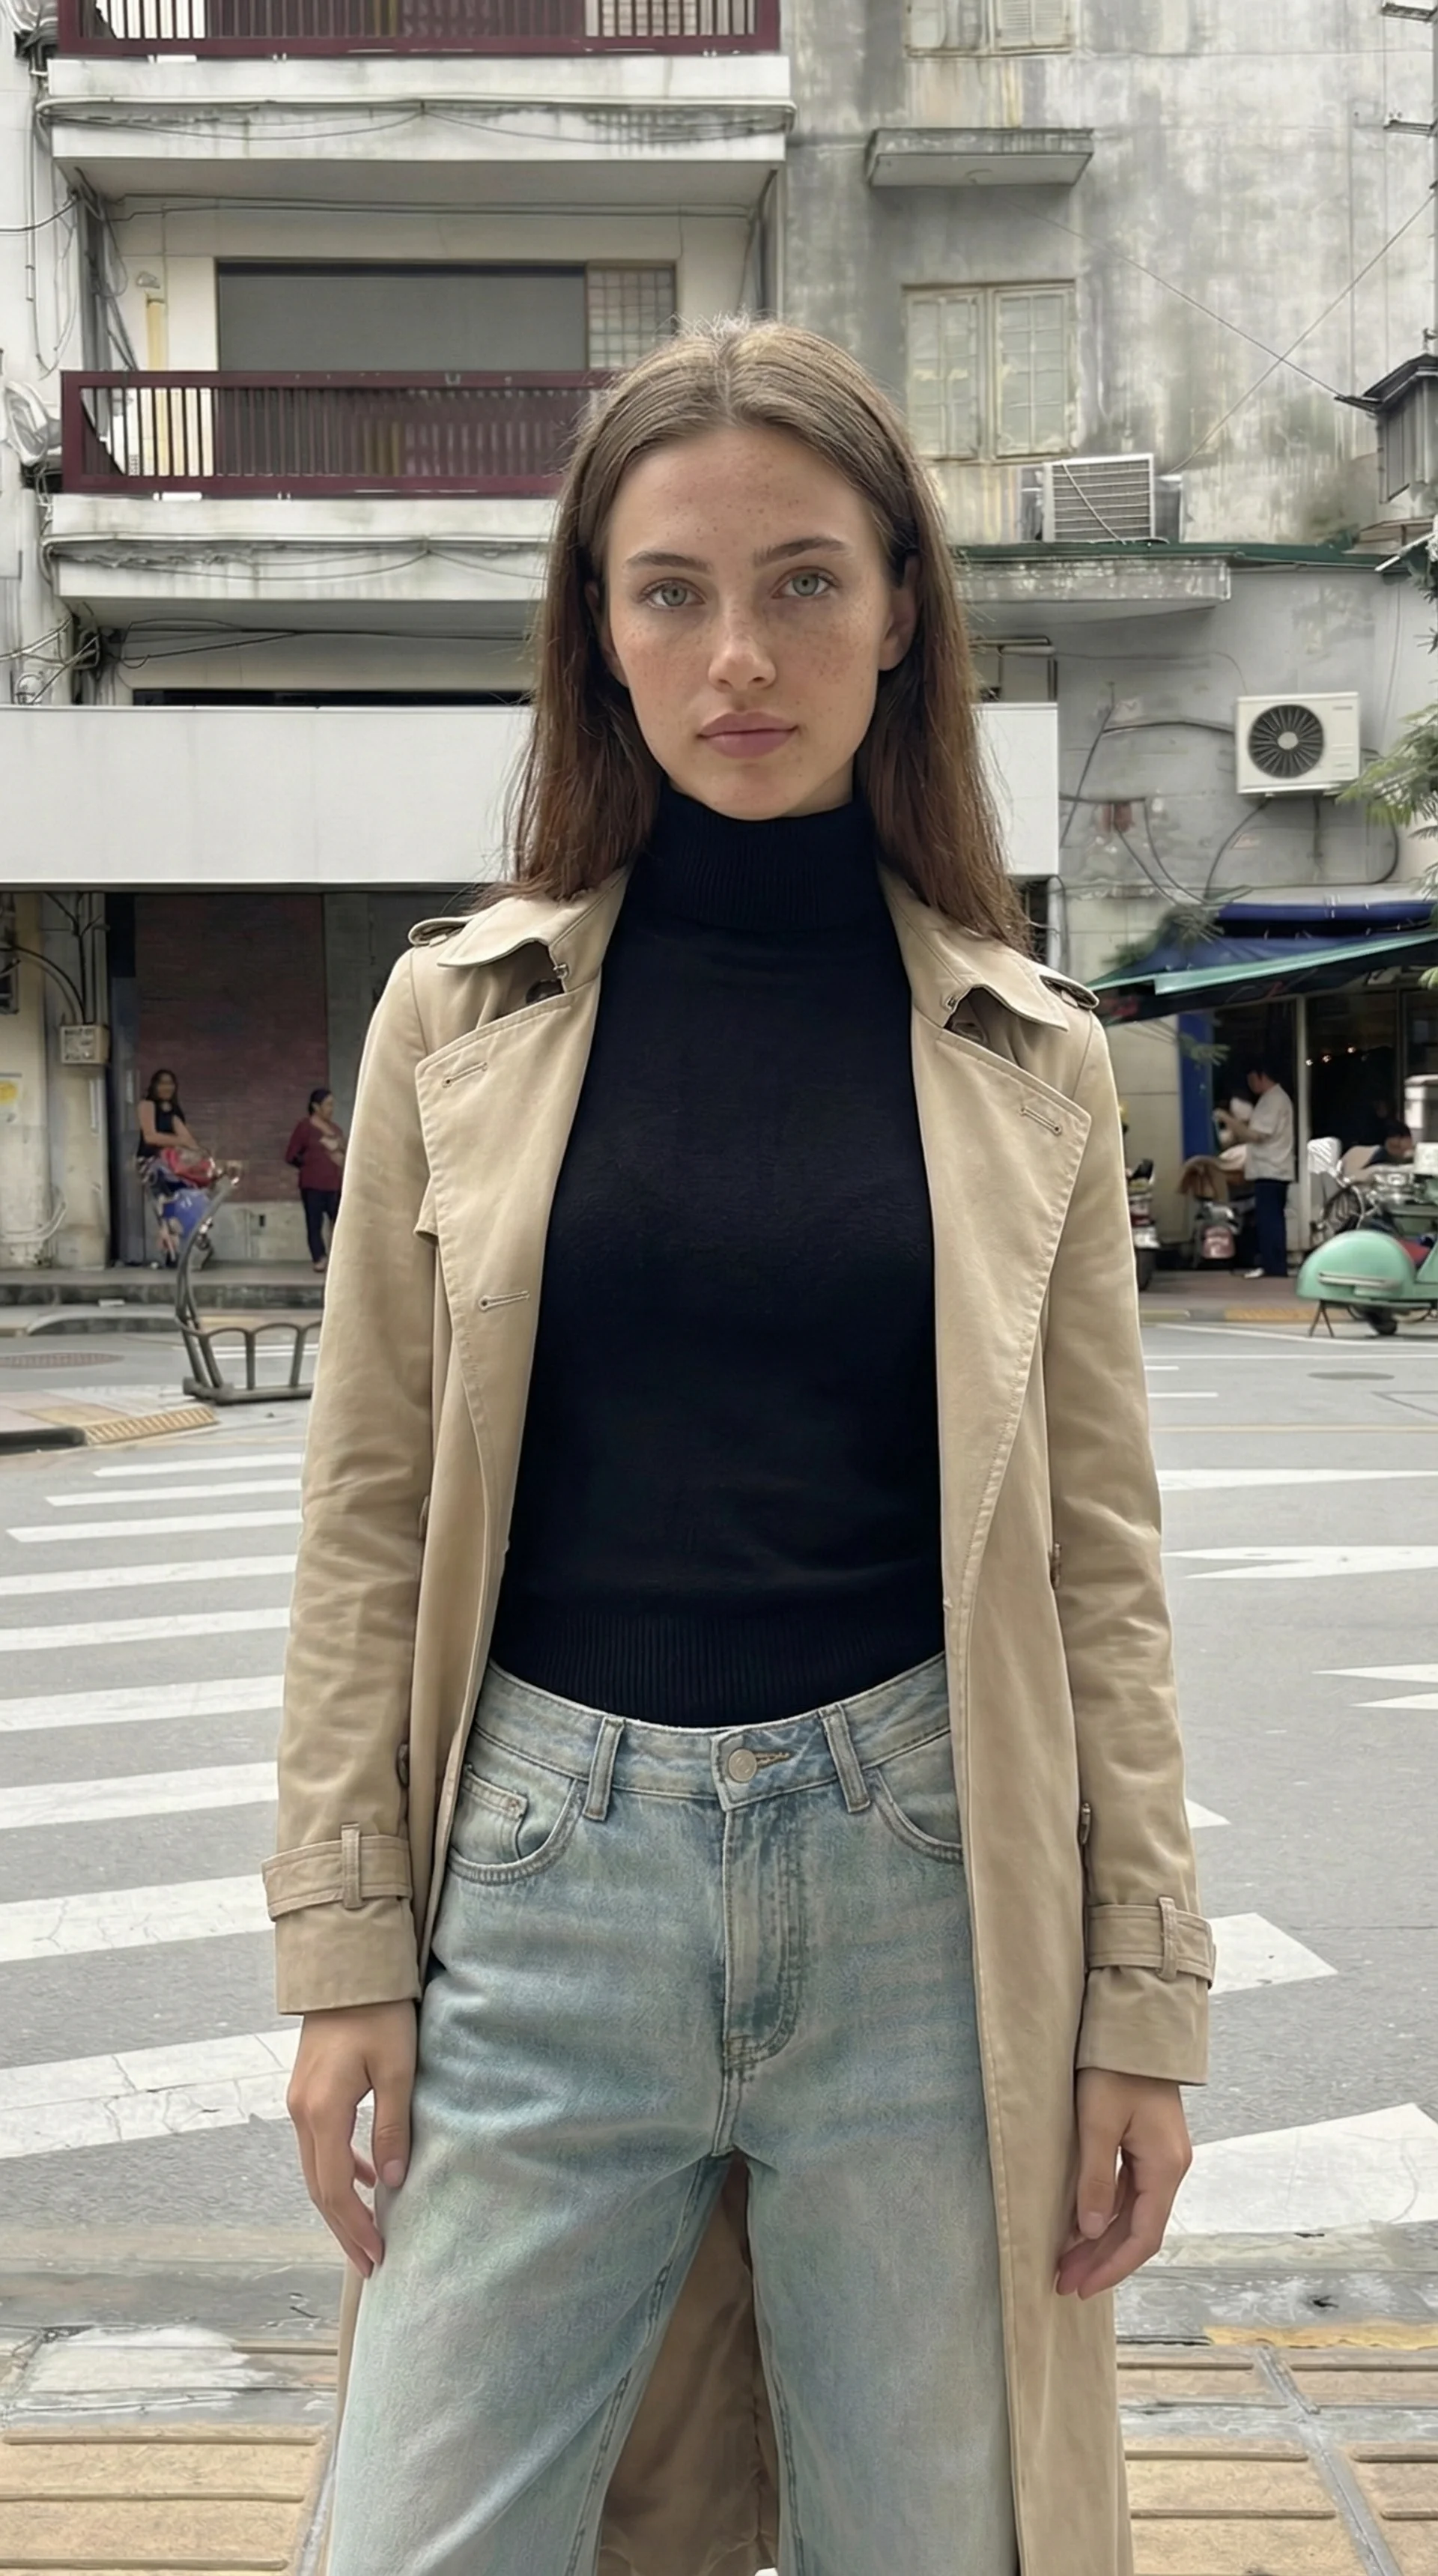
Clothing and Style
Clothing sets the entire context of a UGC shot. It tells the viewer who this person is and what situation they are in.
| What to Specify | Options |
|---|---|
| Style | Casual, streetwear, athleisure, minimalist, cozy, smart casual |
| Specific items | Oversized hoodie, leather jacket, white t-shirt, knit sweater |
| Fit | Oversized, fitted, loose, cropped, tailored |
| Colors | Neutral tones, black, earth tones, pastels, bold accent |
| Condition | Pristine, slightly worn, lived in, wrinkled |
For UGC, clothing should feel effortless. Think "what would this person actually wear at home" not "what would they wear for a photoshoot." Oversized hoodies, simple t-shirts, and cozy knits work better than anything that looks styled.
Accessories
Small details like accessories make a character feel like a real person with a real life.
| Category | Options |
|---|---|
| Jewelry | Small stud earrings, delicate chain necklace, simple rings, watch |
| Eyewear | Reading glasses, sunglasses on head, no glasses |
| Tech | Holding a phone, AirPods in, laptop nearby |
| Other | Hair clip, scrunchie on wrist, tote bag, coffee cup |
Putting It All Together: UGC Prompt Examples
Here are complete prompts that combine everything above for different UGC scenarios.
Casual talking head (TikTok style):
Product review (holding something):
Lifestyle moment (not looking at camera):

Gym or fitness UGC:
Morning routine (bathroom selfie):
Unboxing or first reaction:
Coffee shop casual:
Skincare or beauty UGC:
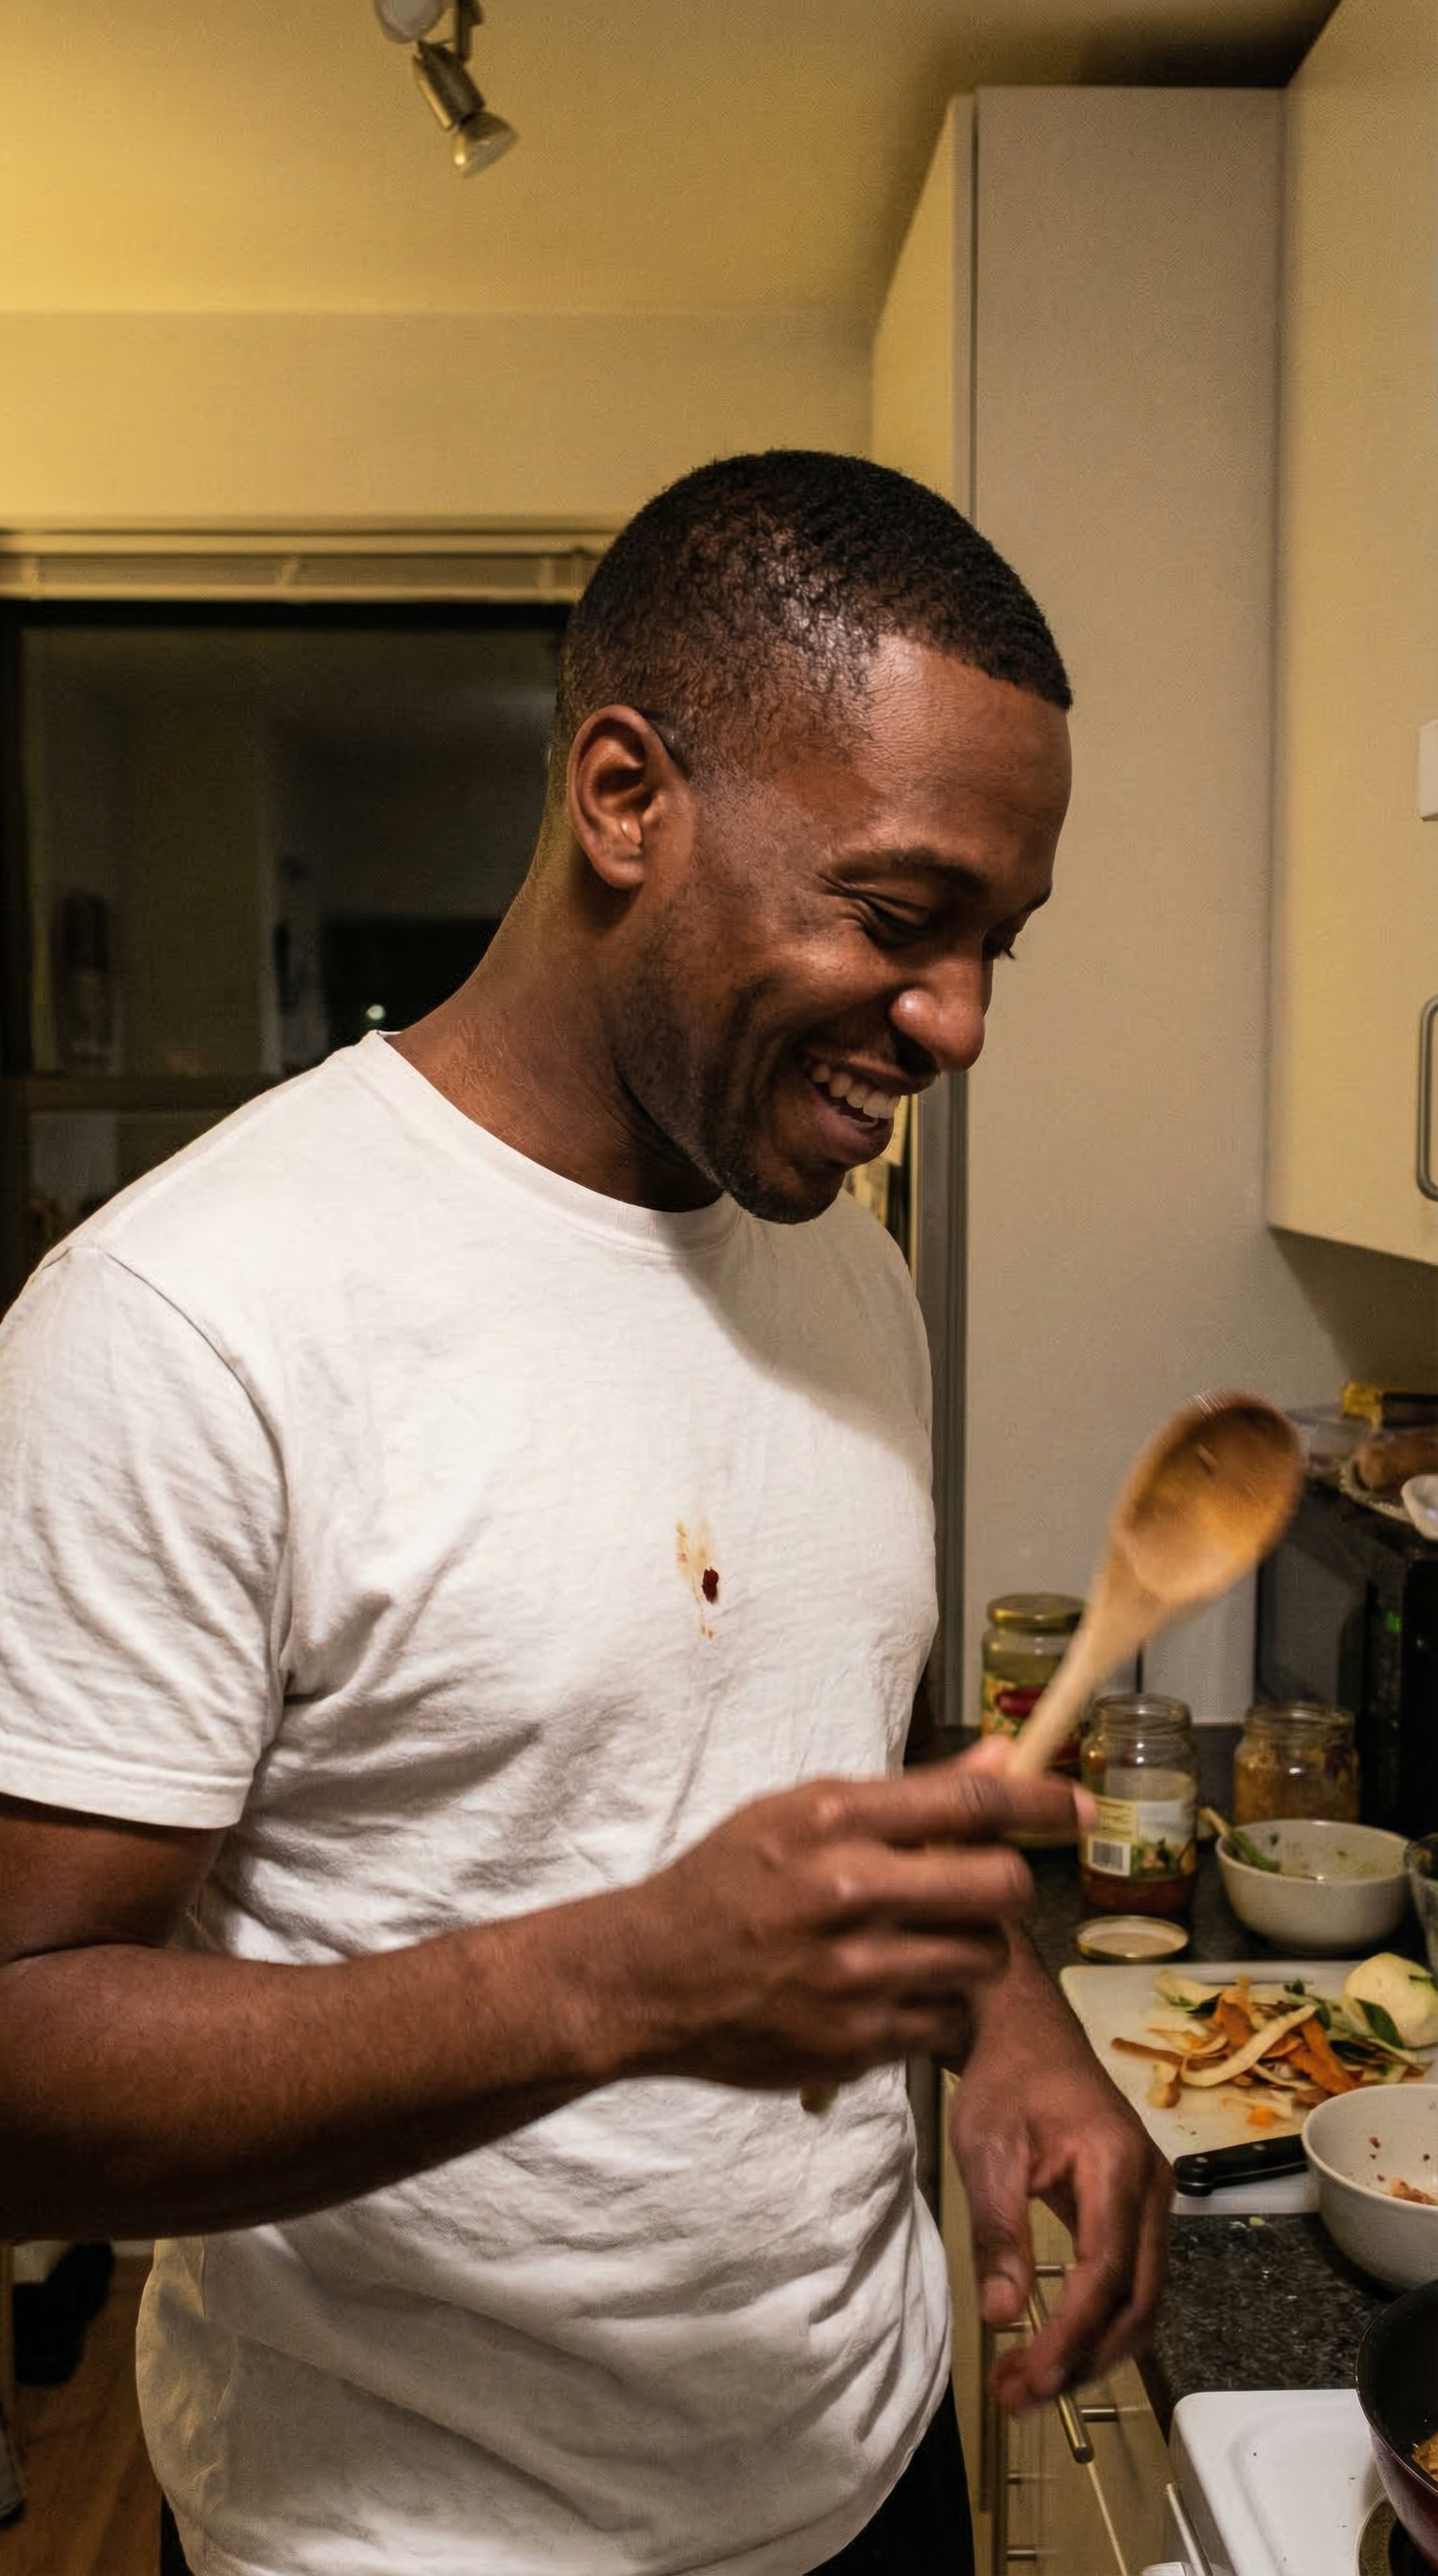
Cooking or kitchen moment:
Outdoor walk or errand run:
Let ChatGPT Write Prompts For You
This is the fastest shortcut and the most powerful way.
Open ChatGPT in Thinking Mode and describe what you want in normal language.
Be extremely specific, even if it feels messy. I recommend the voice input.
Add three key instructions:
Which tool you will use
Example: “Write this for Nano Banana Pro” or “Write this for Kling 3.0”
The role you want ChatGPT to take
Example: “You are a professional art director and photographer”
Any important constraints
Example: “UGC style, vertical 9:16, natural phone look, realistic skin texture”
For Beginners: Use Our Custom GPT
If writing detailed prompts from scratch feels overwhelming right now, we built a custom GPT that does it for you. Just describe what you want in plain everyday language, and it will turn your idea into a detailed, professional UGC prompt ready to paste into Nano Banana. It follows all the realism rules from this book automatically, so you do not have to memorize anything.
Try it here: https://chatgpt.com/g/g-69bc3acf48fc8191a62968f22e03da0c-ugc-image-prompt-generator
Try it here: [https://chatgpt.com/g/g-69bc3acf48fc8191a62968f22e03da0c-ugc-image-prompt-generator](https://chatgpt.com/g/g-69bc3acf48fc8191a62968f22e03da0c-ugc-image-prompt-generator)
What “Model” Means Here
In this book, when we say "model" we are not talking about the AI software. We are talking about your main person or character. This is the person you will reuse across all your content, from AI UGC clips and talking videos to product holding shots and full scene setups. Think of your model as the face of your content. The more realistic your base character is from the start, the easier every single workflow in this book becomes later.
Two Ways to Create a Realistic Person
Option 1: Prompt From Scratch (Fast and Flexible)
This is the simplest and fastest method. You describe the person you want in a prompt, generate a few variations, and pick the best one. It is great for quick experiments, learning how prompt changes affect the output, and testing different looks before committing to a character. The easiest way to do this is to use ChatGPT in Thinking Mode. Describe the person you want in normal everyday language and ask it to turn that into a proper prompt.
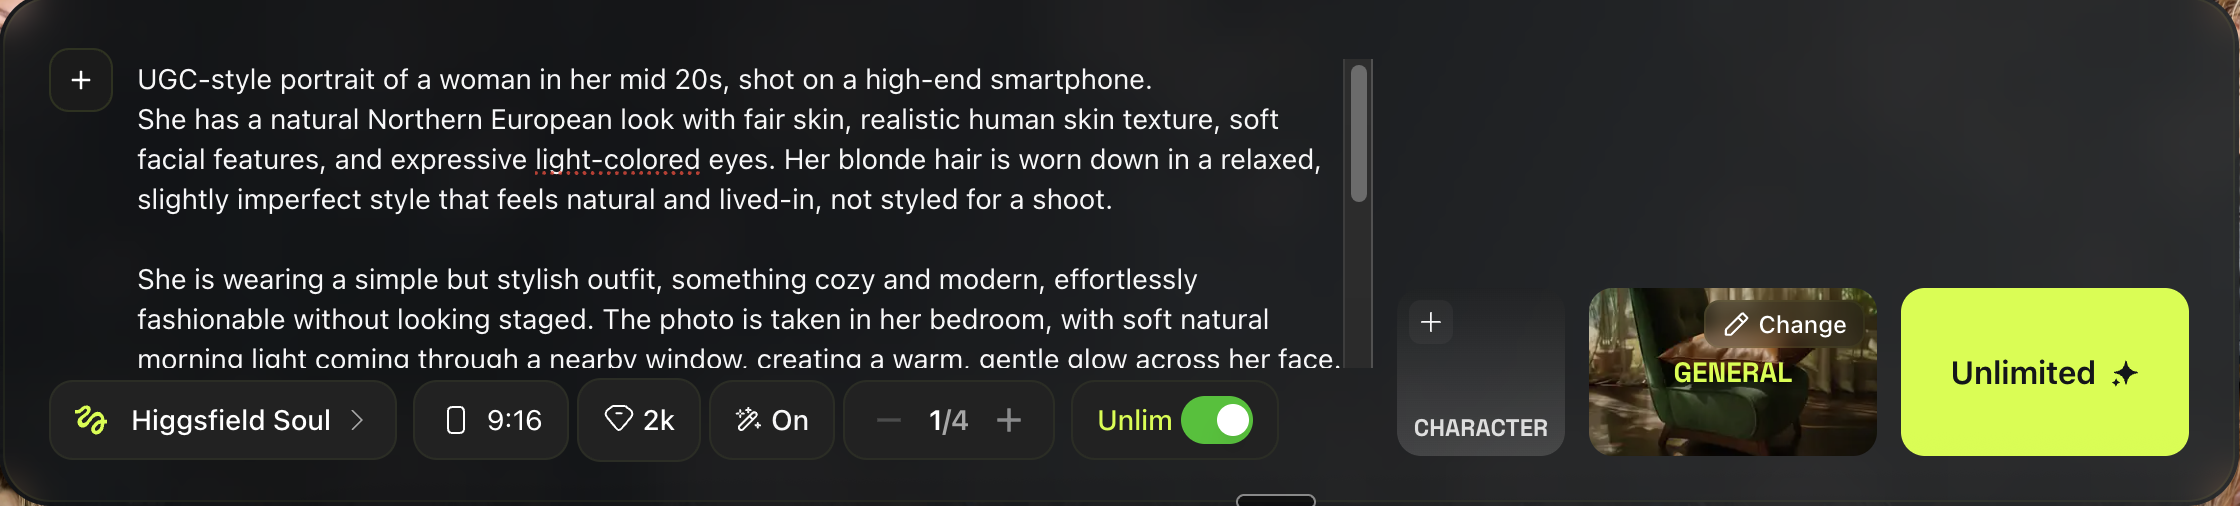
For example: "Act as a professional casting director and photographer. Write a Nano Banana prompt for a realistic 25 year old woman, natural phone photo style, realistic skin texture, subtle imperfections."
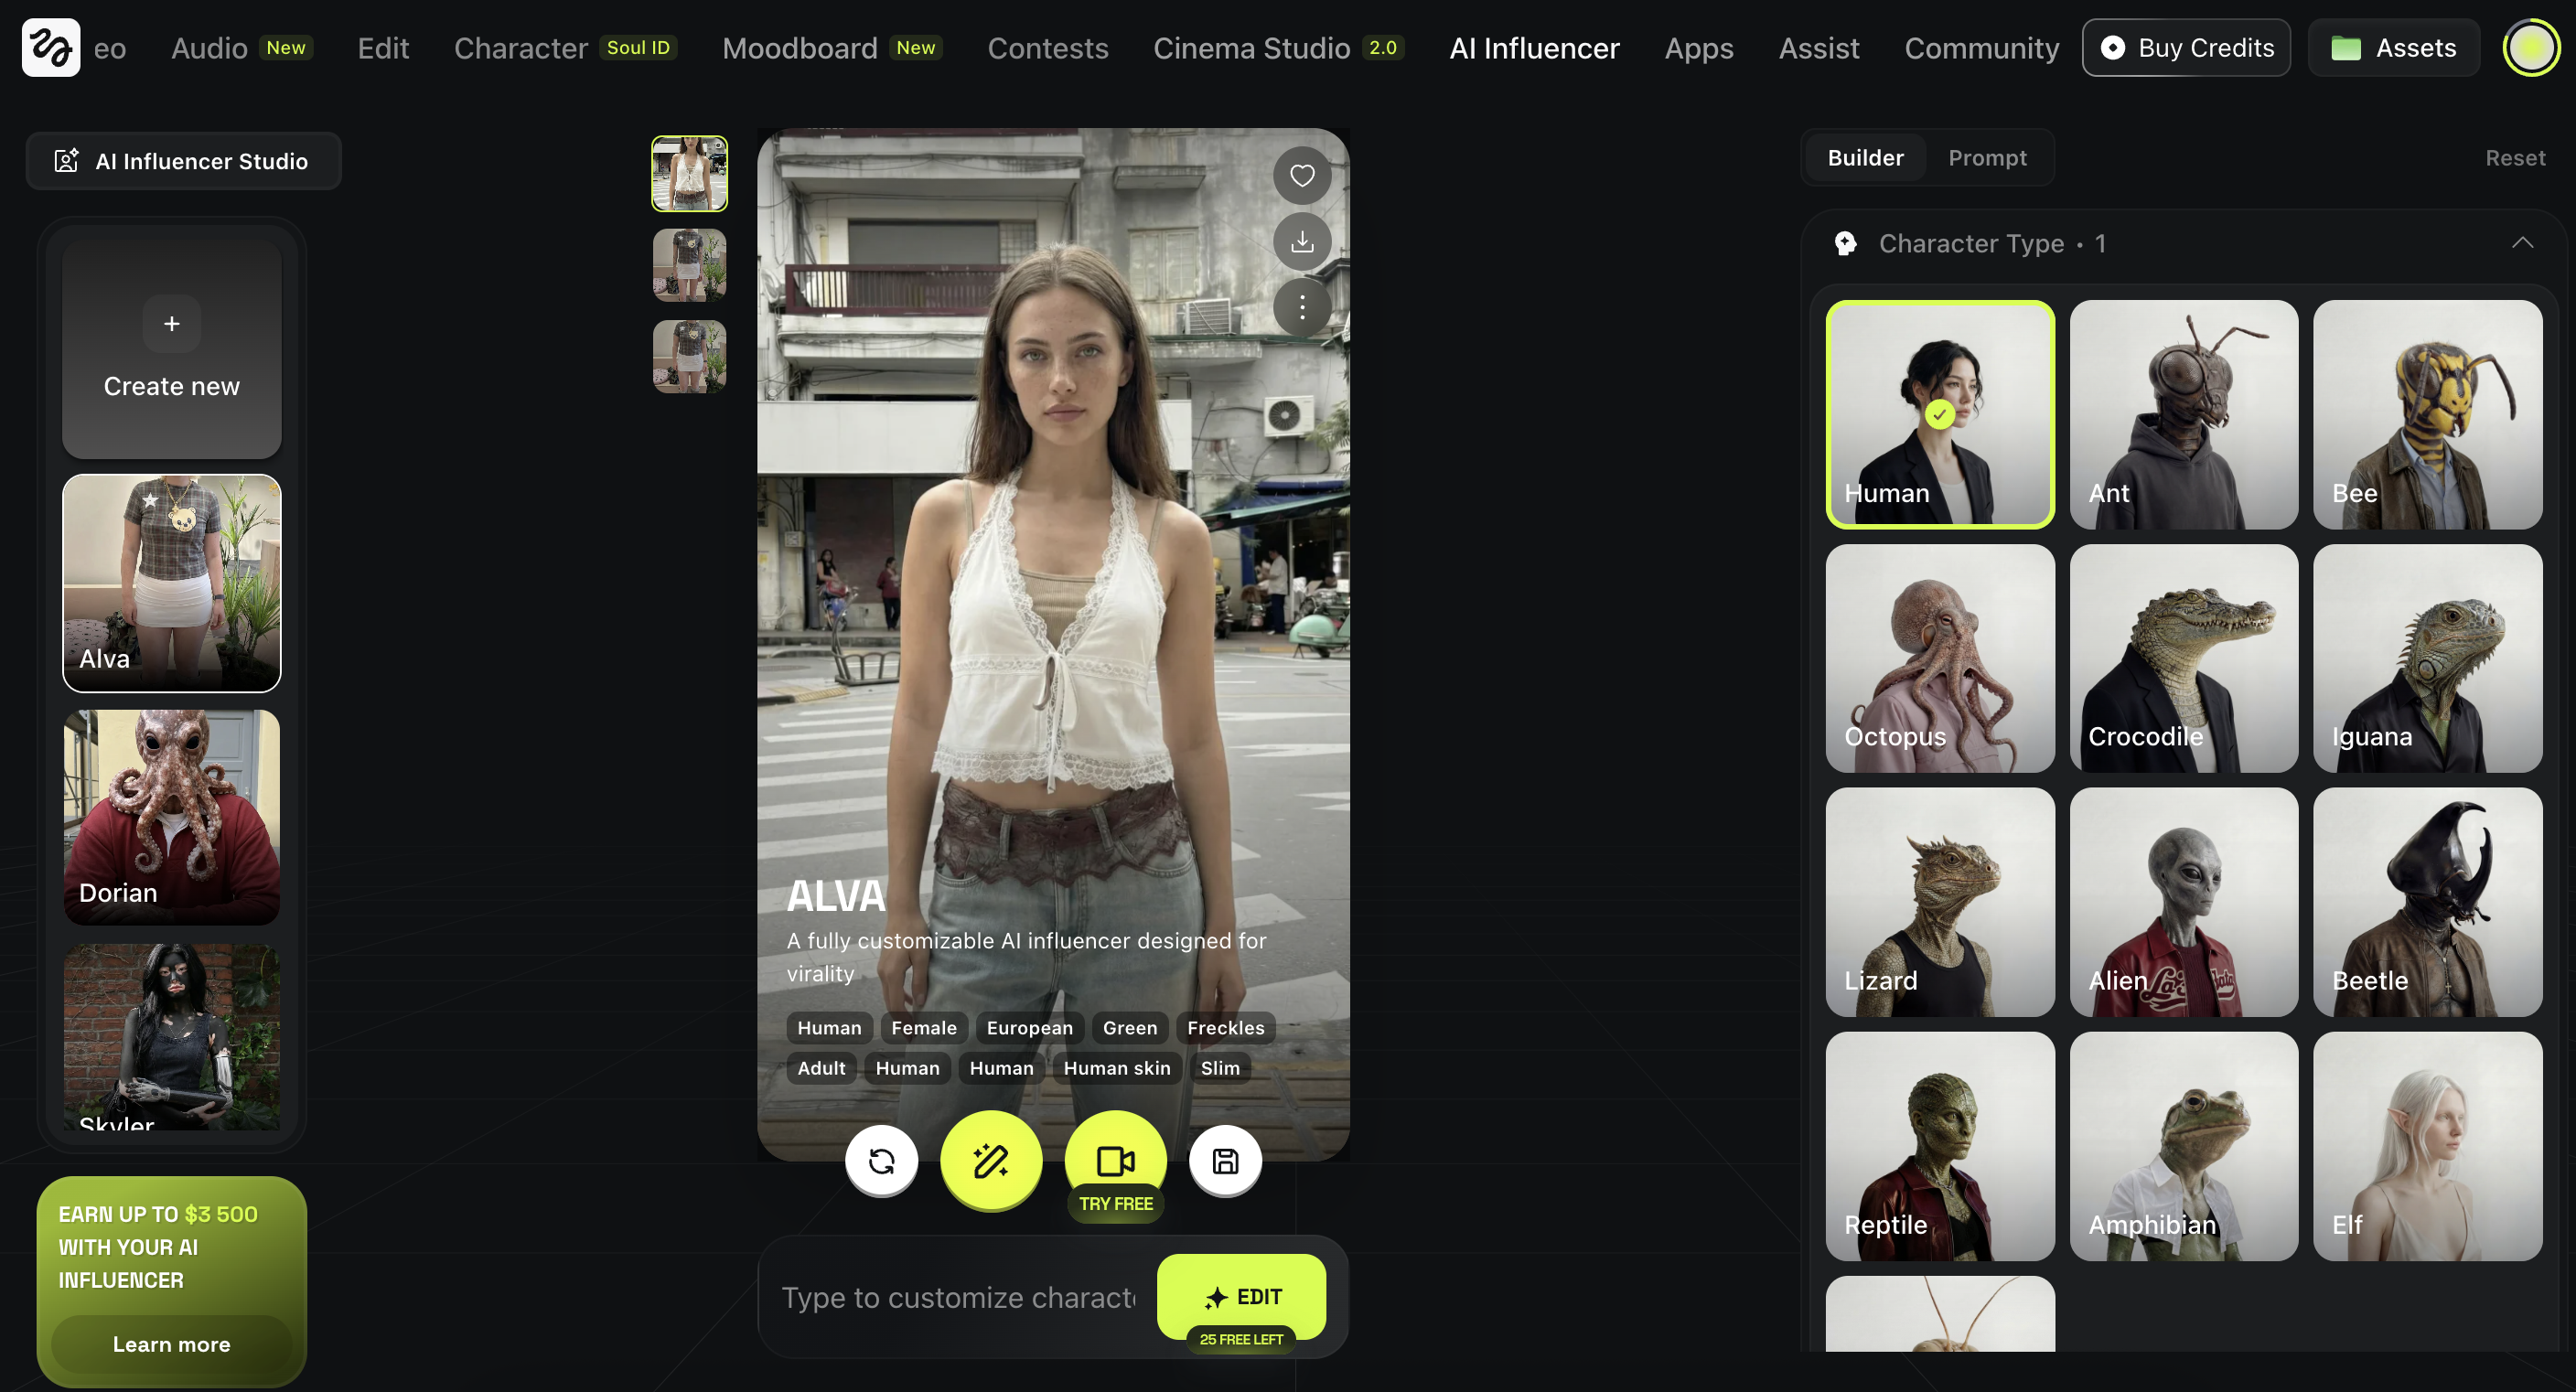
Option 2: Use Higgsfield AI Influencer (Most Controlled)
Higgsfield has a built in feature called AI Influencer that lets you build a character using visual selection controls instead of writing a prompt from scratch. You choose key traits like gender, ethnicity, skin tone, eye color, age range, skin conditions, face and body structure, hairstyle, and overall style. This gives you much more control over the result because you are making specific decisions instead of hoping the model interprets your text correctly. You get a strong, consistent base character without needing to write a single line of prompt.
How To Use AI Influencer (Simple Workflow)
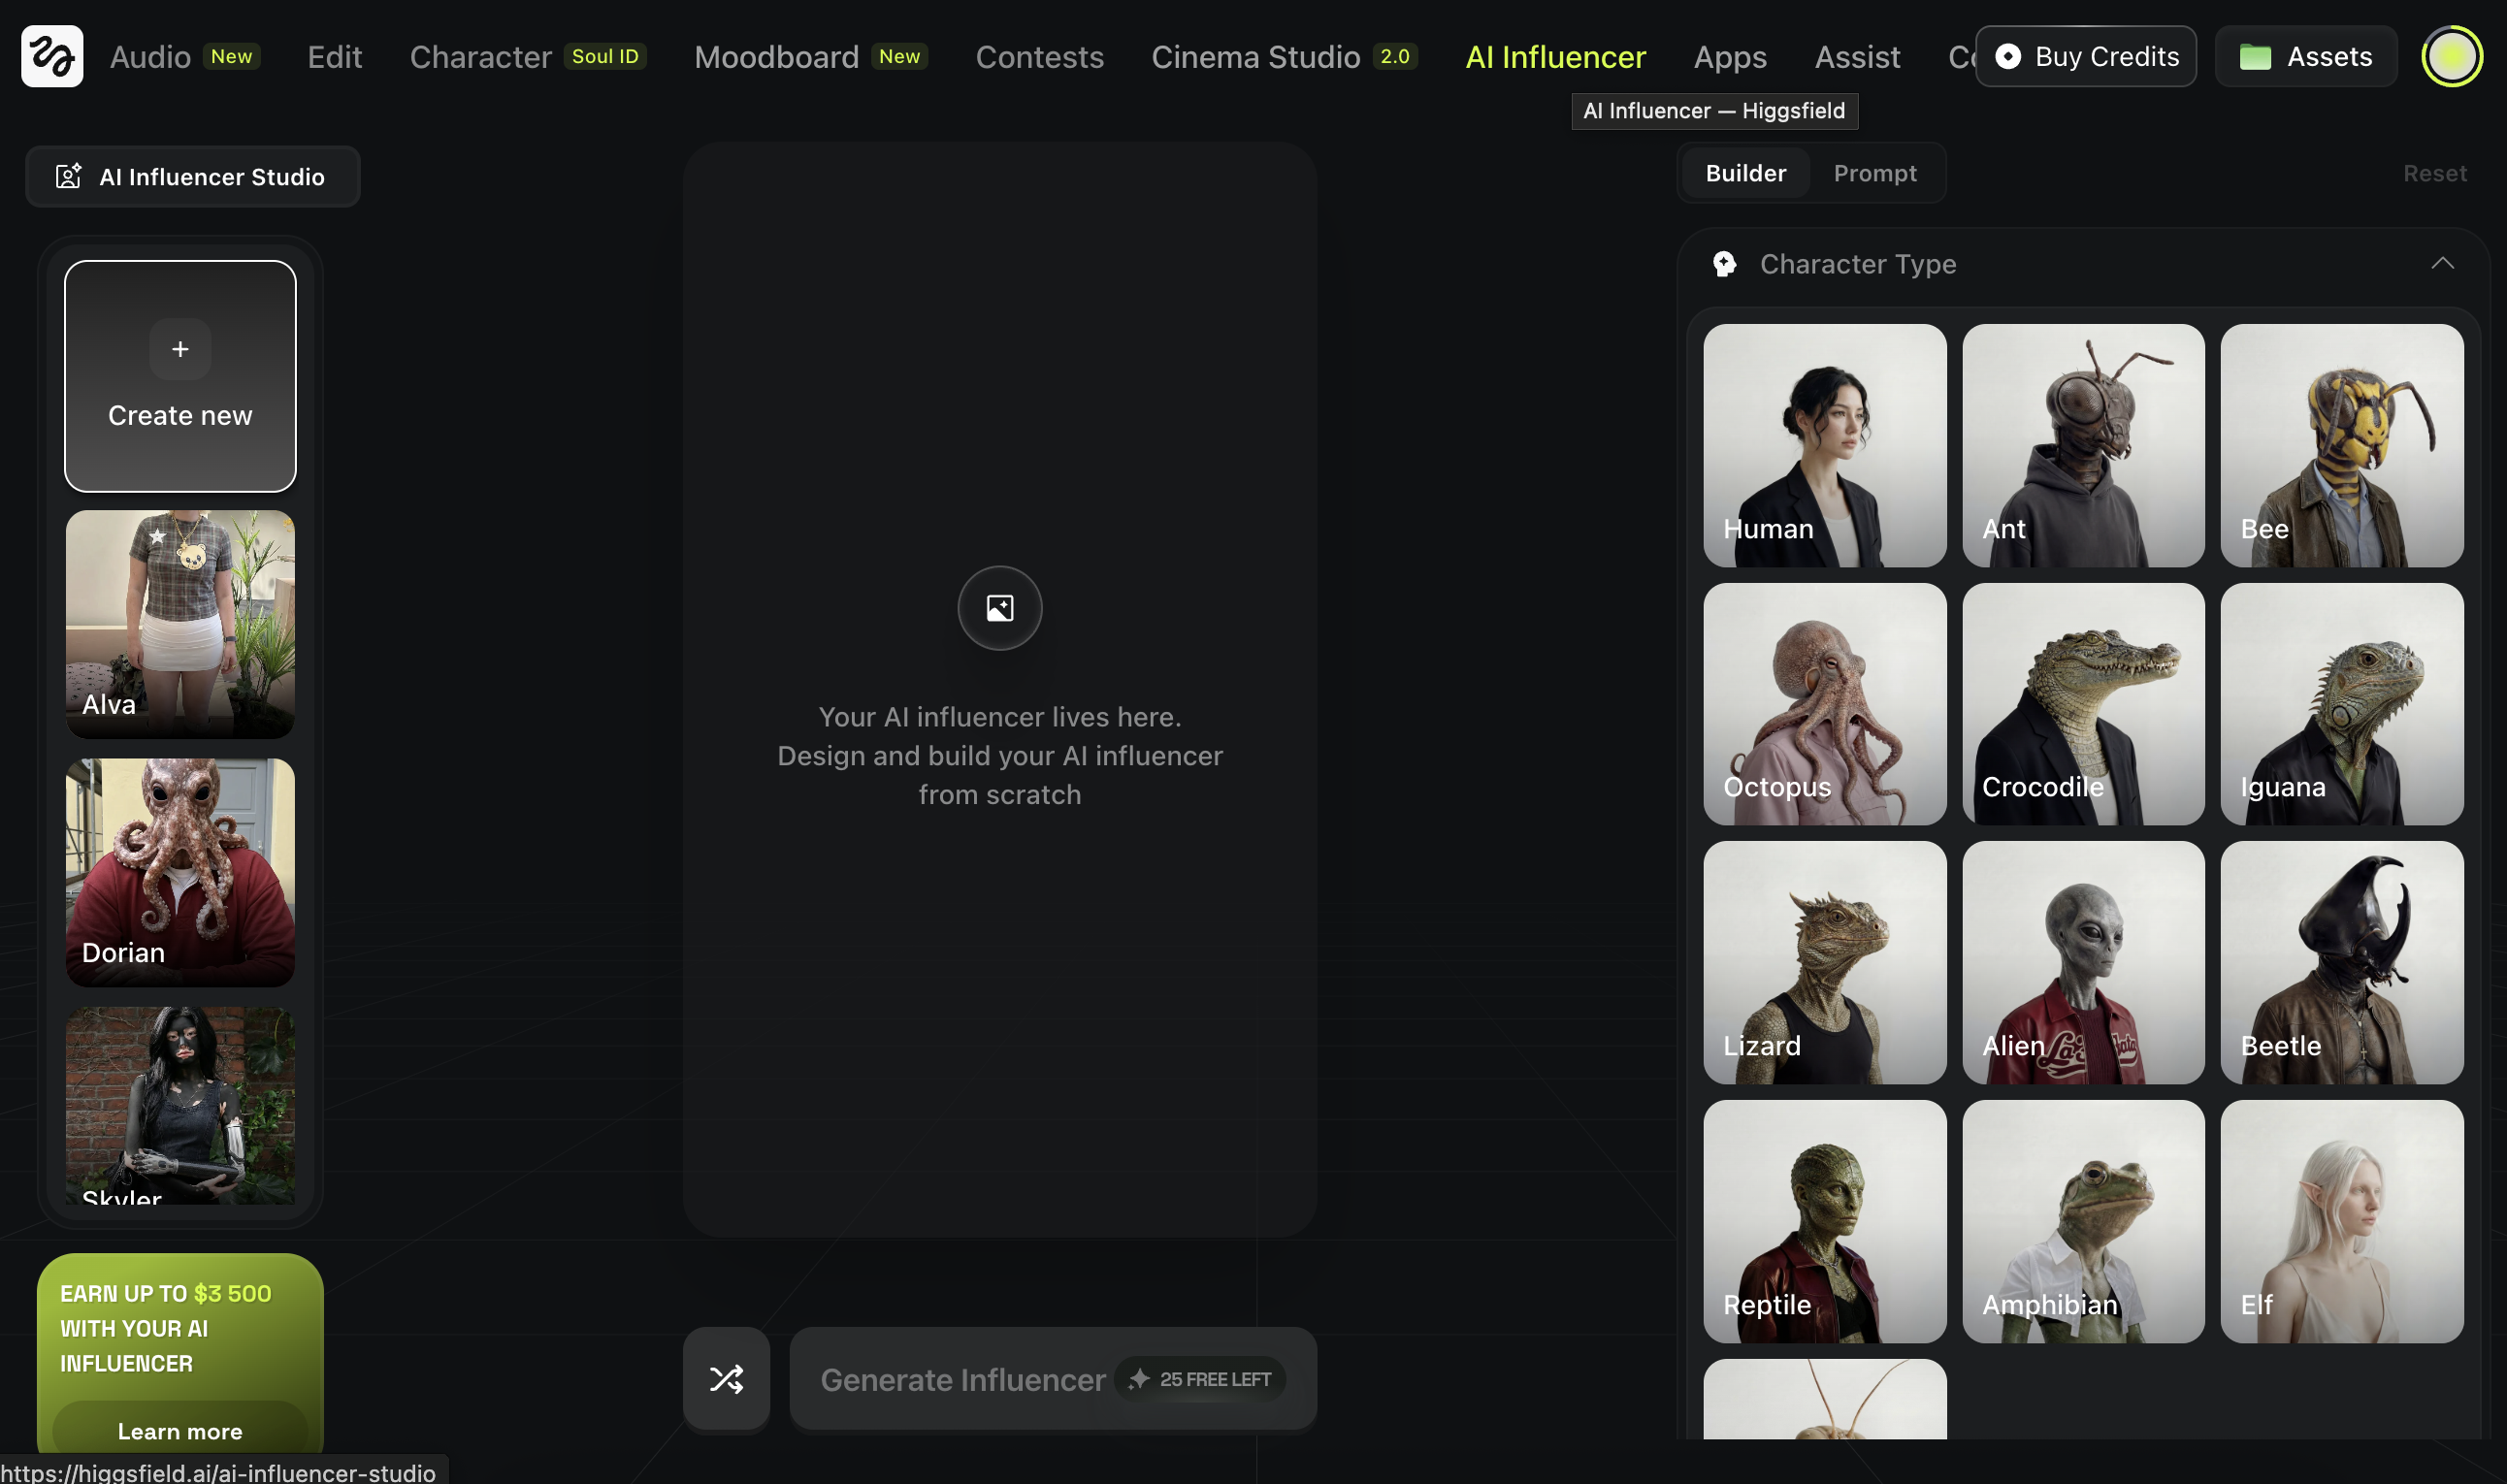
Open Higgsfield and go to AI Influencer
Use the builder to select the main traits
Generate a few variations
Pick the most realistic result as your base character
Example:
Human, Female, European, Green eyes, Freckles, Adult, Human skin, Slim
What “Editing” Means in AI
Editing a character in AI is not like editing a photo in Photoshop where you have pixel level control. It means asking the model to change specific parts of an image while keeping the same person intact. That could be swapping a hairstyle, changing an outfit, adding tattoos or accessories, or shifting the overall color and vibe of the shot. The key challenge is control. You want the change you asked for without losing the identity of your character. The face, proportions, and overall feel should stay the same. Only the detail you targeted should change.
Start With A Reference Image
You need one strong base image first.
It can be:
- generated from scratch
- created with AI Influencer in Higgsfield
- a real photo you own and want to use
Download the image you want to edit.
This becomes your reference.
As an example we use the one from “Create a realistic model”
The Simple Editing Workflow (Higgsfield + Nano Banana)
Go to Image and choose Nano Banana Pro on Higgsfield
Drag and drop your character image
Write what you want to change
Keep it specific and minimal.
Example edits:
- “Change the hairstyle to a short bob haircut.”
- “Change the outfit to a black turtleneck and beige coat.”
- “Add small tattoos on the forearm.”
Generate multiple variations and pick the cleanest one.

Example output:
The More Powerful Method: Edit With Image References
Text edits work, but the most controlled method is using reference images.
Instead of only describing the change, you show it.
Examples:
- upload your character image as the base
- upload a second image as a hairstyle reference
- upload another image as an outfit reference
Then prompt like this:

Output example:

Make sure to generate multiple runs.
This method is great for:
- copying a specific haircut
- matching a fashion style
- swapping tops and bottoms
- adding tattoos that look real etc
What “Fixing” Means
Fixing a character means locking down their identity so you can place them in any new scene without the face, body, or overall look changing between generations. Without this step, every new image risks producing a slightly different version of your character. The goal is simple: one person, same identity, unlimited scenes. The best way to achieve this is by creating a strong anchor image that serves as your consistency reference for every future generation.
Make Your Anchor (Character Sheet)
A character sheet is a multi angle reference image.
It becomes your consistency base for future generations.
Open Higgsfield
Go to Image and select Nano Banana 2

Set your settings
- Aspect ratio: 3:2 (good for multi panel layouts)
- Quality: 4K
Upload your character image
Use the best face you made earlier (from AI Influencer or from scratch).
Paste this prompt and generate a few times
Pick the cleanest result.
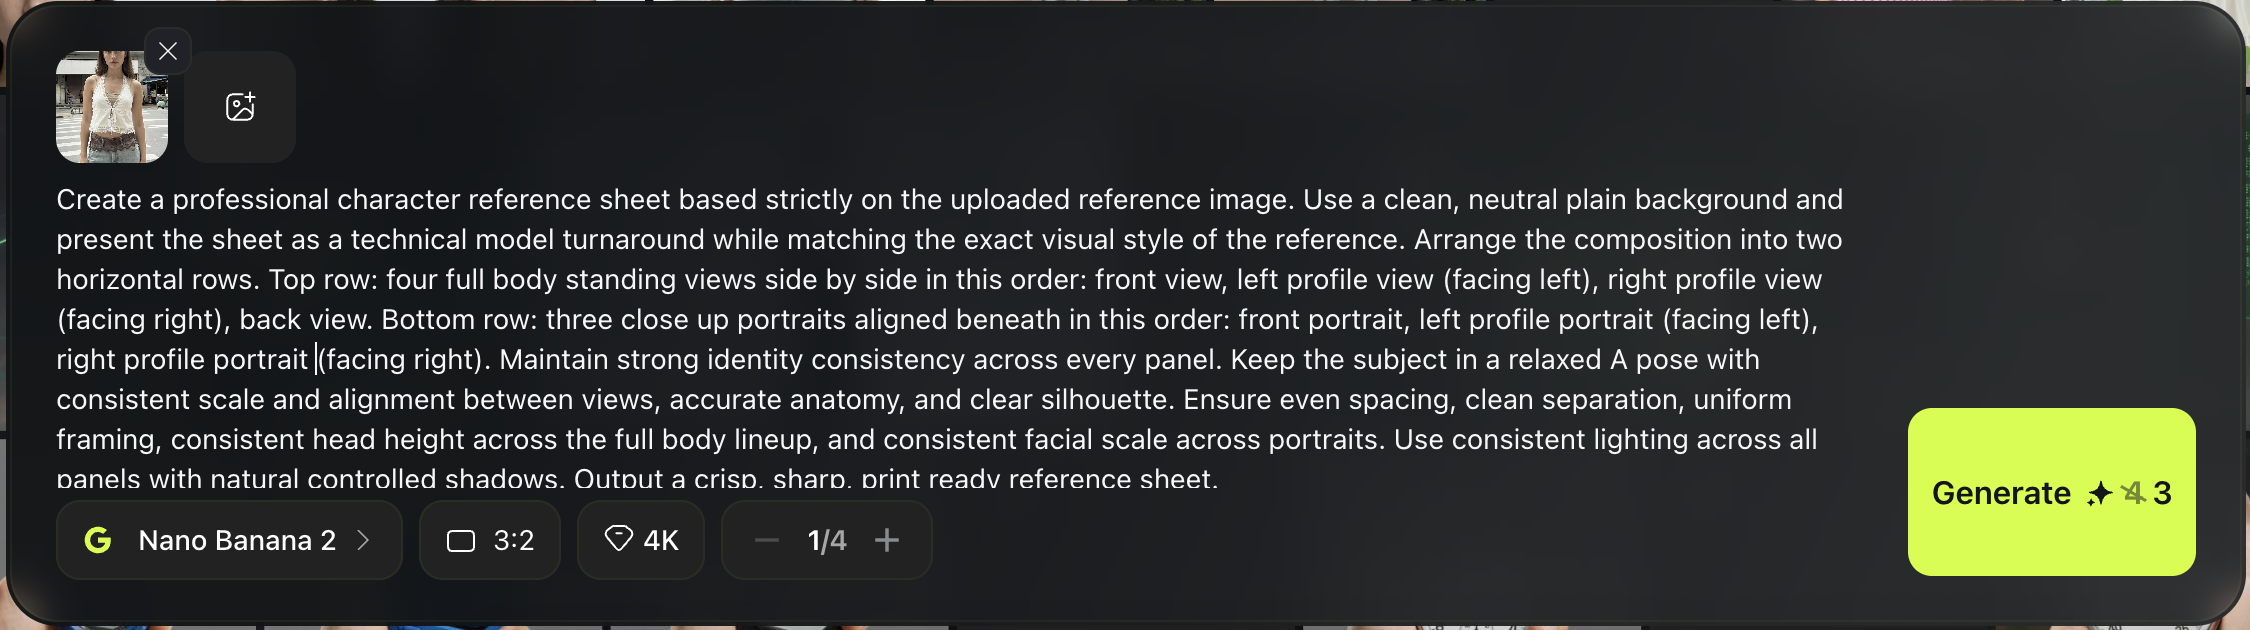
Character sheet prompt:
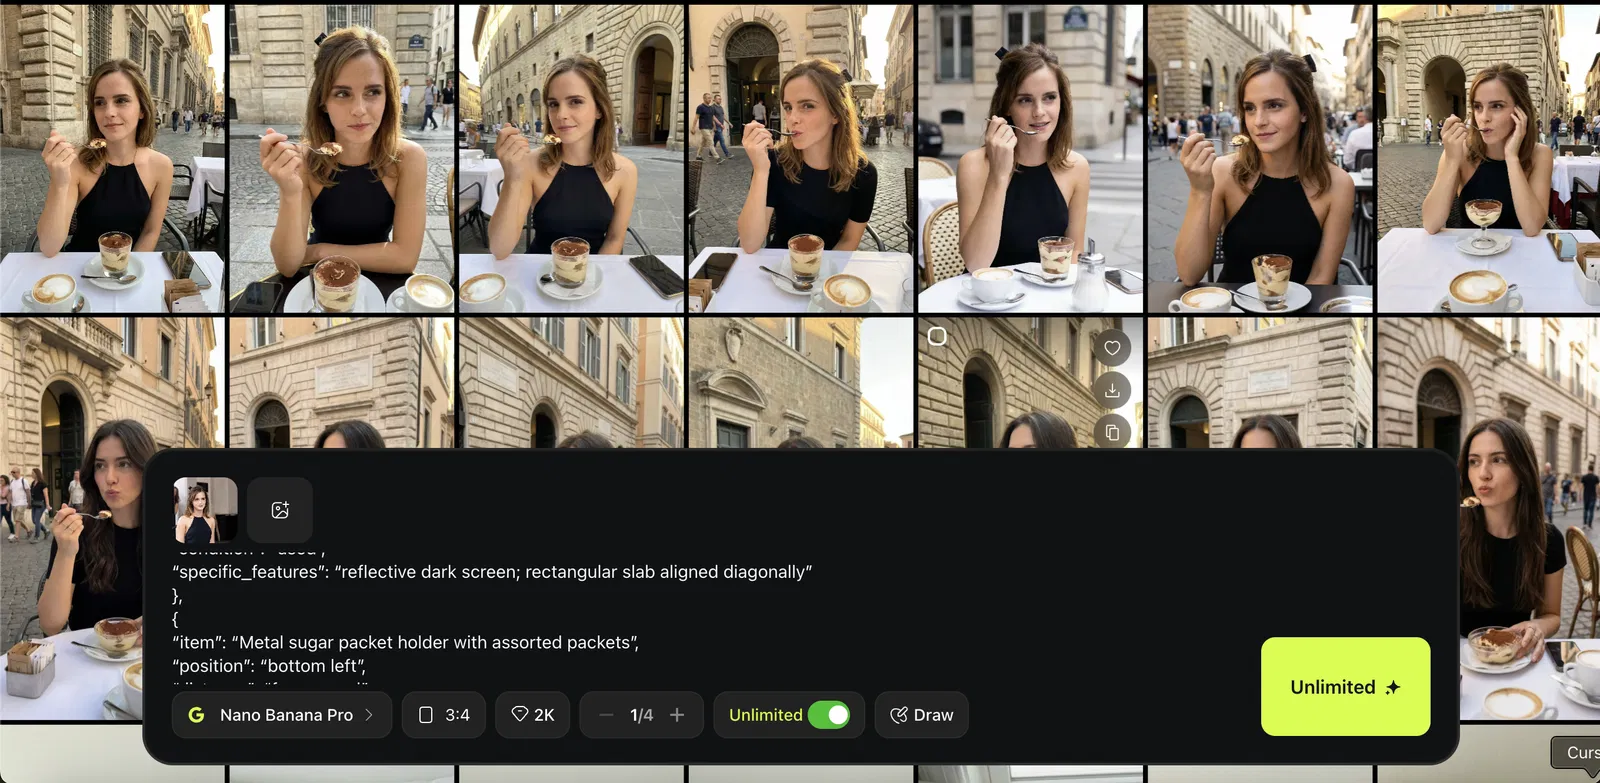
Create a professional character reference sheet based strictly on the uploaded reference image. Use a clean, neutral plain background and present the sheet as a technical model turnaround while matching the exact visual style of the reference. Arrange the composition into two horizontal rows. Top row: four full body standing views side by side in this order: front view, left profile view (facing left), right profile view (facing right), back view. Bottom row: three close up portraits aligned beneath in this order: front portrait, left profile portrait (facing left), right profile portrait (facing right). Maintain strong identity consistency across every panel. Keep the subject in a relaxed A pose with consistent scale and alignment between views, accurate anatomy, and clear silhouette. Ensure even spacing, clean separation, uniform framing, consistent head height across the full body lineup, and consistent facial scale across portraits. Use consistent lighting across all panels with natural controlled shadows. Output a crisp, sharp, print ready reference sheet.
Example output:

Selection Checklist (Pick The Best Anchor)
Choose the sheet where:
- the face looks like the same person in every angle
- hairline and hairstyle stay consistent
- outfit and accessories stay consistent
- background is clean and simple
Tip:
If the anchor is weak, everything later becomes harder.
Regenerate until you get a strong one.
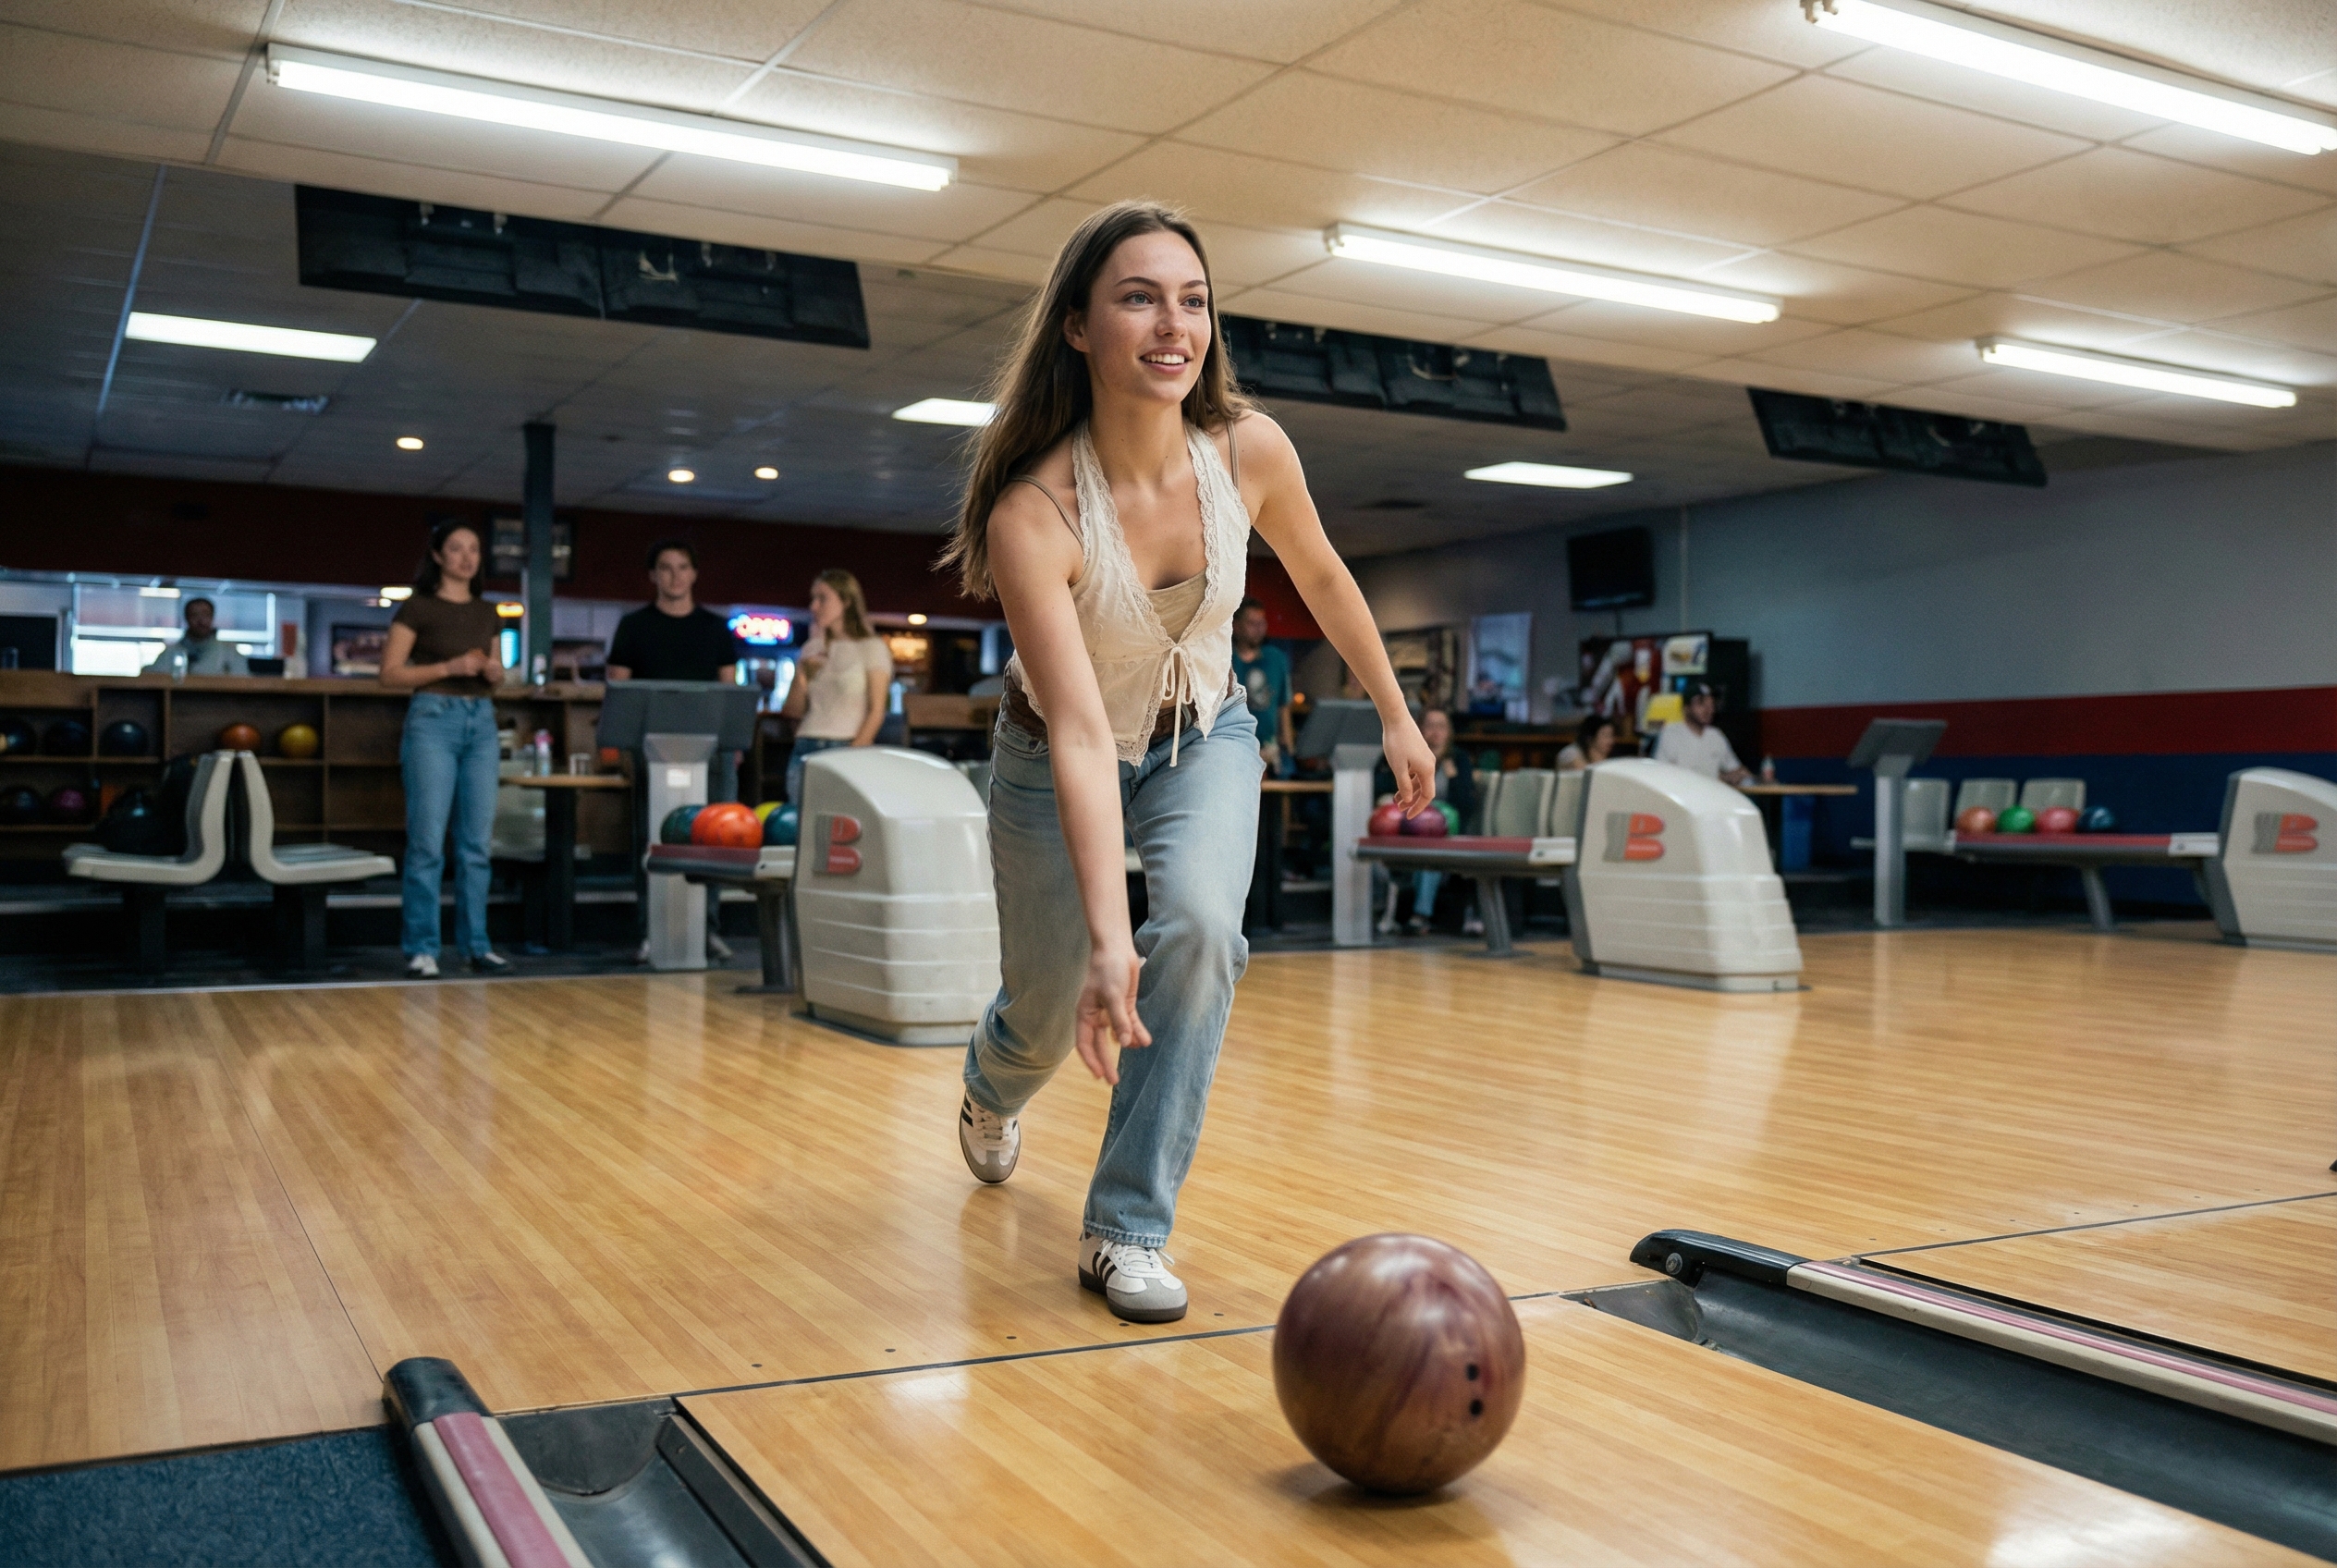
Generate New Scenes Using The Anchor
Once you have your character sheet, you can create consistent scenes.
Keep Nano Banana selected (2 or Pro)
Upload your chosen character sheet image
Write one simple scene prompt For example, shes playing bowling

Generate
Output example
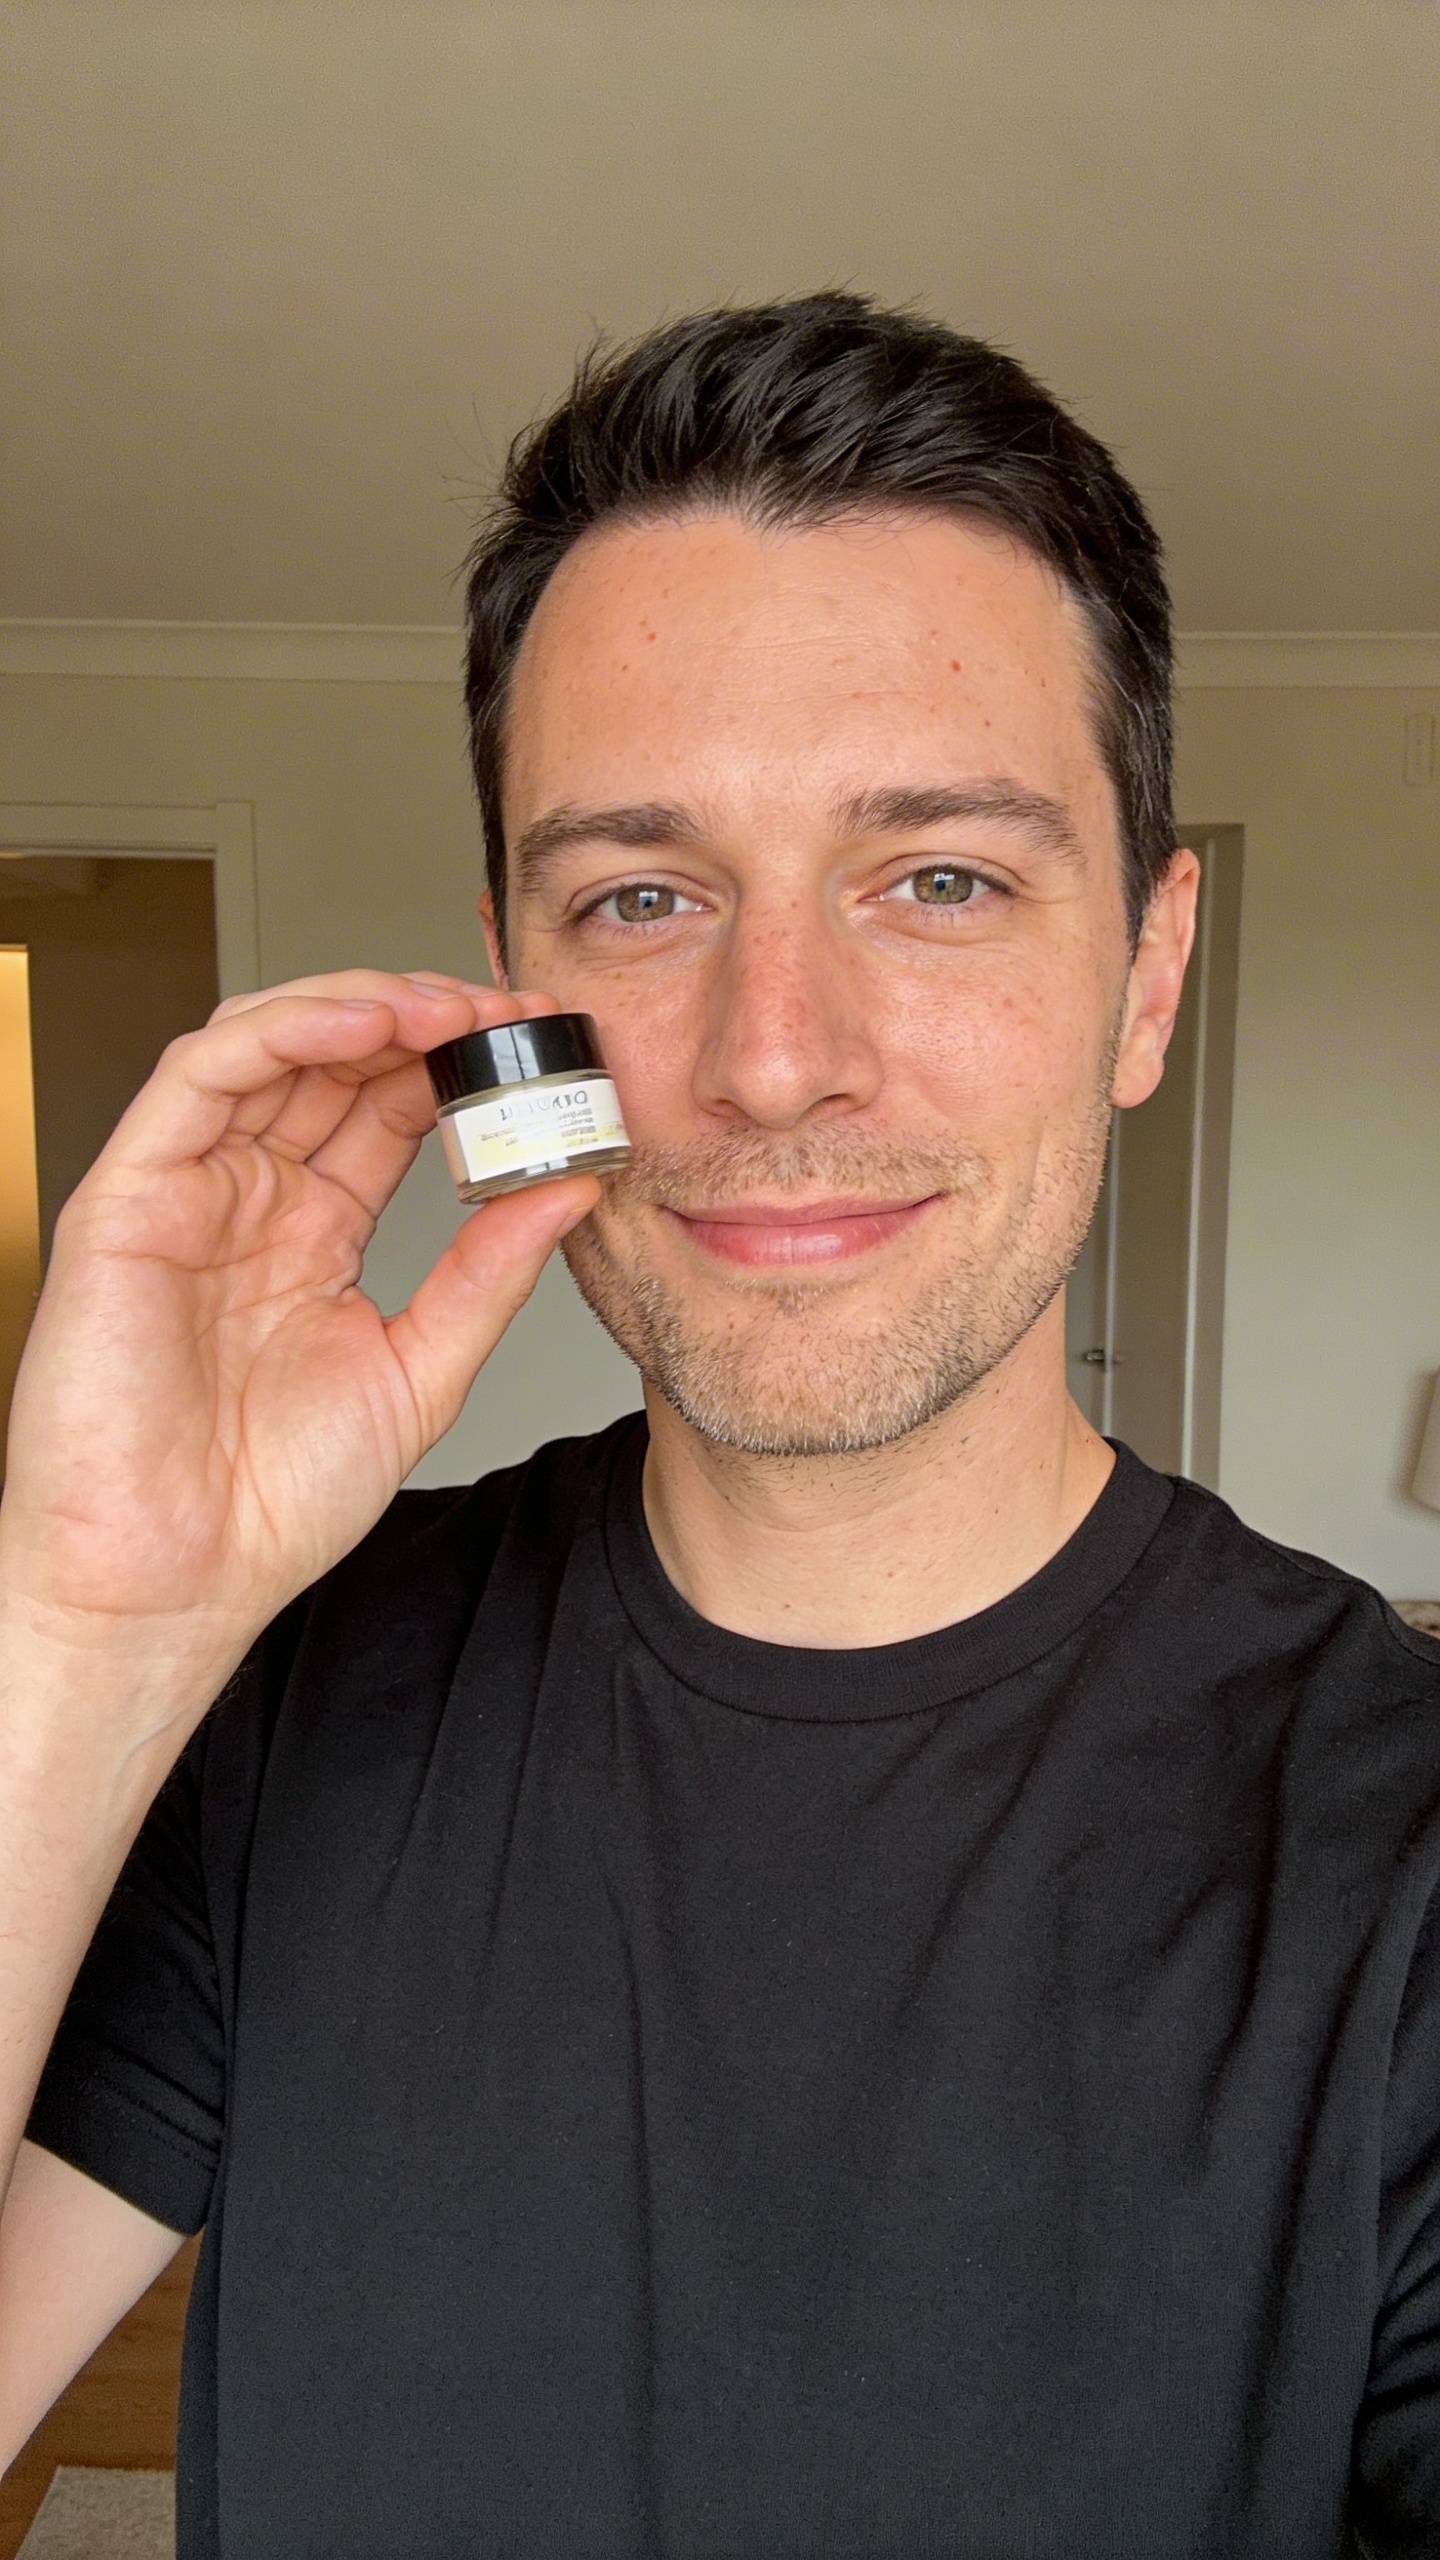
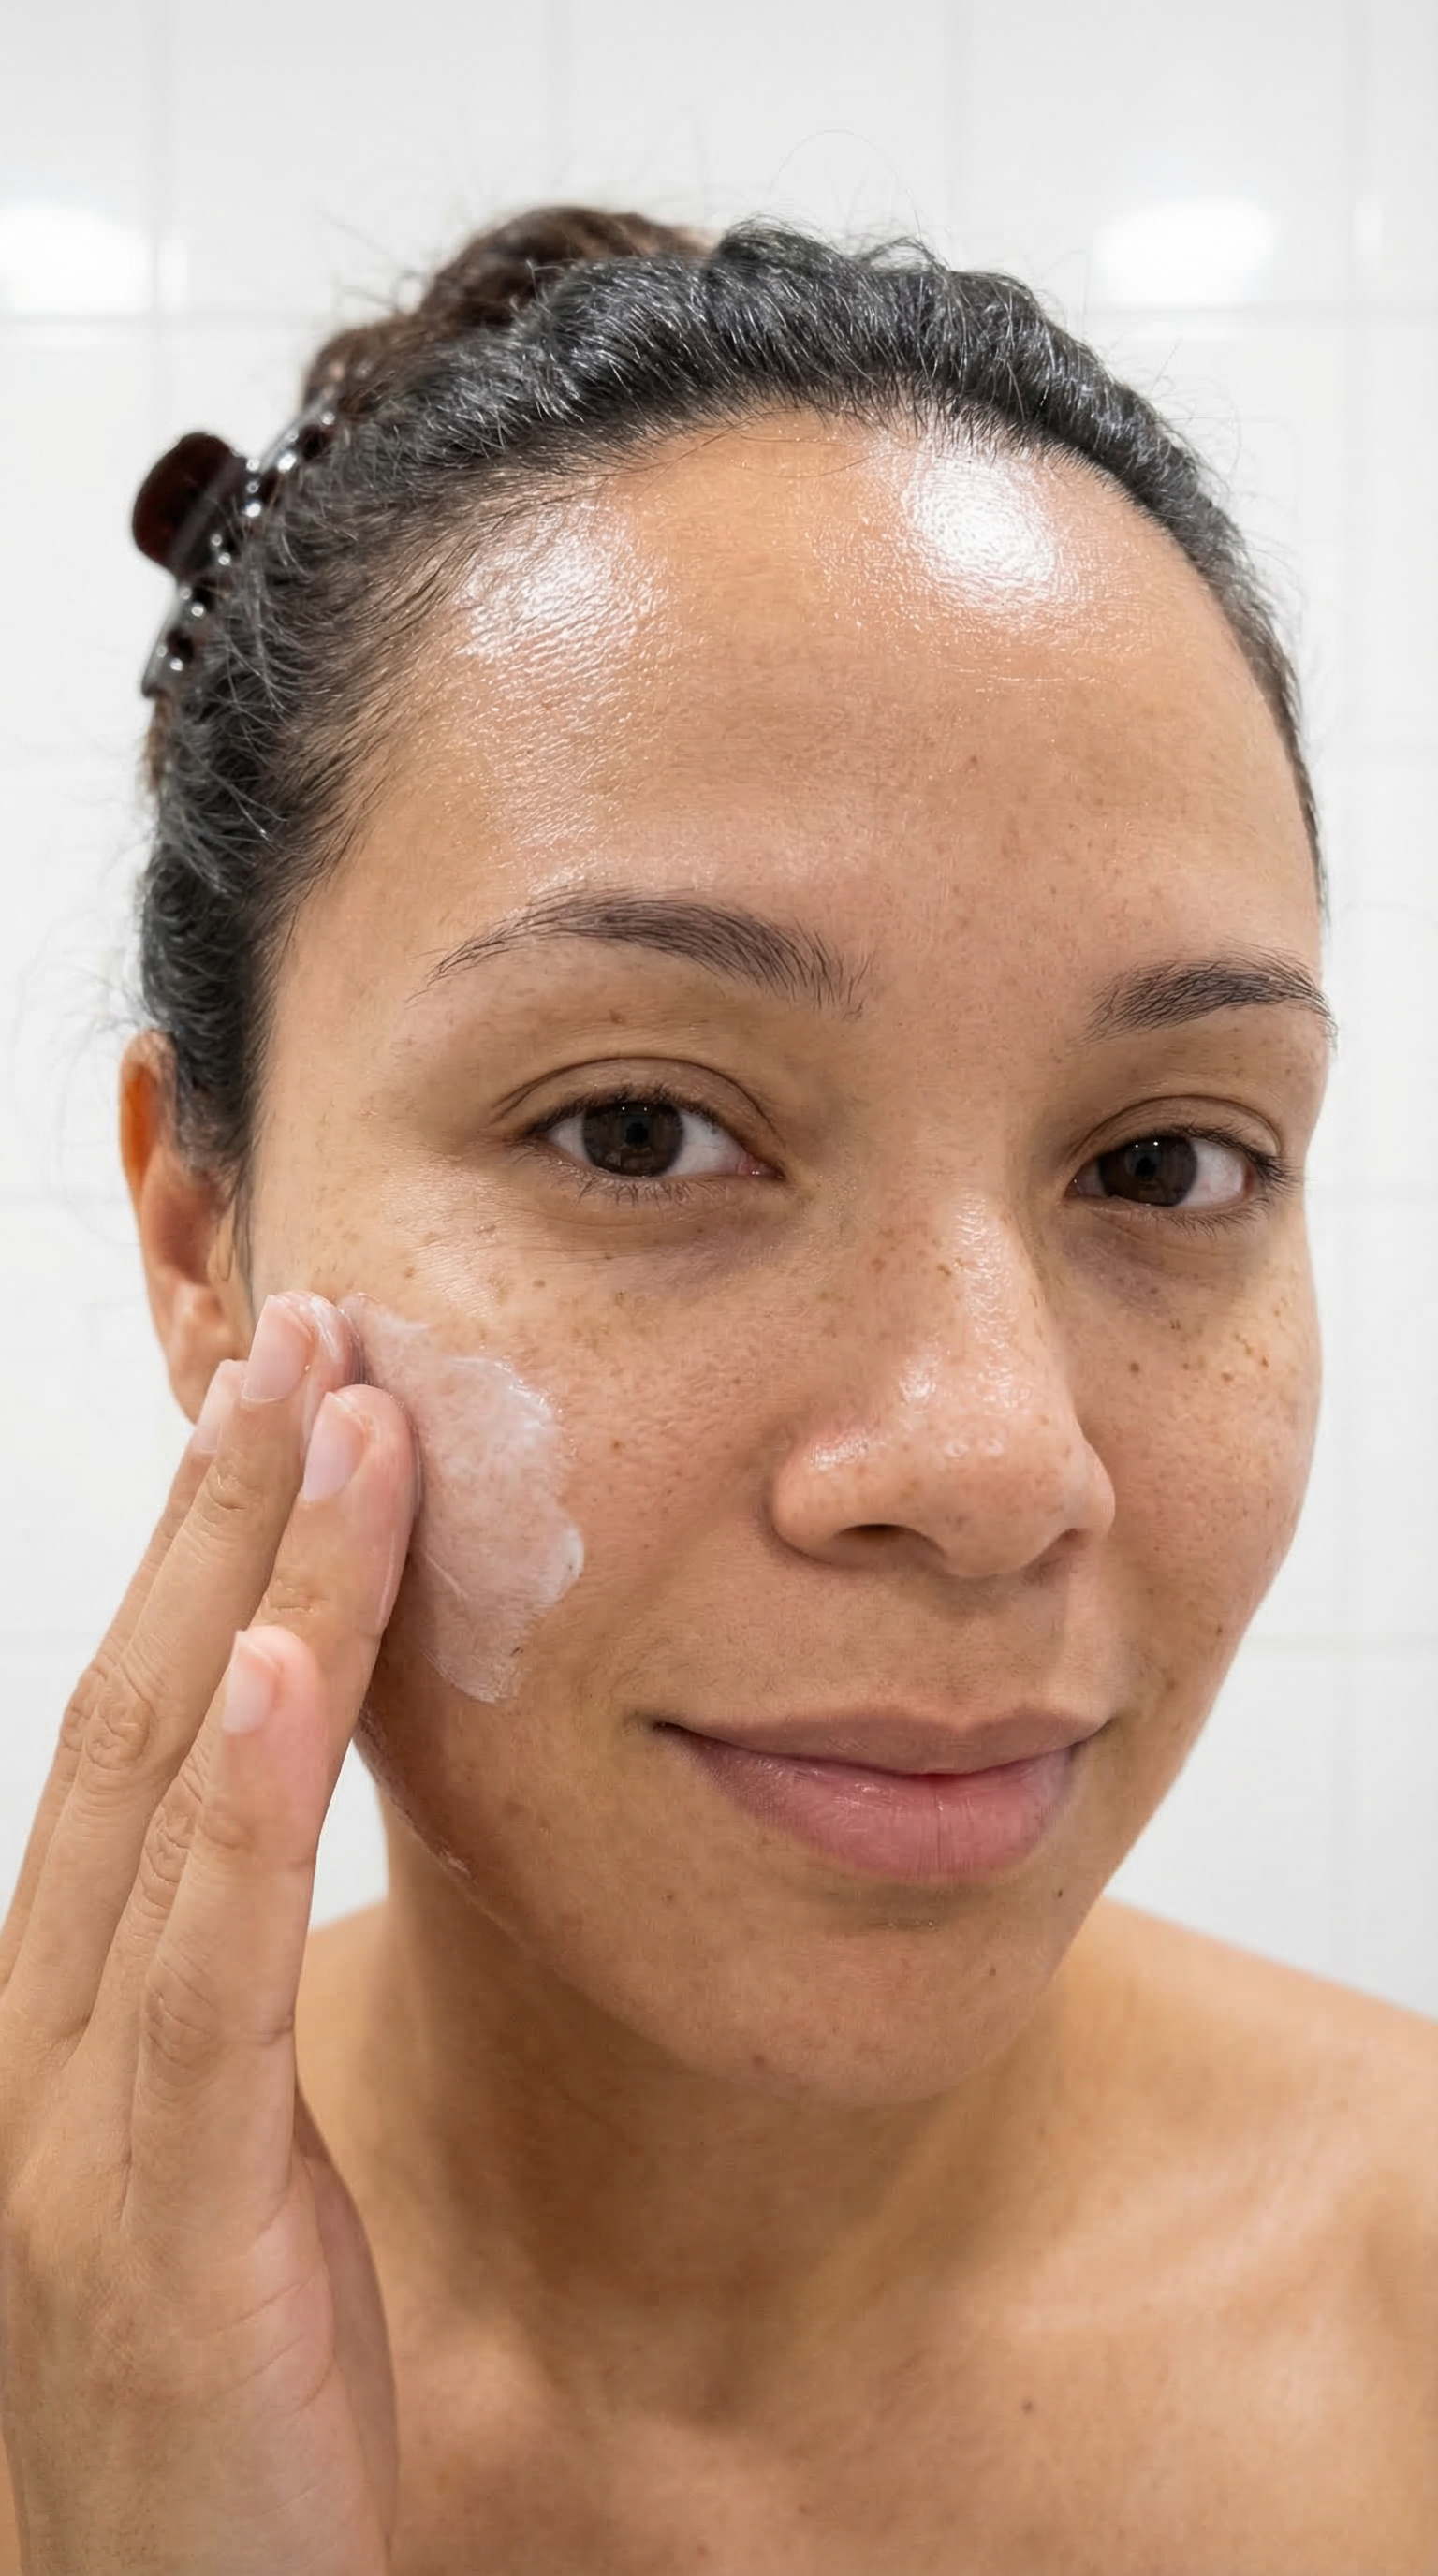
Pro Tips (Stronger Realism + Better Skin)
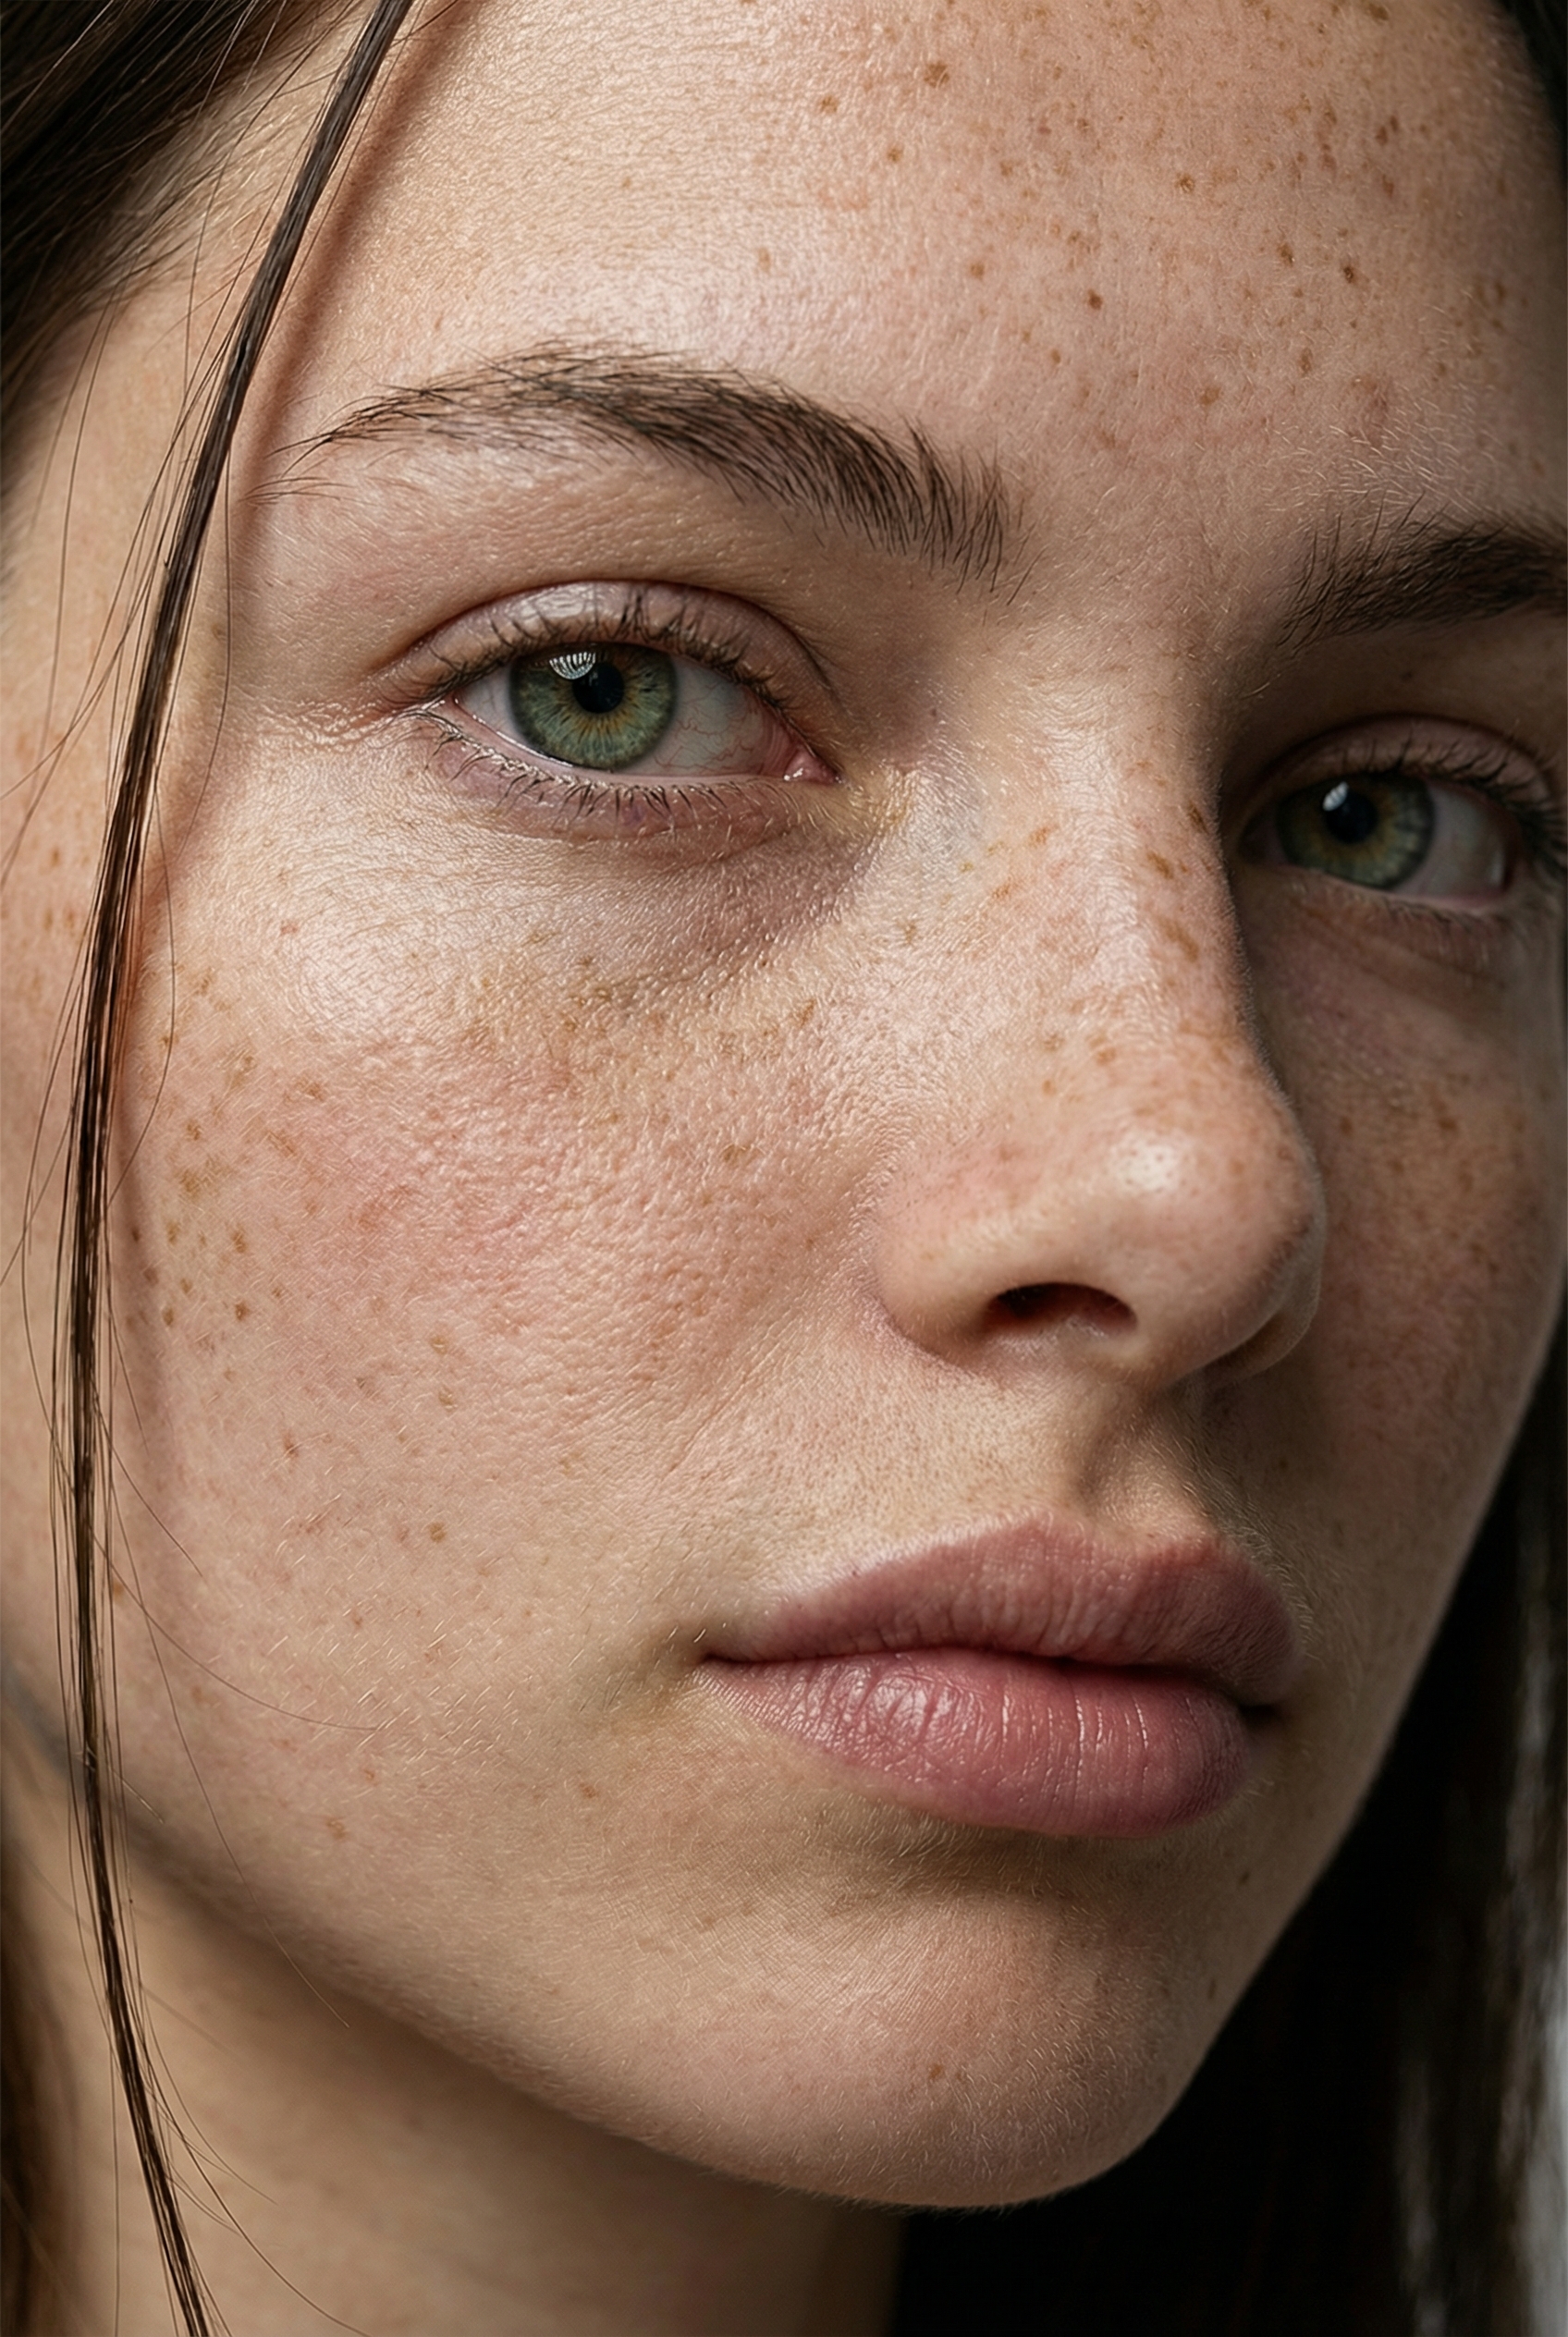
1) Add a Face Close Up Anchor
Your character sheet is great for full body consistency, but it is not always the best for skin texture.
If you want ultra realistic faces, you should create one extra anchor:
a close up face reference with detailed skin.
Why this helps:
- the face becomes clearer
- skin texture becomes more consistent
- you reduce the “smooth plastic” look
2) Generate a Hyper Realistic Close Up
Keep Nano Banana selected and upload your character sheet as the reference.
Then use a prompt like this:
“give me close up photo that has hyper realistic skin of this girl ”
Generate a few times and pick the best one.
Example:
3) Use Two References For New Scenes
From now on, when you generate new images, use:
- Reference 1: the character sheet (identity and body consistency)
- Reference 2: the close up face photo (skin and facial realism)
This two reference setup is one of the easiest ways to get both: consistency and realism at the same time.
What This Method Does
This workflow lets you recreate the look of a reference photo without copying the original person.
You will:
- extract a detailed style blueprint from a photo using ChatGPT as JSON
- use that JSON to generate new images with the same composition, lighting, and vibe
- reuse the same blueprint to place your own character into the exact same scene
Use cases:
- copy a mood and shot setup quickly
- keep one character consistent across multiple scenes
Pick a Reference Photo
Choose one photo with a look you want to copy.
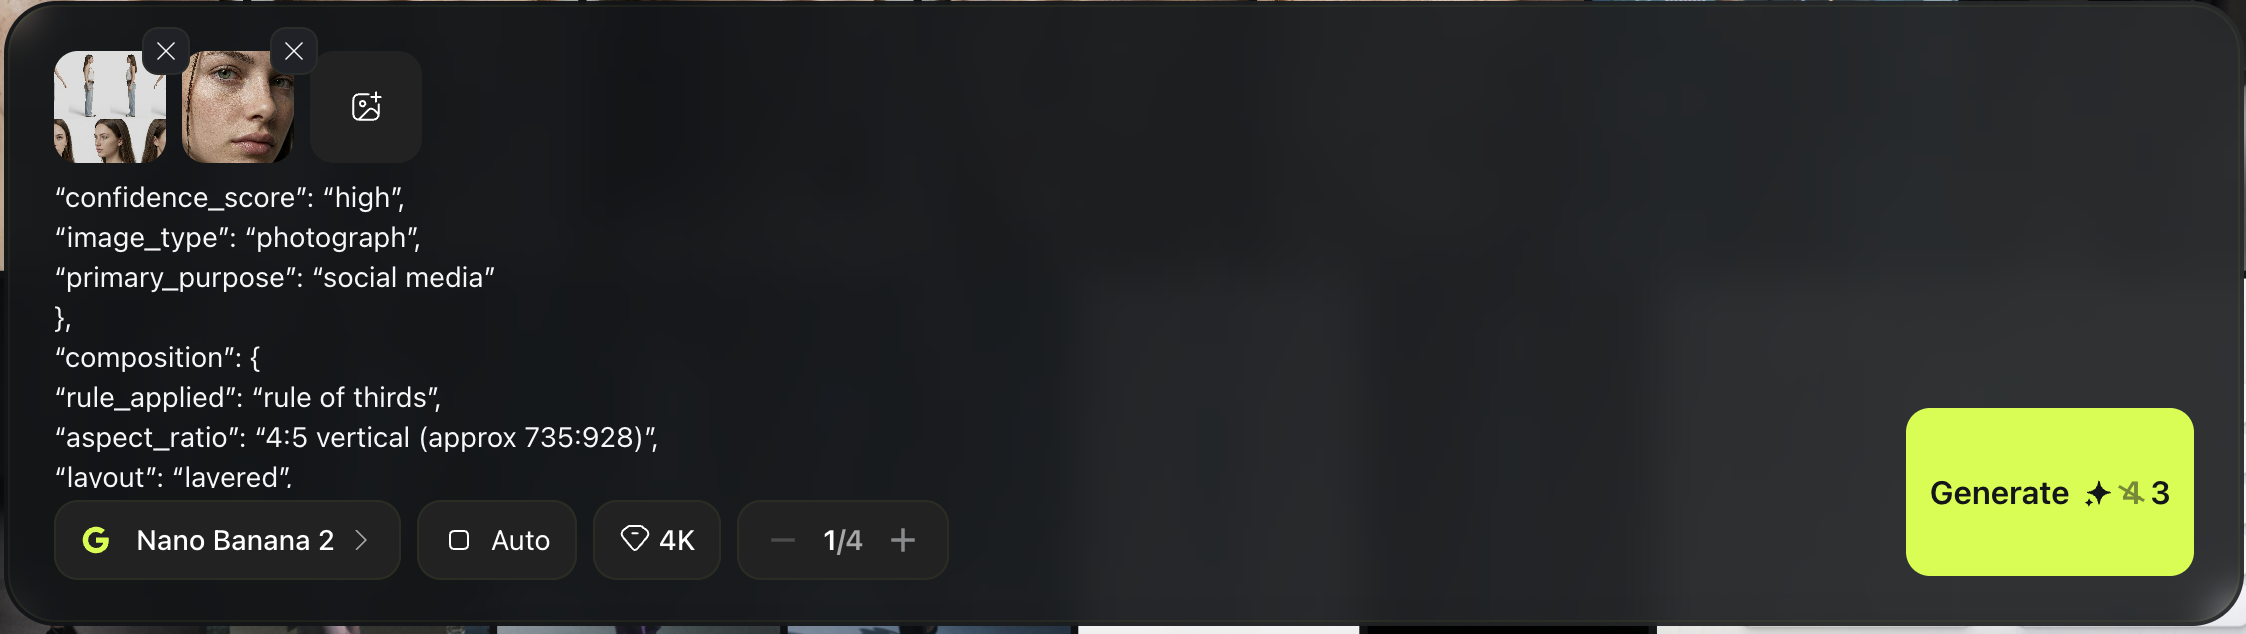
Extract the Style Blueprint (ChatGPT JSON)
Open ChatGPT and do this:
Upload the reference photo
Paste your Visual Analysis JSON template
Run it in Thinking Mode if available
Goal:
You get one clean JSON object describing the style and a ready to use generation prompt inside it.
Use your same Visual Analysis template here. ”””
## Context & Goal
You are an expert visual analysis specialist with 30+ years of experience in digital art, photography, graphic design, and AI image generation. You excel at deconstructing visual elements and translating artistic styles into technical specifications.
Your task: Analyze uploaded images and return comprehensive JSON profiles for recreating the visual style. Make sure composition, lighting, texture, angle and everything should exactly the same in detail and ultra realistic.
## Input Variable
Required Input:
- `{{$json.image}}` - Single uploaded image file
## Output Format
Return ONLY valid JSON. No explanations, no commentary, no markdown formatting.
Output format:
{JSON_ANALYSIS_OBJECT}
## Core JSON Schema
{
"metadata": {
"confidence_score": "high/medium/low - assessment of analysis accuracy",
"image_type": "photograph/digital art/illustration/graphic design/mixed media",
"primary_purpose": "marketing/editorial/social media/product/portrait/landscape/abstract"
},
"composition": {
"rule_applied": "rule of thirds/golden ratio/center composition/symmetry/asymmetry",
"aspect_ratio": "width:height ratio or format description",
"layout": "grid/single subject/multi-element/layered",
"focal_points": [
"Primary focal point location and element",
"Secondary focal point if present"
],
"visual_hierarchy": "Description of how eye moves through the image",
"balance": "symmetric/asymmetric/radial - with description"
},
"color_profile": {
"dominant_colors": [
{
"color": "Specific color name",
"hex": "#000000",
"percentage": "approximate percentage of image",
"role": "background/accent/primary subject"
}
],
"color_palette": "complementary/analogous/triadic/monochromatic/split-complementary",
"temperature": "warm/cool/neutral - overall feeling",
"saturation": "highly saturated/moderate/desaturated/black and white",
"contrast": "high contrast/medium contrast/low contrast/soft"
},
"lighting": {
"type": "natural window/artificial/mixed/studio/practical lights",
"source_count": "single source/multiple sources - number and placement",
"direction": "front/45-degree side/90-degree side/back/top/bottom/diffused from above",
"directionality": "highly directional/moderately directional/diffused/omni-directional",
"quality": "hard light/soft light/dramatic/even/gradient/sculpted",
"intensity": "bright/moderate/low/moody/high-key/low-key",
"contrast_ratio": "high contrast (dramatic shadows)/medium contrast/low contrast (flat)",
"mood": "cheerful/dramatic/mysterious/calm/energetic/professional/casual",
"shadows": {
"type": "harsh defined edges/soft gradual edges/minimal/dramatic/absent",
"density": "deep black/gray/transparent/faint",
"placement": "under subject/on wall/from objects/cast patterns",
"length": "short/medium/long - shadow projection distance"
},
"highlights": {
"treatment": "blown out/preserved/subtle/dramatic/specular",
"placement": "on face/hair/clothing/background - where light hits strongest"
},
"ambient_fill": "present/absent - secondary fill light reducing shadows",
"light_temperature": "warm (golden)/neutral/cool (blue) - color cast"
},
"technical_specs": {
"medium": "digital photography/3D render/digital painting/vector/photo manipulation/mixed",
"style": "realistic/hyperrealistic/stylized/minimalist/maximalist/abstract/surreal",
"texture": "smooth/grainy/sharp/soft/painterly/glossy/matte",
"sharpness": "tack sharp/slightly soft/deliberately soft/bokeh effect",
"grain": "none/film grain/digital noise/intentional grain - level",
"depth_of_field": "shallow/medium/deep - with subject isolation description",
"perspective": "straight on/low angle/high angle/dutch angle/isometric/one-point/two-point"
},
"artistic_elements": {
"genre": "portrait/landscape/abstract/conceptual/commercial/editorial/street/fine art",
"influences": [
{
"type": "sans-serif/serif/script/display/handwritten",
"weight": "thin/light/regular/medium/bold/black",
"characteristics": "modern/vintage/playful/serious/technical"
}
],
"placement": "overlay/integrated/border/corner - with strategic description",
"integration": "subtle/prominent/dominant/background"
},
"subject_analysis": {
"primary_subject": "Main subject description",
"positioning": "center/left/right/top/bottom/rule of thirds placement",
"scale": "close-up/medium/full/environmental/macro",
"interaction": "isolated/interacting with environment/multiple subjects",
"facial_expression": {
"mouth": "closed smile/open smile/slight smile/neutral/serious/pursed - exact mouth position",
"smile_intensity": "no smile/subtle/moderate/broad/wide - degree of smile",
"eyes": "direct gaze/looking away/squinting/wide/relaxed/intense - eye expression",
"eyebrows": "raised/neutral/furrowed/relaxed - brow position",
"overall_emotion": "happy/content/serious/playful/confident/approachable/guarded/warm/cold",
"authenticity": "genuine/posed/candid/formal/natural"
},
"hair": {
"length": "pixie/short/chin-length/shoulder-length/mid-back/long/very long - specific measurement",
"cut": "blunt/layered/shaggy/undercut/fade/tapered/disconnected - exact style name",
"texture": "straight/wavy/curly/coily/kinky - natural pattern with specific wave type (loose waves/tight curls/s-waves)",
"texture_quality": "smooth/coarse/fine/thick/thin - hair strand thickness",
"natural_imperfections": "flyaways/frizz/uneven sections/growth patterns/cowlicks - observable natural variation",
"styling": "sleek/tousled/wet look/blow-dried/natural/product-heavy/messy/textured - exact current state",
"styling_detail": "Degree of styling: heavily styled/lightly styled/unstyled, product visibility, movement quality",
"part": "center/side/deep side/no part/zigzag - exact location with precision",
"volume": "flat/moderate volume/voluminous - root lift and overall fullness",
"details": "Specific features: bangs type, face-framing layers, buzzed sections, faded areas, length variations, texture inconsistencies"
},
"hands_and_gestures": {
"left_hand": "Exact position and gesture - touching face/holding object/resting on surface/in pocket/behind back/clasped/visible or not visible",
"right_hand": "Exact position and gesture - touching face/holding object/resting on surface/in pocket/behind back/clasped/visible or not visible",
"finger_positions": "Specific details: pointing/peace sign/thumbs up/relaxed/gripping/spread/interlaced/curled",
"finger_interlacing": "if hands clasped: natural loose interlacing/tight formal interlacing/fingers overlapping/thumbs position",
"hand_tension": "relaxed/tense/natural/posed/rigid - muscle tension observable",
"interaction": "What hands are doing: holding phone/touching hair/on hip/crossed/clasped at waist/clasped at chest/gesturing",
"naturalness": "organic casual gesture/deliberately posed/caught mid-motion/static formal pose"
},
"body_positioning": {
"posture": "standing/sitting/leaning/lying - exact position",
"angle": "facing camera/45 degree turn/profile/back to camera",
"weight_distribution": "leaning left/right/centered/shifted",
"shoulders": "level/tilted/rotated/hunched/back"
}
},
"background": {
"setting_type": "indoor/outdoor/studio/natural environment - specific location",
"spatial_depth": "shallow/medium/deep - layers description",
"elements_detailed": [
{
"item": "Specific object name (if plant: species like monstera/pothos/bird of paradise/fern)",
"position": "left/right/center/top/bottom - exact placement with quadrant",
"distance": "foreground/midground/background",
"size": "dominant/medium/small - relative scale and proportion",
"condition": "new/worn/vintage/pristine/wilted/thriving - state description",
"specific_features": "For plants: flower color, leaf pattern, pot type; For objects: brand, wear, details"
}
],
"wall_surface": {
"material": "painted drywall/concrete/brick/wood paneling/tile/wallpaper/plaster - exact base material",
"surface_treatment": "smooth paint/textured paint/raw concrete/polished concrete/exposed brick/finished/unfinished",
"texture": "perfectly smooth/slightly textured/rough/patterned/brushed - tactile quality",
"finish": "matte/satin/glossy/flat - sheen level",
"color": "Specific color with undertones (e.g., warm gray, cool blue-gray, off-white)",
"color_variation": "uniform/gradient/patchy/streaked - color consistency",
"features": "clean/water stains/vertical streaks/horizontal marks/cracks/patches/fixtures/artwork/scuffs - ALL observable surface details",
"wear_indicators": "pristine/aged/weathered/industrial/residential - condition and style"
},
"floor_surface": {
"material": "wood/tile/carpet/concrete/grass - exact type",
"color": "Specific color",
"pattern": "solid/checkered/striped/herringbone - if present"
},
"objects_catalog": "List every visible object with position: furniture pieces, decorative items, functional objects, natural elements",
"background_treatment": "blurred/sharp/minimal/detailed/gradient/textured"
},
"generation_parameters": {
"prompts": [
"Detailed technical prompt for recreating this style",
"Alternative angle or variation prompt"
],
"keywords": [
"keyword1",
"keyword2",
"keyword3",
"keyword4",
"keyword5"
],
"technical_settings": "Recommended camera/render settings description for recreation",
"post_processing": "Color grading, filters, or editing techniques applied"
}
}
{
"type": "sans-serif/serif/script/display/handwritten",
"weight": "thin/light/regular/medium/bold/black",
"characteristics": "modern/vintage/playful/serious/technical"
}
],
"placement": "overlay/integrated/border/corner - with strategic description",
"integration": "subtle/prominent/dominant/background"
},
"subject_analysis": {
"primary_subject": "Main subject description",
"positioning": "center/left/right/top/bottom/rule of thirds placement",
"scale": "close-up/medium/full/environmental/macro",
"interaction": "isolated/interacting with environment/multiple subjects",
"facial_expression": {
"mouth": "closed smile/open smile/slight smile/neutral/serious/pursed - exact mouth position",
"smile_intensity": "no smile/subtle/moderate/broad/wide - degree of smile",
"eyes": "direct gaze/looking away/squinting/wide/relaxed/intense - eye expression",
"eyebrows": "raised/neutral/furrowed/relaxed - brow position",
"overall_emotion": "happy/content/serious/playful/confident/approachable/guarded/warm/cold",
"authenticity": "genuine/posed/candid/formal/natural"
},
"hair": {
"length": "pixie/short/chin-length/shoulder-length/mid-back/long/very long - specific measurement",
"cut": "blunt/layered/shaggy/undercut/fade/tapered/disconnected - exact style name",
"texture": "straight/wavy/curly/coily/kinky - natural pattern with specific wave type (loose waves/tight curls/s-waves)",
"texture_quality": "smooth/coarse/fine/thick/thin - hair strand thickness",
"natural_imperfections": "flyaways/frizz/uneven sections/growth patterns/cowlicks - observable natural variation",
"styling": "sleek/tousled/wet look/blow-dried/natural/product-heavy/messy/textured - exact current state",
"styling_detail": "Degree of styling: heavily styled/lightly styled/unstyled, product visibility, movement quality",
"part": "center/side/deep side/no part/zigzag - exact location with precision",
"volume": "flat/moderate volume/voluminous - root lift and overall fullness",
"details": "Specific features: bangs type, face-framing layers, buzzed sections, faded areas, length variations, texture inconsistencies"
},
"hands_and_gestures": {
"left_hand": "Exact position and gesture - touching face/holding object/resting on surface/in pocket/behind back/clasped/visible or not visible",
"right_hand": "Exact position and gesture - touching face/holding object/resting on surface/in pocket/behind back/clasped/visible or not visible",
"finger_positions": "Specific details: pointing/peace sign/thumbs up/relaxed/gripping/spread/interlaced/curled",
"finger_interlacing": "if hands clasped: natural loose interlacing/tight formal interlacing/fingers overlapping/thumbs position",
"hand_tension": "relaxed/tense/natural/posed/rigid - muscle tension observable",
"interaction": "What hands are doing: holding phone/touching hair/on hip/crossed/clasped at waist/clasped at chest/gesturing",
"naturalness": "organic casual gesture/deliberately posed/caught mid-motion/static formal pose"
},
"body_positioning": {
"posture": "standing/sitting/leaning/lying - exact position",
"angle": "facing camera/45 degree turn/profile/back to camera",
"weight_distribution": "leaning left/right/centered/shifted",
"shoulders": "level/tilted/rotated/hunched/back"
}
},
"background": {
"setting_type": "indoor/outdoor/studio/natural environment - specific location",
"spatial_depth": "shallow/medium/deep - layers description",
"elements_detailed": [
{
"item": "Specific object name (if plant: species like monstera/pothos/bird of paradise/fern)",
"position": "left/right/center/top/bottom - exact placement with quadrant",
"distance": "foreground/midground/background",
"size": "dominant/medium/small - relative scale and proportion",
"condition": "new/worn/vintage/pristine/wilted/thriving - state description",
"specific_features": "For plants: flower color, leaf pattern, pot type; For objects: brand, wear, details"
}
],
"wall_surface": {
"material": "painted drywall/concrete/brick/wood paneling/tile/wallpaper/plaster - exact base material",
"surface_treatment": "smooth paint/textured paint/raw concrete/polished concrete/exposed brick/finished/unfinished",
"texture": "perfectly smooth/slightly textured/rough/patterned/brushed - tactile quality",
"finish": "matte/satin/glossy/flat - sheen level",
"color": "Specific color with undertones (e.g., warm gray, cool blue-gray, off-white)",
"color_variation": "uniform/gradient/patchy/streaked - color consistency",
"features": "clean/water stains/vertical streaks/horizontal marks/cracks/patches/fixtures/artwork/scuffs - ALL observable surface details",
"wear_indicators": "pristine/aged/weathered/industrial/residential - condition and style"
},
"floor_surface": {
"material": "wood/tile/carpet/concrete/grass - exact type",
"color": "Specific color",
"pattern": "solid/checkered/striped/herringbone - if present"
},
"objects_catalog": "List every visible object with position: furniture pieces, decorative items, functional objects, natural elements",
"background_treatment": "blurred/sharp/minimal/detailed/gradient/textured"
},
"generation_parameters": {
"prompts": [
"Detailed technical prompt for recreating this style",
"Alternative angle or variation prompt"
],
"keywords": [
"keyword1",
"keyword2",
"keyword3",
"keyword4",
"keyword5"
],
"technical_settings": "Recommended camera/render settings description for recreation",
"post_processing": "Color grading, filters, or editing techniques applied"
}
}
## Analysis Rules
### Composition Analysis
- Identify grid systems, alignment, and spatial relationships
- Note use of negative space and breathing room
- Describe visual flow and eye movement path
- Identify focal points using color, contrast, size, or placement
- Assess balance between elements
### Color Analysis
- Extract dominant colors with approximate hex values
- Identify color relationships (complementary, analogous, etc.)
- Assess temperature bias (warm vs cool)
- Note saturation levels and contrast intensity
- Describe how color creates mood and directs attention
### Lighting Assessment
- Determine light source type, direction, and quality
- Analyze shadow characteristics and depth
- Assess highlight preservation or blown-out areas
- Describe overall lighting mood and emotional impact
- Note light's role in creating dimension and form
### Technical Evaluation
- Identify creation medium and technique
- Assess texture, sharpness, and grain characteristics
- Evaluate depth of field and focus points
- Analyze perspective and viewpoint
- Note any technical limitations or intentional choices
### Artistic Context
- Identify genre and artistic influences
- Assess mood, atmosphere, and emotional tone
- Describe visual style (minimal, maximalist, etc.)
- Note any cultural or temporal references
- Evaluate overall aesthetic cohesion
### Typography (if present)
- Identify font styles and weights
- Assess placement and integration strategy
- Evaluate readability and hierarchy
- Describe relationship to other visual elements
### Subject Treatment
- **Hair Analysis (CRITICAL)**:
- Measure exact length using body reference points (ears, shoulders, etc.)
- Identify specific cut style by name (bob, shag, fade, undercut, etc.)
- Note texture pattern AND texture quality - distinguish between natural imperfect texture vs "AI smooth" perfect texture
- Capture natural imperfections: flyaways, frizz, uneven sections, growth patterns, texture variation
- Describe part location with precision (1 inch from center, deep left, etc.)
- Document all details: bang style, layering, undercut sections, faded areas
- Specify product use evidence (wet look, matte, glossy, natural) and degree of styling
- Note volume and movement quality
- AVOID: Describing hair as "perfect" or overly uniform - real hair has natural variation
- **Hand & Gesture Analysis (CRITICAL)**:
- Describe EACH hand separately with exact position
- Note if hands are visible or hidden (in pockets, behind back, out of frame)
- Document specific finger positions and shapes
- For clasped hands: describe interlacing style (natural loose vs formal tight), thumb positions, finger overlap patterns
- Assess hand tension: relaxed vs tense, organic vs posed
- Describe what hands are interacting with (phone, face, object, clothing, each other)
- Note natural vs posed quality of gesture
- Specify pressure/contact points (lightly touching vs gripping)
- Evaluate overall naturalness: organic casual vs deliberately posed
- **Background Elements (CRITICAL)**:
- Catalog EVERY visible object with exact position and quadrant placement
- For plants: identify species (monstera, pothos, bird of paradise, fern, etc.)
- Describe spatial relationships between objects and their depth layers
- **Wall analysis is CRITICAL**:
- Distinguish between painted drywall vs concrete vs brick vs other materials
- Note surface treatment: smooth paint vs textured vs raw vs polished
- Document finish: matte vs glossy vs satin
- Identify any surface features: water stains, streaks, cracks, patches, wear
- Assess condition: pristine residential vs industrial weathered vs aged
- Document floor type, color, pattern
- Specify distance/depth layer for each element
- Note condition and state of objects (new/worn/vintage/thriving/wilted)
- Describe any text, artwork, or decorative elements
- Include architectural features (windows, doors, molding, fixtures, frames)
- **Lighting Analysis (CRITICAL)**:
- Distinguish between dramatic directional lighting vs flat even lighting
- Assess directionality: highly directional (strong shadows) vs diffused (soft minimal shadows)
- Document shadow characteristics: harsh defined edges vs soft gradual edges vs minimal
- Note contrast ratio: high contrast (dramatic) vs low contrast (flat)
- Identify if ambient fill light is present reducing shadow depth
- Describe how light sculpts the subject vs evenly illuminates
- Document cast shadows from objects (like plants) on walls
- Note shadow density: deep black vs gray vs faint
- **Facial Expression (CRITICAL)**:
- Capture exact mouth position: closed smile vs slight smile vs neutral vs serious
- Quantify smile intensity: no smile/subtle/moderate/broad
- Note eye expression and gaze direction
- Assess overall emotional tone: warm approachable vs serious neutral
- Distinguish between genuine natural expression vs posed formal expression
- Analyze primary subject and positioning
- Assess scale and framing choices
- Describe subject-background relationship
- Note any secondary subjects or supporting elements
### Generation Parameters
- Create actionable technical prompts for recreation
- Extract relevant keywords for searchability
- Recommend technical settings for similar results
- Describe post-processing techniques applied
## Output Requirements
- **Format**: Valid JSON only
- **No markdown**: No ```json``` blocks, no backticks
- **No commentary**: No explanatory text before/after JSON
- **No instructions**: No "Here is your analysis" or "Copy this"
- **Clean structure**: Properly formatted, parseable JSON
- **Single object**: Return one complete JSON analysis object
- **Comprehensive**: All sections must be populated with detailed analysis
- **Specific**: Use precise technical terminology, not vague descriptions
- **Actionable**: Generation parameters must be detailed enough for recreation
## Processing Logic
1. Receive image input from `{{$json.image}}`
2. Perform comprehensive visual analysis across all categories
3. Extract technical specifications and artistic elements
4. Generate recreation prompts and parameters
5. Output single, complete JSON object
## Quality Standards
- **Confidence score**: Honest assessment of analysis certainty
- **Hex codes**: Approximate but reasonable color values
- **Specific descriptions**: Avoid generic terms like "nice" or "good"
- **Technical accuracy**: Use correct terminology for medium and technique
- **Completeness**: Every JSON field must contain meaningful analysis
- **Actionability**: Prompts and keywords must be specific enough to recreate style
### CRITICAL Accuracy Requirements:
**Hair Description Must Include:**
- Exact length measurement using reference points
- Specific cut style name (not just "short" or "long")
- Texture type AND texture quality (avoid "perfect" - describe natural variation)
- Natural imperfections: flyaways, frizz, uneven sections, texture inconsistencies
- Styling state with product evidence and degree of styling
- Part location with precision
- Volume and movement quality
- All unique features (bangs, layers, fades, undercuts)
- **AVOID**: "AI smooth" or overly perfect descriptions - real hair has variation
**Hand & Gesture Description Must Include:**
- Position of BOTH hands (even if one is hidden)
- Exact finger configurations
- For clasped hands: interlacing pattern (loose/tight), thumb position, finger overlap
- Hand tension assessment (relaxed vs tense)
- What hands are interacting with
- Natural vs posed quality with specific evidence
- Contact points and pressure
- Overall gesture naturalness assessment
**Background Description Must Include:**
- Every visible object cataloged with quadrant position
- Plant species identification (not just "plant")
- **Wall material distinction** (painted drywall vs concrete vs brick - THIS IS CRITICAL)
- Wall surface treatment (smooth paint vs raw concrete vs textured)
- Wall finish (matte vs glossy) and condition (pristine vs weathered vs industrial)
- Any surface features: water stains, vertical streaks, cracks, patches
- Floor materials with exact colors
- Spatial depth layers (foreground/mid/background) for each element
- Object conditions and states
- Architectural features
- Text or decorative elements
**Lighting Description Must Include:**
- Directionality assessment (highly directional vs diffused)
- Contrast ratio (high/medium/low)
- Shadow characteristics: edge quality (harsh vs soft), density (deep vs faint), placement
- Cast shadows from objects onto walls
- Presence or absence of ambient fill light
- Whether lighting is dramatic and sculpting vs flat and even
- This distinction is CRITICAL for recreation accuracy
**Facial Expression Must Include:**
- Exact mouth position (closed smile/slight smile/neutral/serious)
- Smile intensity quantification
- Eye expression details
- Overall emotional tone (warm vs neutral vs serious)
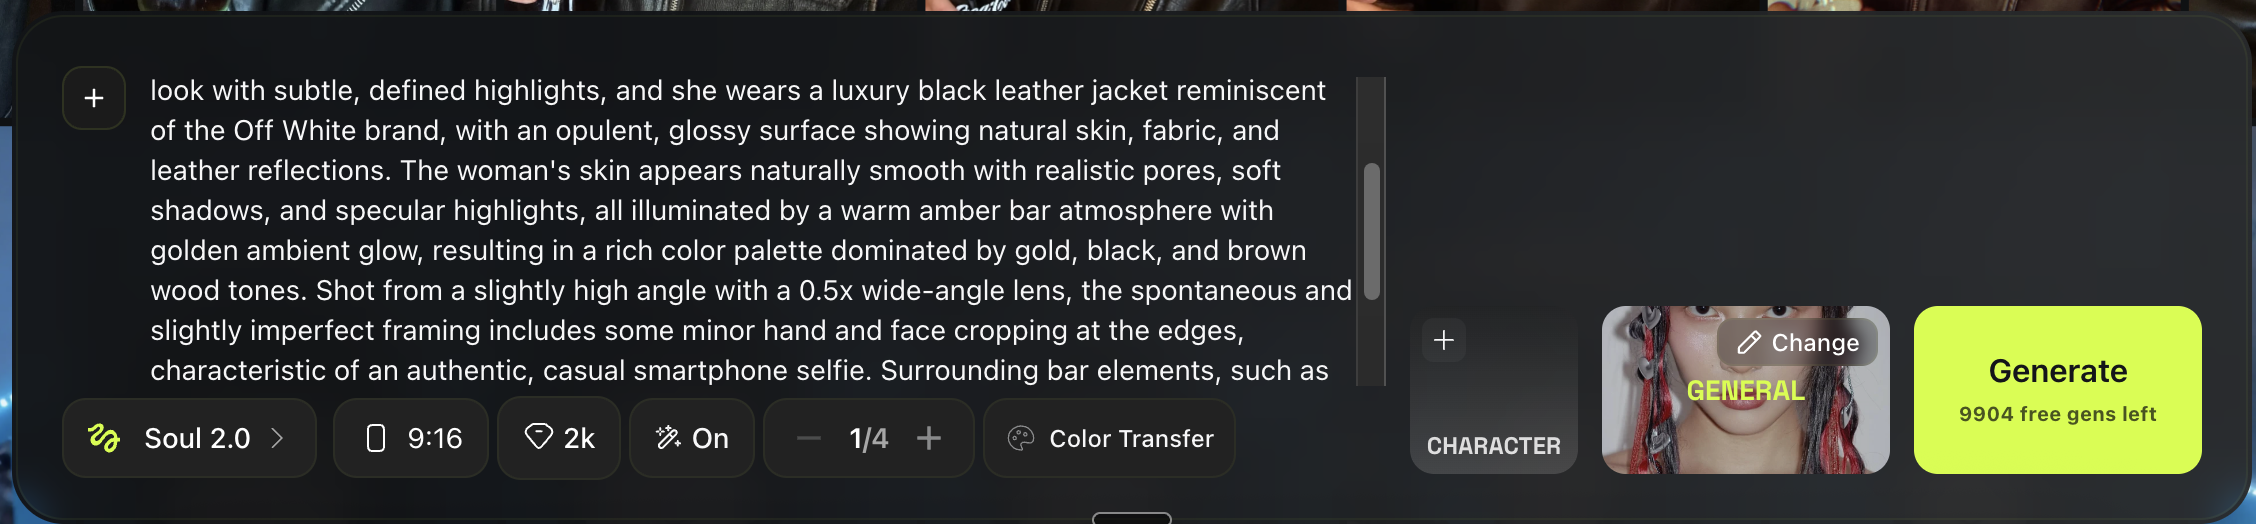
- Genuine vs posed quality assessmentGenerate the Look in Higgsfield (Nano Banana Pro)
Open Higgsfield
Select Image → Nano Banana Pro
Paste the prompt from your JSON output
Match the aspect ratio to the reference photo (You can just choose auto)
Generate multiple outputs
Optional: Put Your Own Character Into the Same Scene
This is where it gets powerful.
Goal:
Keep the scene constant, swap the person.
Workflow:
Prepare your character references
Reuse the same JSON scene blueprint
Paste the same prompt blueprint you extracted from the reference scene.
Add your character as the subject using references
Upload your character references in Nano Banana Pro, then generate variations.
Generate multiple outputs and pick the best.
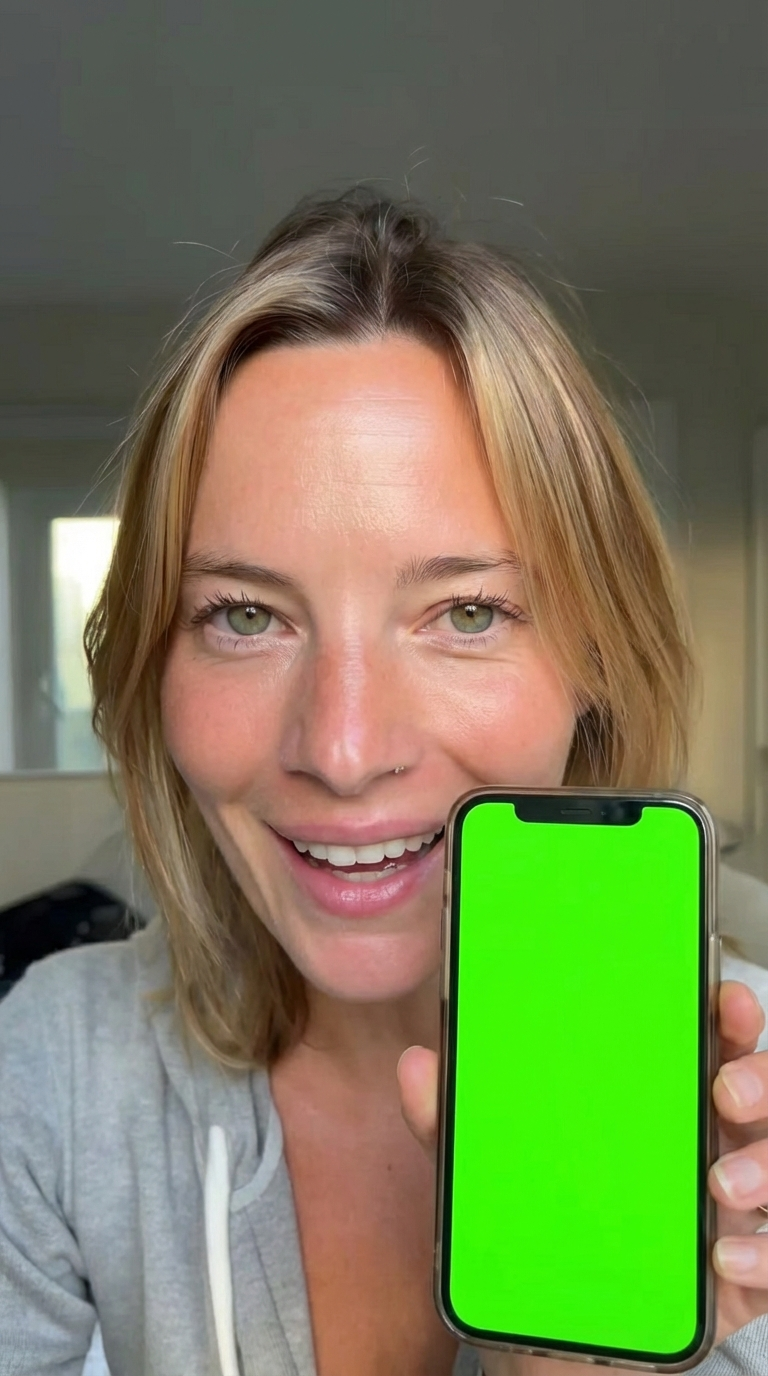
What You’re Making
In this chapter, you will learn how to create a realistic UGC style image or video where your model holds an iPhone with actual content visible on the screen. This is perfect for app demos, landing pages, and product showcases. The technique is simpler than it sounds. You generate the scene with a green screen on the phone first, then replace that green screen with whatever content you want to display. This two step approach gives you full control over what appears on screen while keeping the rest of the image looking natural and realistic.
Step 1: Create the Base Selfie Image (Higgsfield)
Of course you can use your own model, I show you some other way here.
Open Higgsfield
Go to Image and choose Soul 2.0
Choose “General”
Use a prompt like this
Example prompt for a realistic selfie vibe:
Generate a few variations and choose the most believable one.
Example:
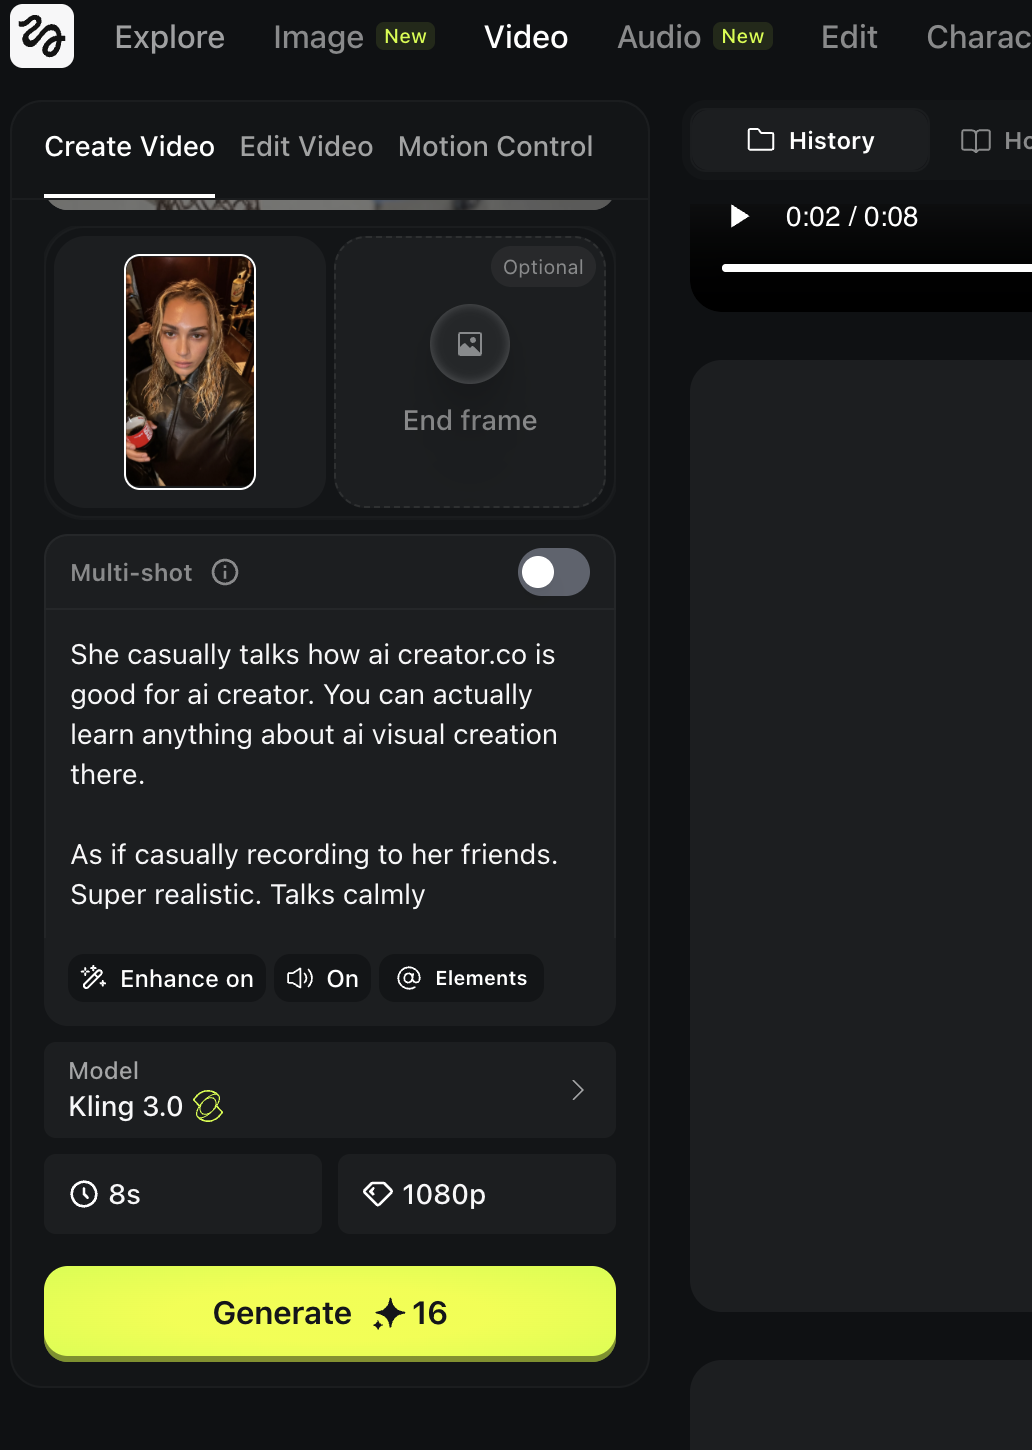
Generate the Talking Video
Open Higgsfield Video
Go to Video and select Kling 3.0
Upload your final image
Drag and drop the selfie image you prepared.
Paste a talking video prompt
You can decide what will happen the video, gesture, script etc.
Example prompt:
Set your settings and generate
- Aspect ratio: 9:16
- Duration: 8 seconds (short is easier to make realistic)
Result:
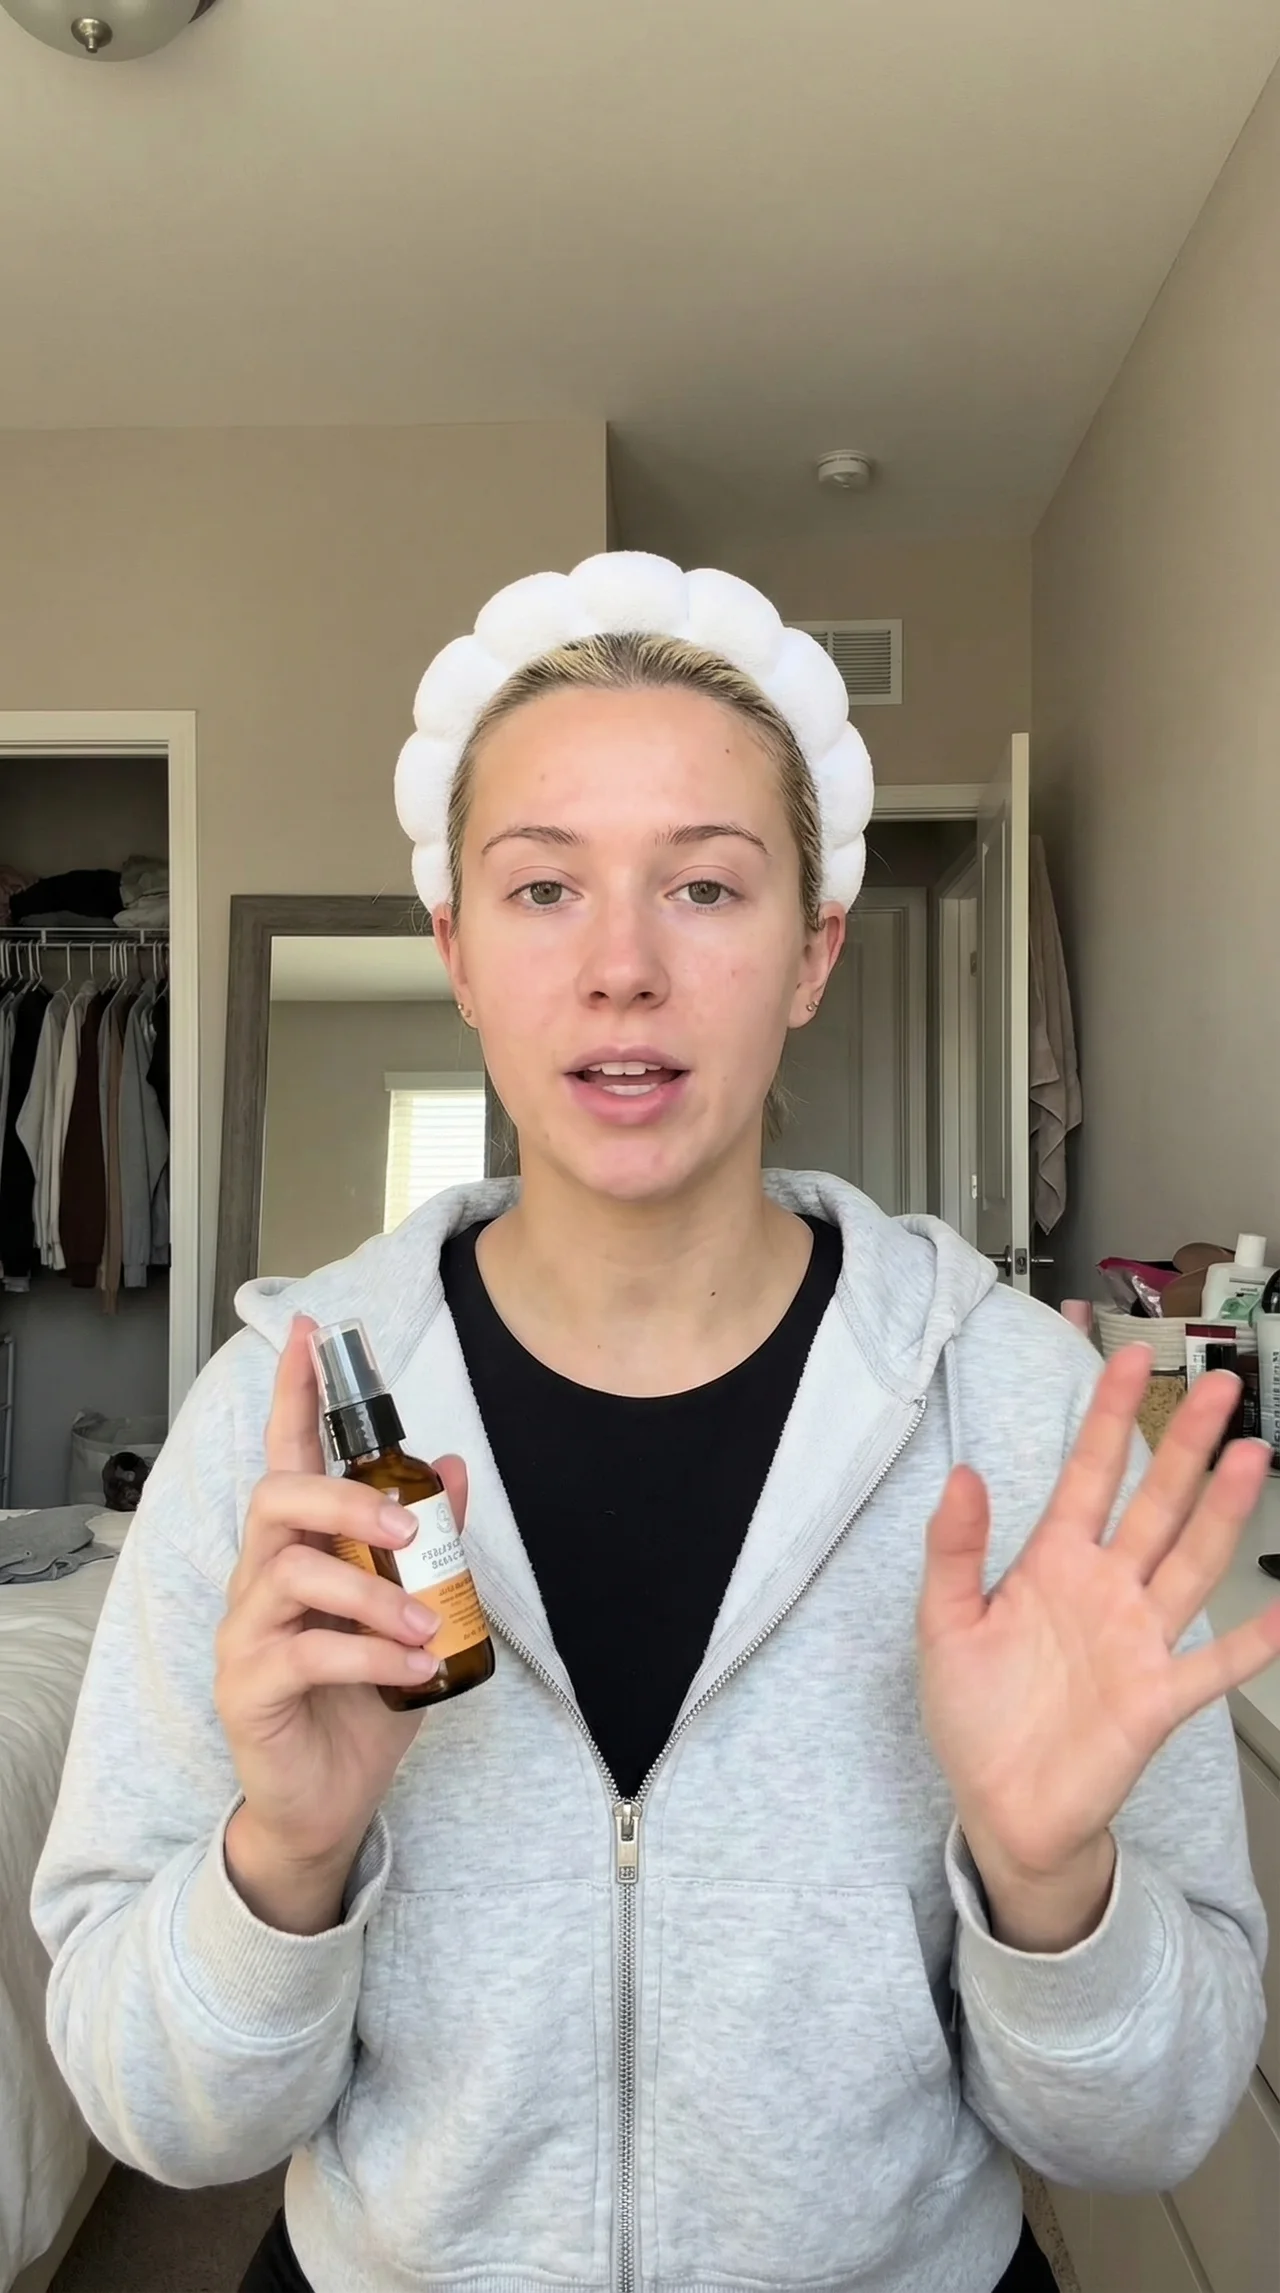
Prepare the Model and Background
First, you need a realistic base frame.
Use the same workflow from the section:
Realistic Images From a Real Photo
Quick version:
Find a UGC reference image you like (pose, framing, vibe)
Extract the style blueprint with ChatGPT JSON
Generate a matching frame in Nano Banana Pro
Where to find good references:
Search Pinterest for keywords like:
UGC product
UGC holding product
TikTok UGC ad
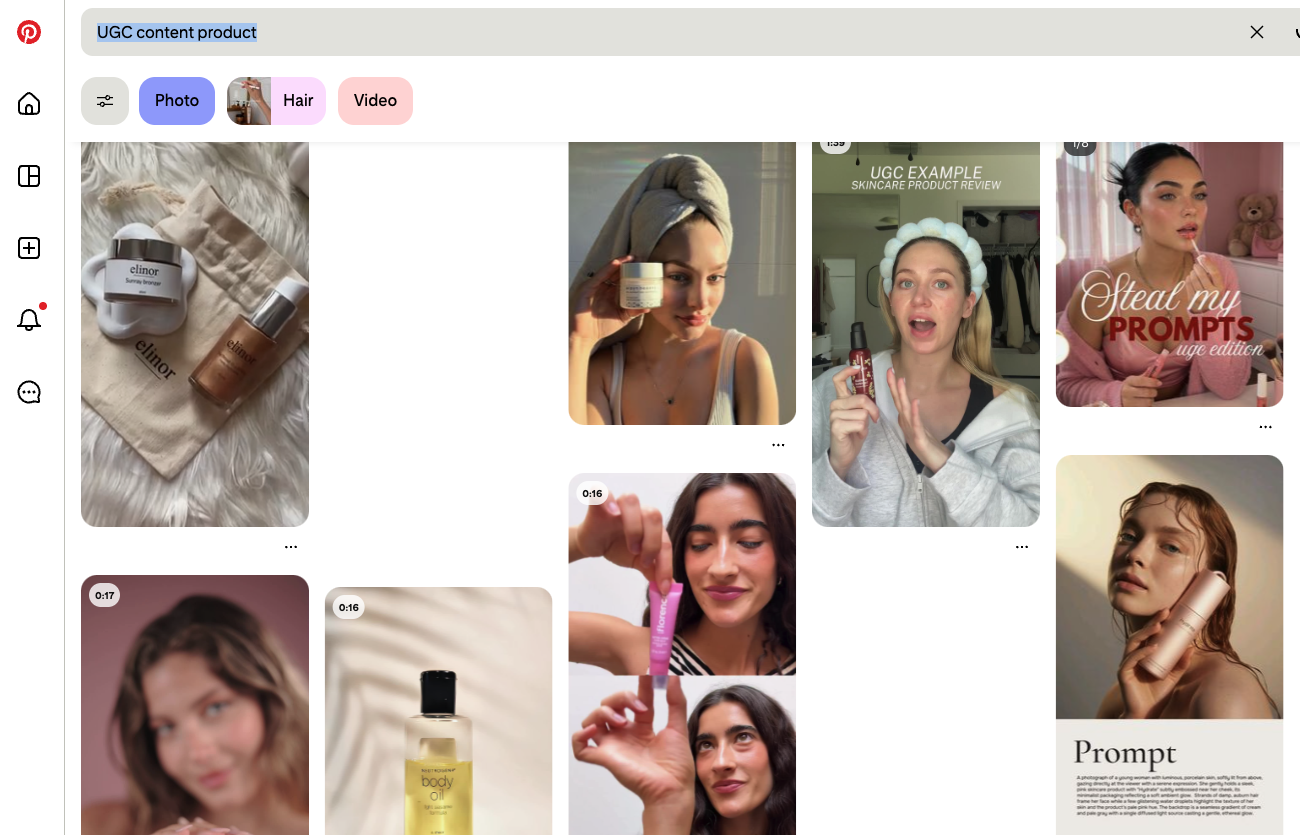
Pick a reference that clearly shows:
- the hand position
- the product angle
- phone style framing
Example model generated:
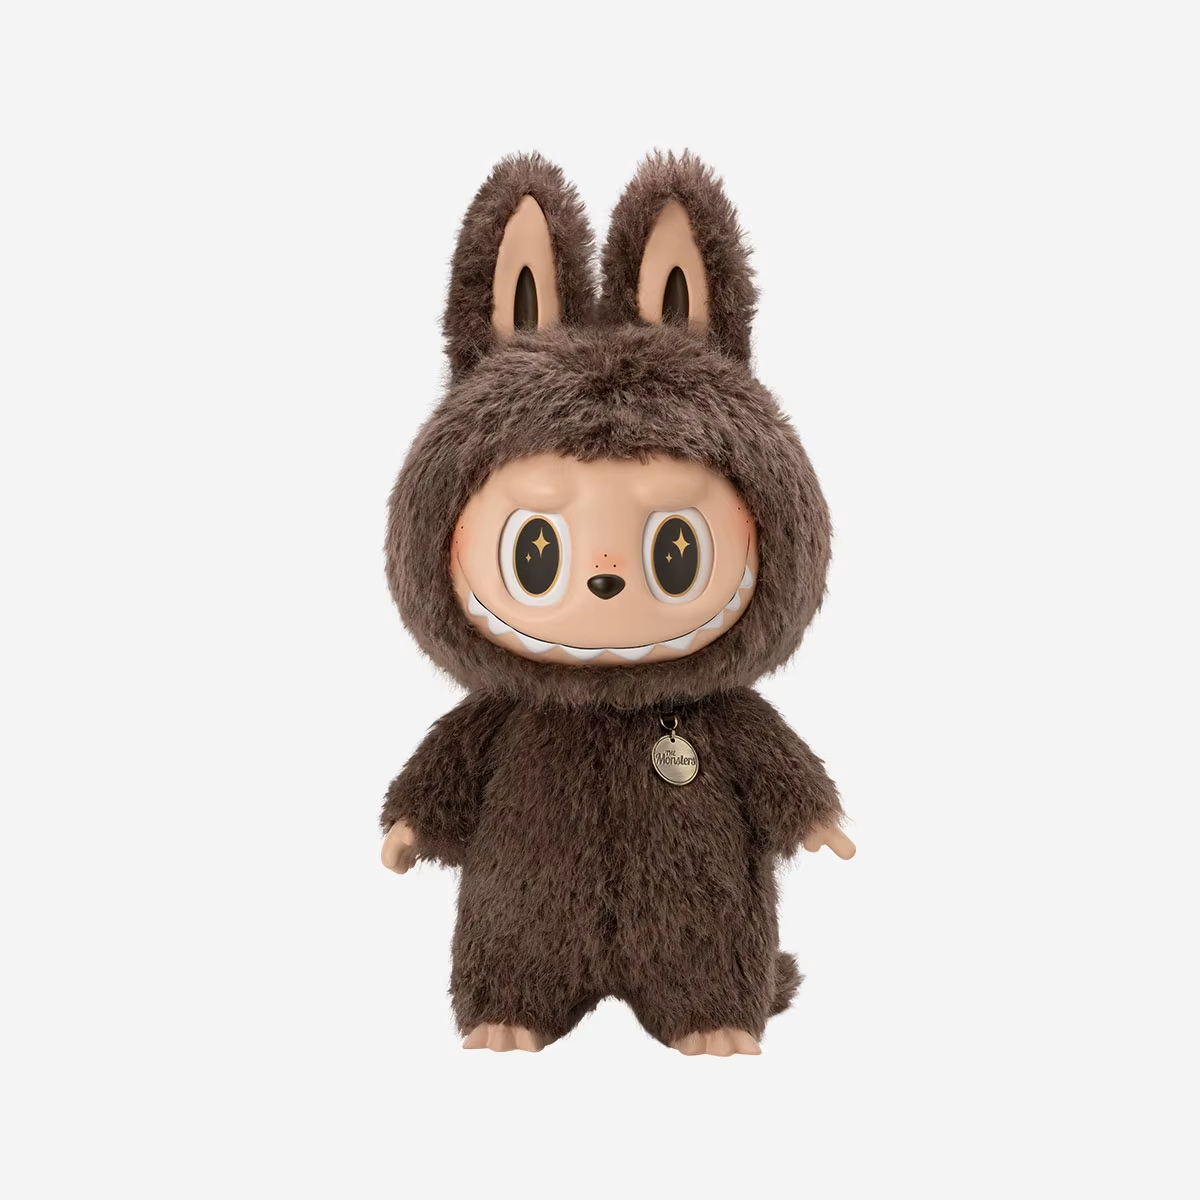
Prepare the Product Image
Choose the product you want them to hold.
In this example, we use Labubu.
Try to use a product image that is:
- clean
- high resolution
- clear shape
- easy to recognize
Combine Both Images in Nano Banana Pro
Now you will blend the model frame and the product into one realistic image.
Open Higgsfield
Go to Image → Nano Banana Pro
Upload two images
- Image 1: your realistic model frame
- Image 2: the product image
Add a simple prompt
Keep it short and direct.
Example prompt:
“Her holding this super naturally.”
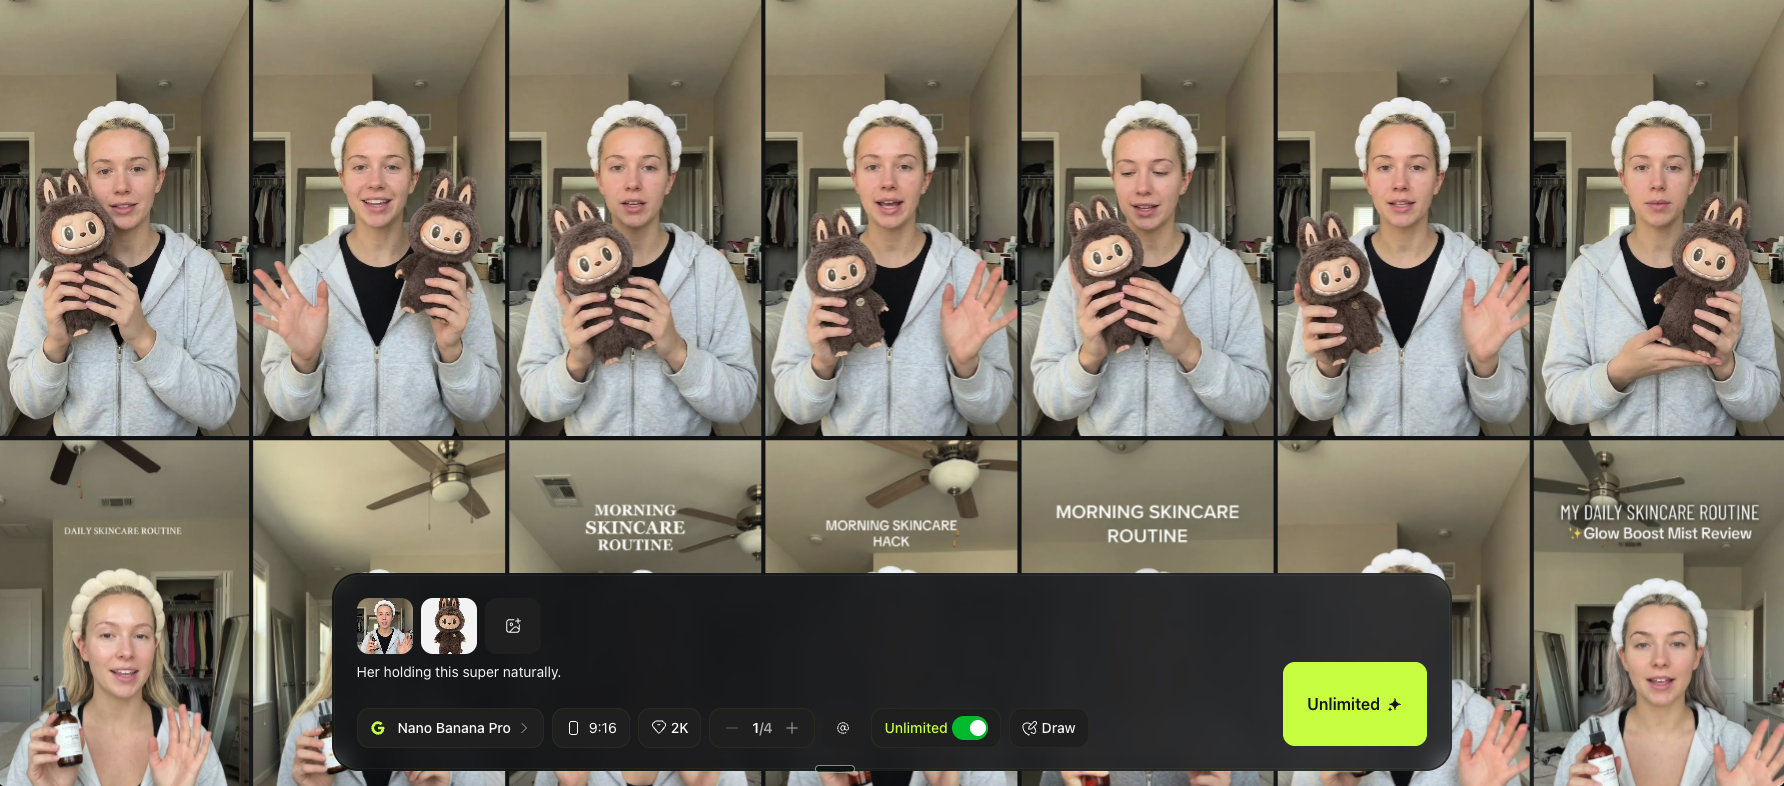
Generate multiple variations and choose the most natural one.
Choose the Most Natural Result
Pick the image where:
- the fingers look normal
- the grip makes sense
- the product scale feels right
- shadows and reflections match the room lighting
- the face still looks like the same person
If hands look weird, regenerate more.
Hands are one of the hardest parts in AI.
Example:

Turn It Into a Talking UGC Video (Veo 3.1)
Now follow the same workflow as the How to Make Them Talk section.
Go to Higgsfield Video
Select Veo 3.1
Upload your final image
Use the one where the product holding looks best.
Use a prompt like this
Example prompt:
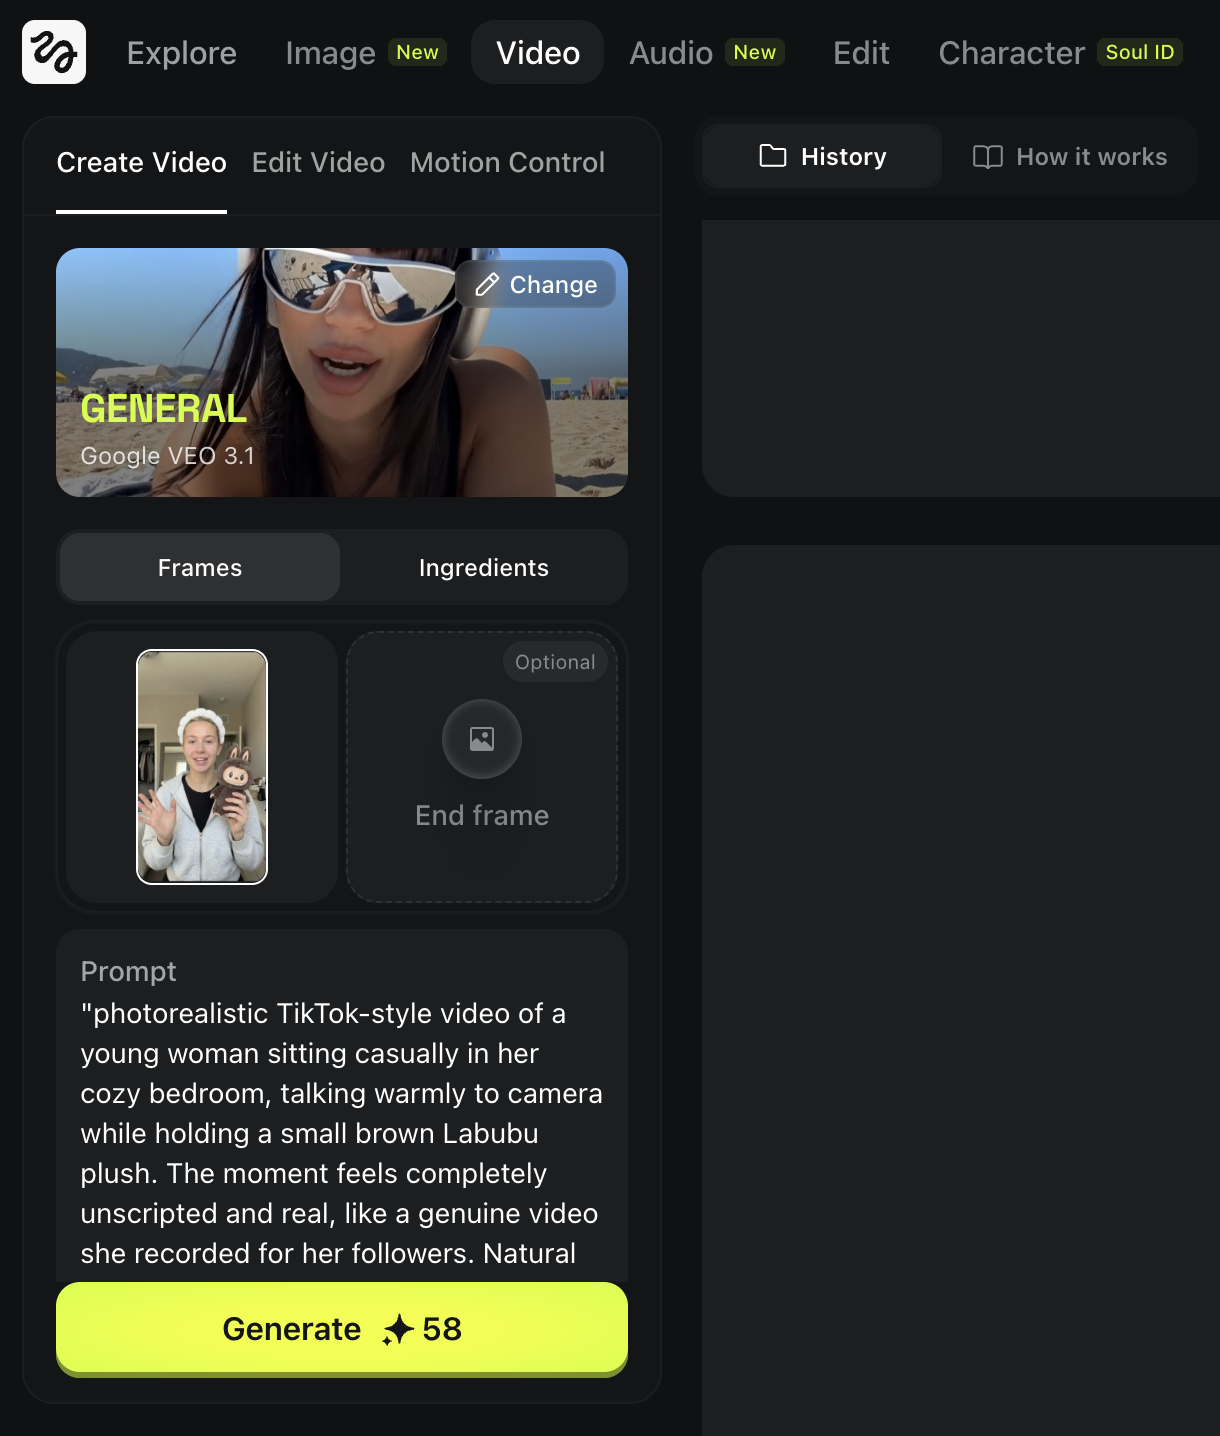
Generate a few versions and choose the most believable one.
What You're Making
In this chapter, you will learn how to create a realistic dance animation where your AI character follows the exact movement from a real video. The core idea is straightforward: you find a real dance clip with the motion you want, then swap in your own character while keeping the movement identical.
Pick a Dance Video to Copy
Find any short dance clip.
Pinterest works well.
Search keyword:
“dance”
Pick a video where:
- the full body is visible
- the background is not too chaotic
- the movement is clear
Extract the First Frame
We need the first frame as the pose reference.
Open frame-extractor.com
Upload your dance video
Set frames to extract: 1
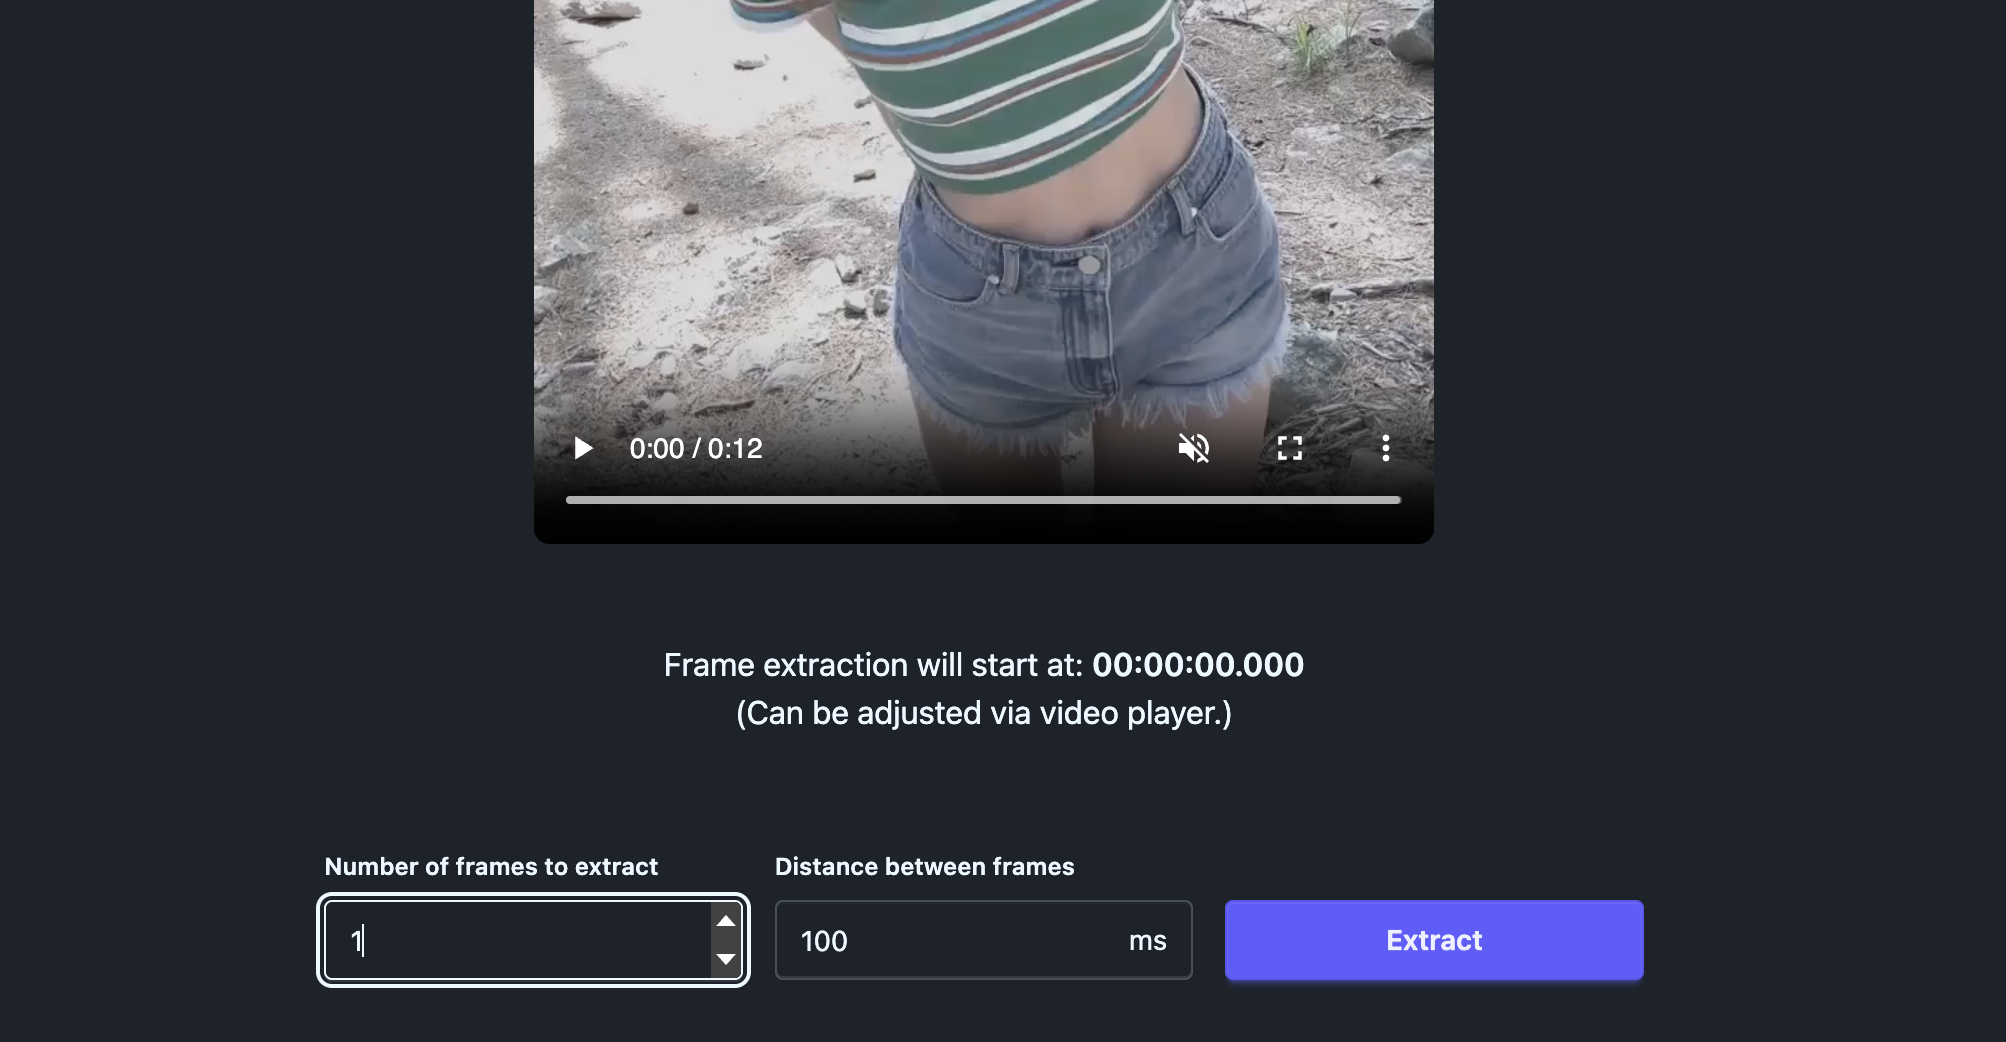
Extract and download the frame
This frame becomes your pose and camera reference.
Download the frame.

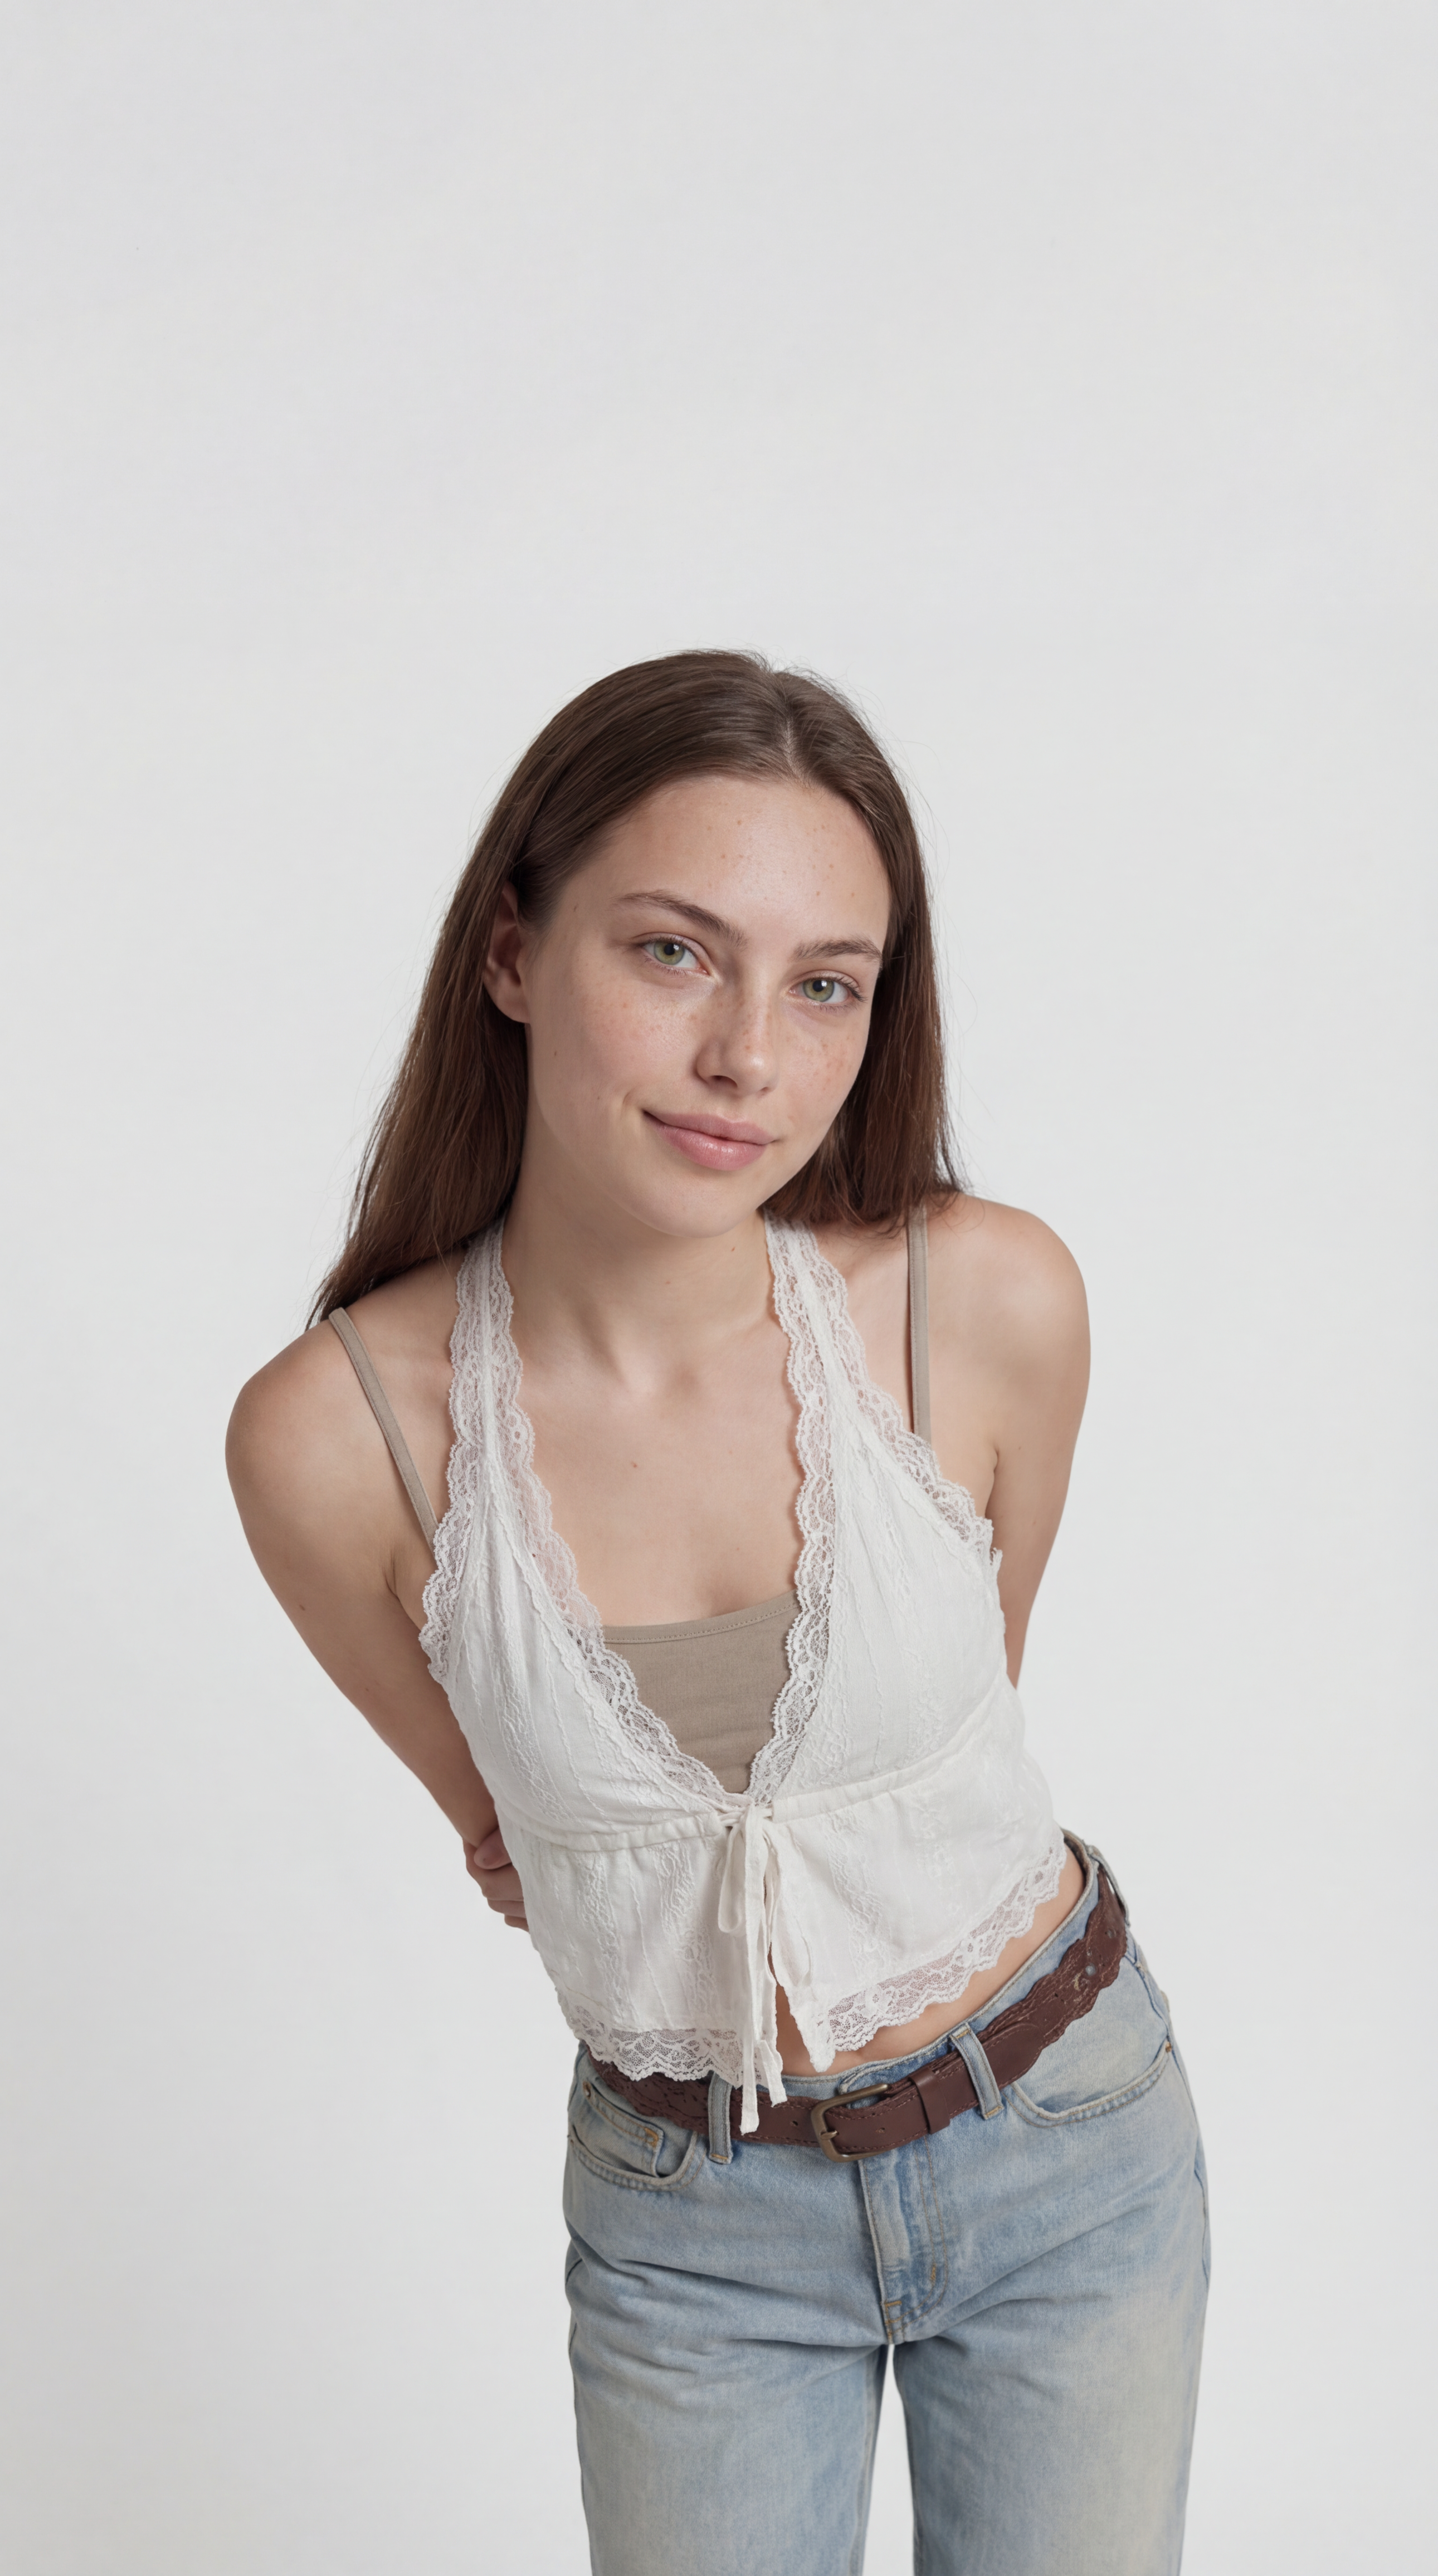
Recreate the Same Pose With Your Character (Nano Banana Pro)
Now we swap the dancer into your consistent character.
Open Higgsfield
Go to Image → Nano Banana Pro
Upload three references
- your character sheet
- your face close up anchor (optional but recommended)
- the first frame you extracted from the dance video
Use a simple prompt like this

Generate multiple variations and pick the one where:
- pose matches closely
- the body proportions look correct
- the face still feels like your character
You can change the background later.
For learning, white background makes everything easier.
Output:
Animate With Motion Control (Kling 3.0)
Now we apply the real motion.
Open Higgsfield Video
Select Kling 3.0 Motion Control
Set your references
- Left side: the original dance video
- Right side: your generated character pose frame
Set the scene background
If you want a white background, set it to Image.
Generate
The output should follow the original motion while keeping your character.

Output:
Pro Tips (Cleaner Motion, Less Weirdness)
Start short. Keep your clips between 5 and 8 seconds. Short sequences are much easier for the model to handle than long choreography.
Pick simple, readable motion. Too much spinning or fast arm movement can break hands and limbs. If the original clip has complex motion, the output will almost certainly have issues.
Fix the pose frame first. If the result looks off, do not keep regenerating the video. Go back and improve your starting image. Motion control quality depends heavily on how clean your first frame is.
What You're Making
In this chapter, you will learn how to create a realistic UGC style image or video where your model holds an iPhone with actual content visible on the screen. This is perfect for app demos, landing pages, and product showcases. The technique is simpler than it sounds. You generate the scene with a green screen on the phone first, then replace that green screen with whatever content you want to display. This two step approach gives you full control over what appears on screen while keeping the rest of the image looking natural and realistic.
Prepare the Base Model Scene
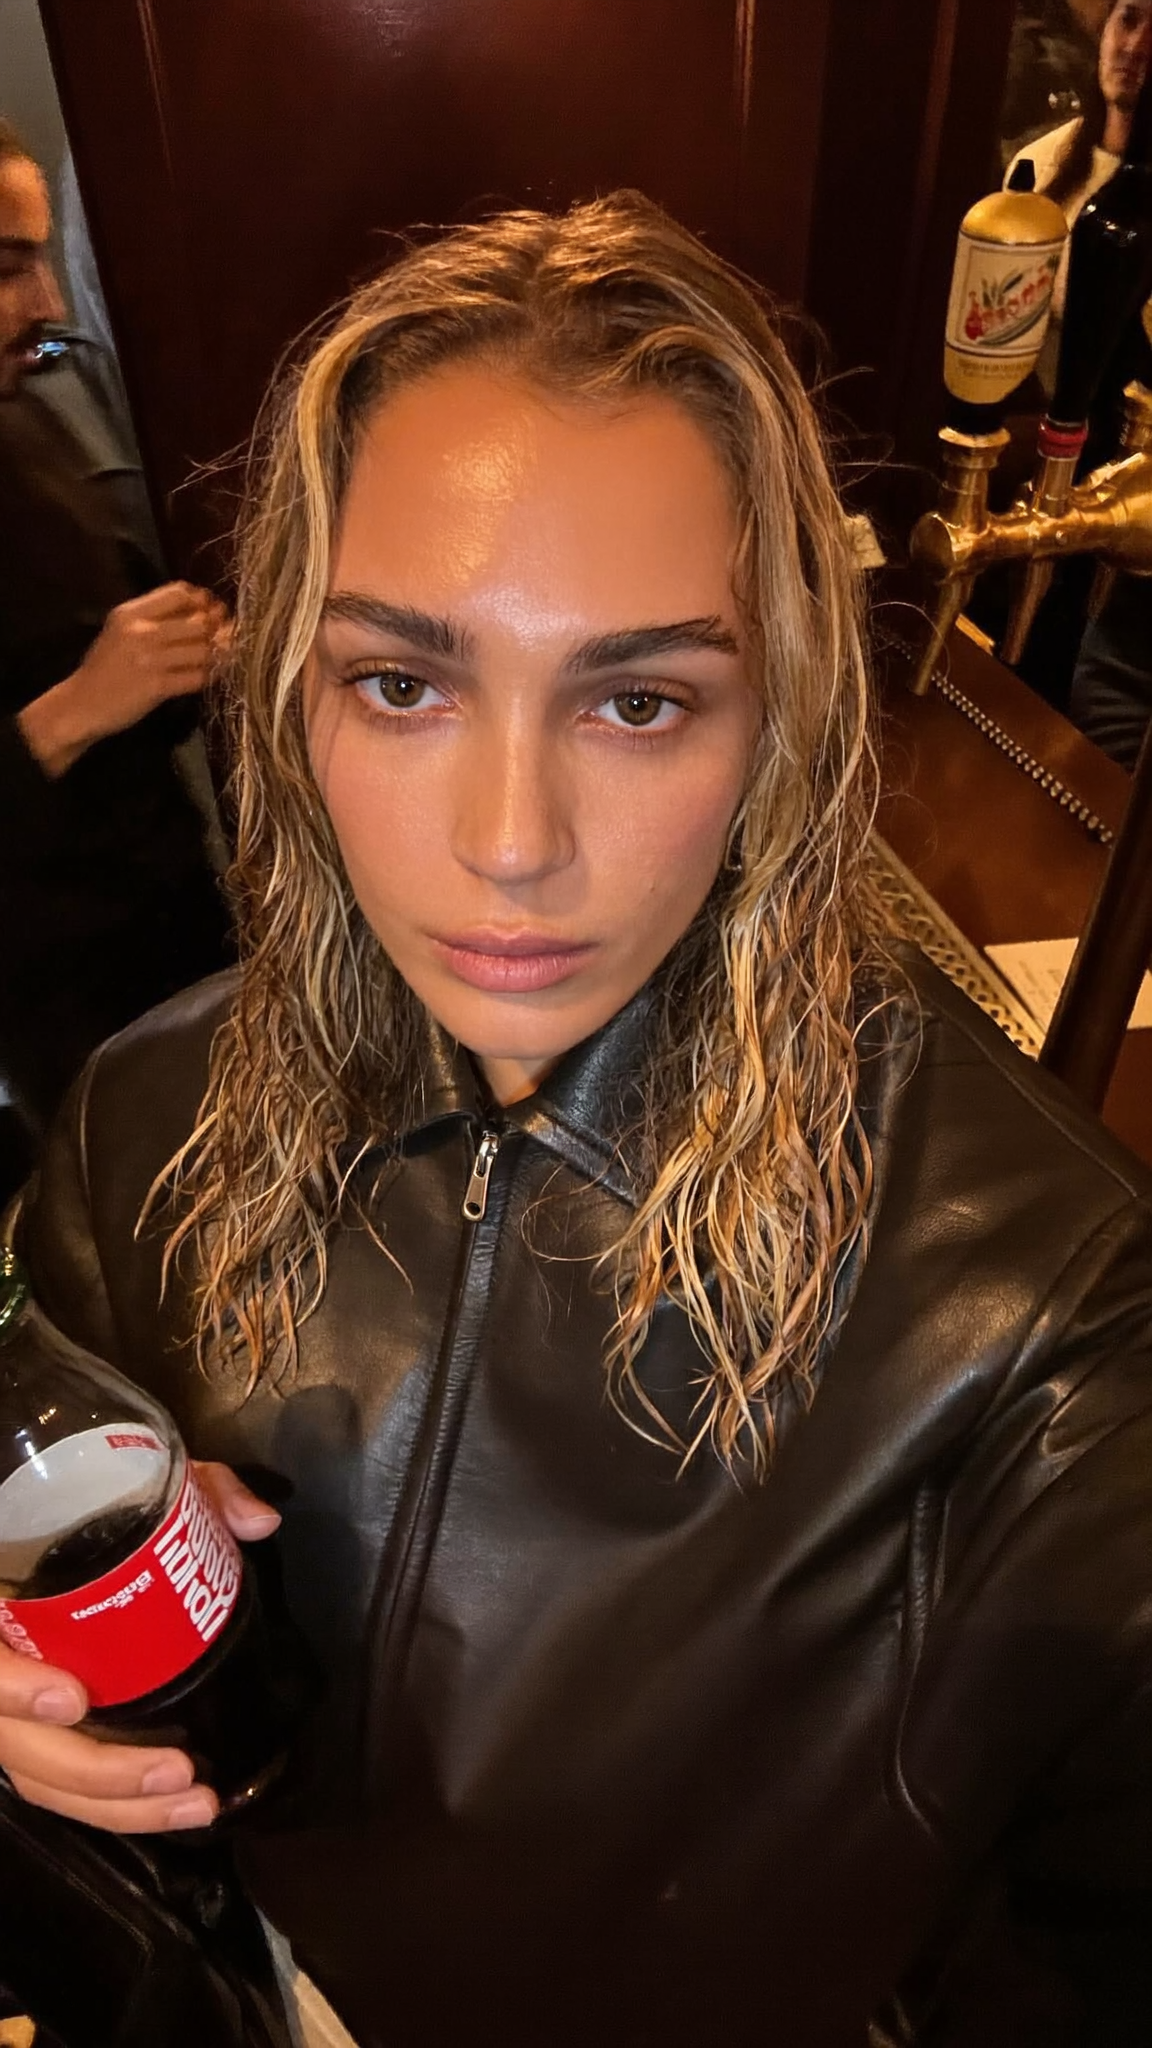
Since we are near the end of the book, this is a good moment to show that the workflows you have learned are not locked to one model. Everything we have covered applies no matter which tool you use. So for this chapter, we will use Soul 2.0 instead of Nano Banana. You can of course still use Nano Banana if you prefer, but this is a good example of how flexible the approach really is.
Go to Higgsfield and choose the Soul model.
Example prompt:
Generate multiple and pick the most realistic one.
Example:
Add an iPhone With a Green Screen
Now we create the same image but with a phone in hand.
Stay in Nano Banana Pro
Upload the image you just generated
Use this prompt:

Example:
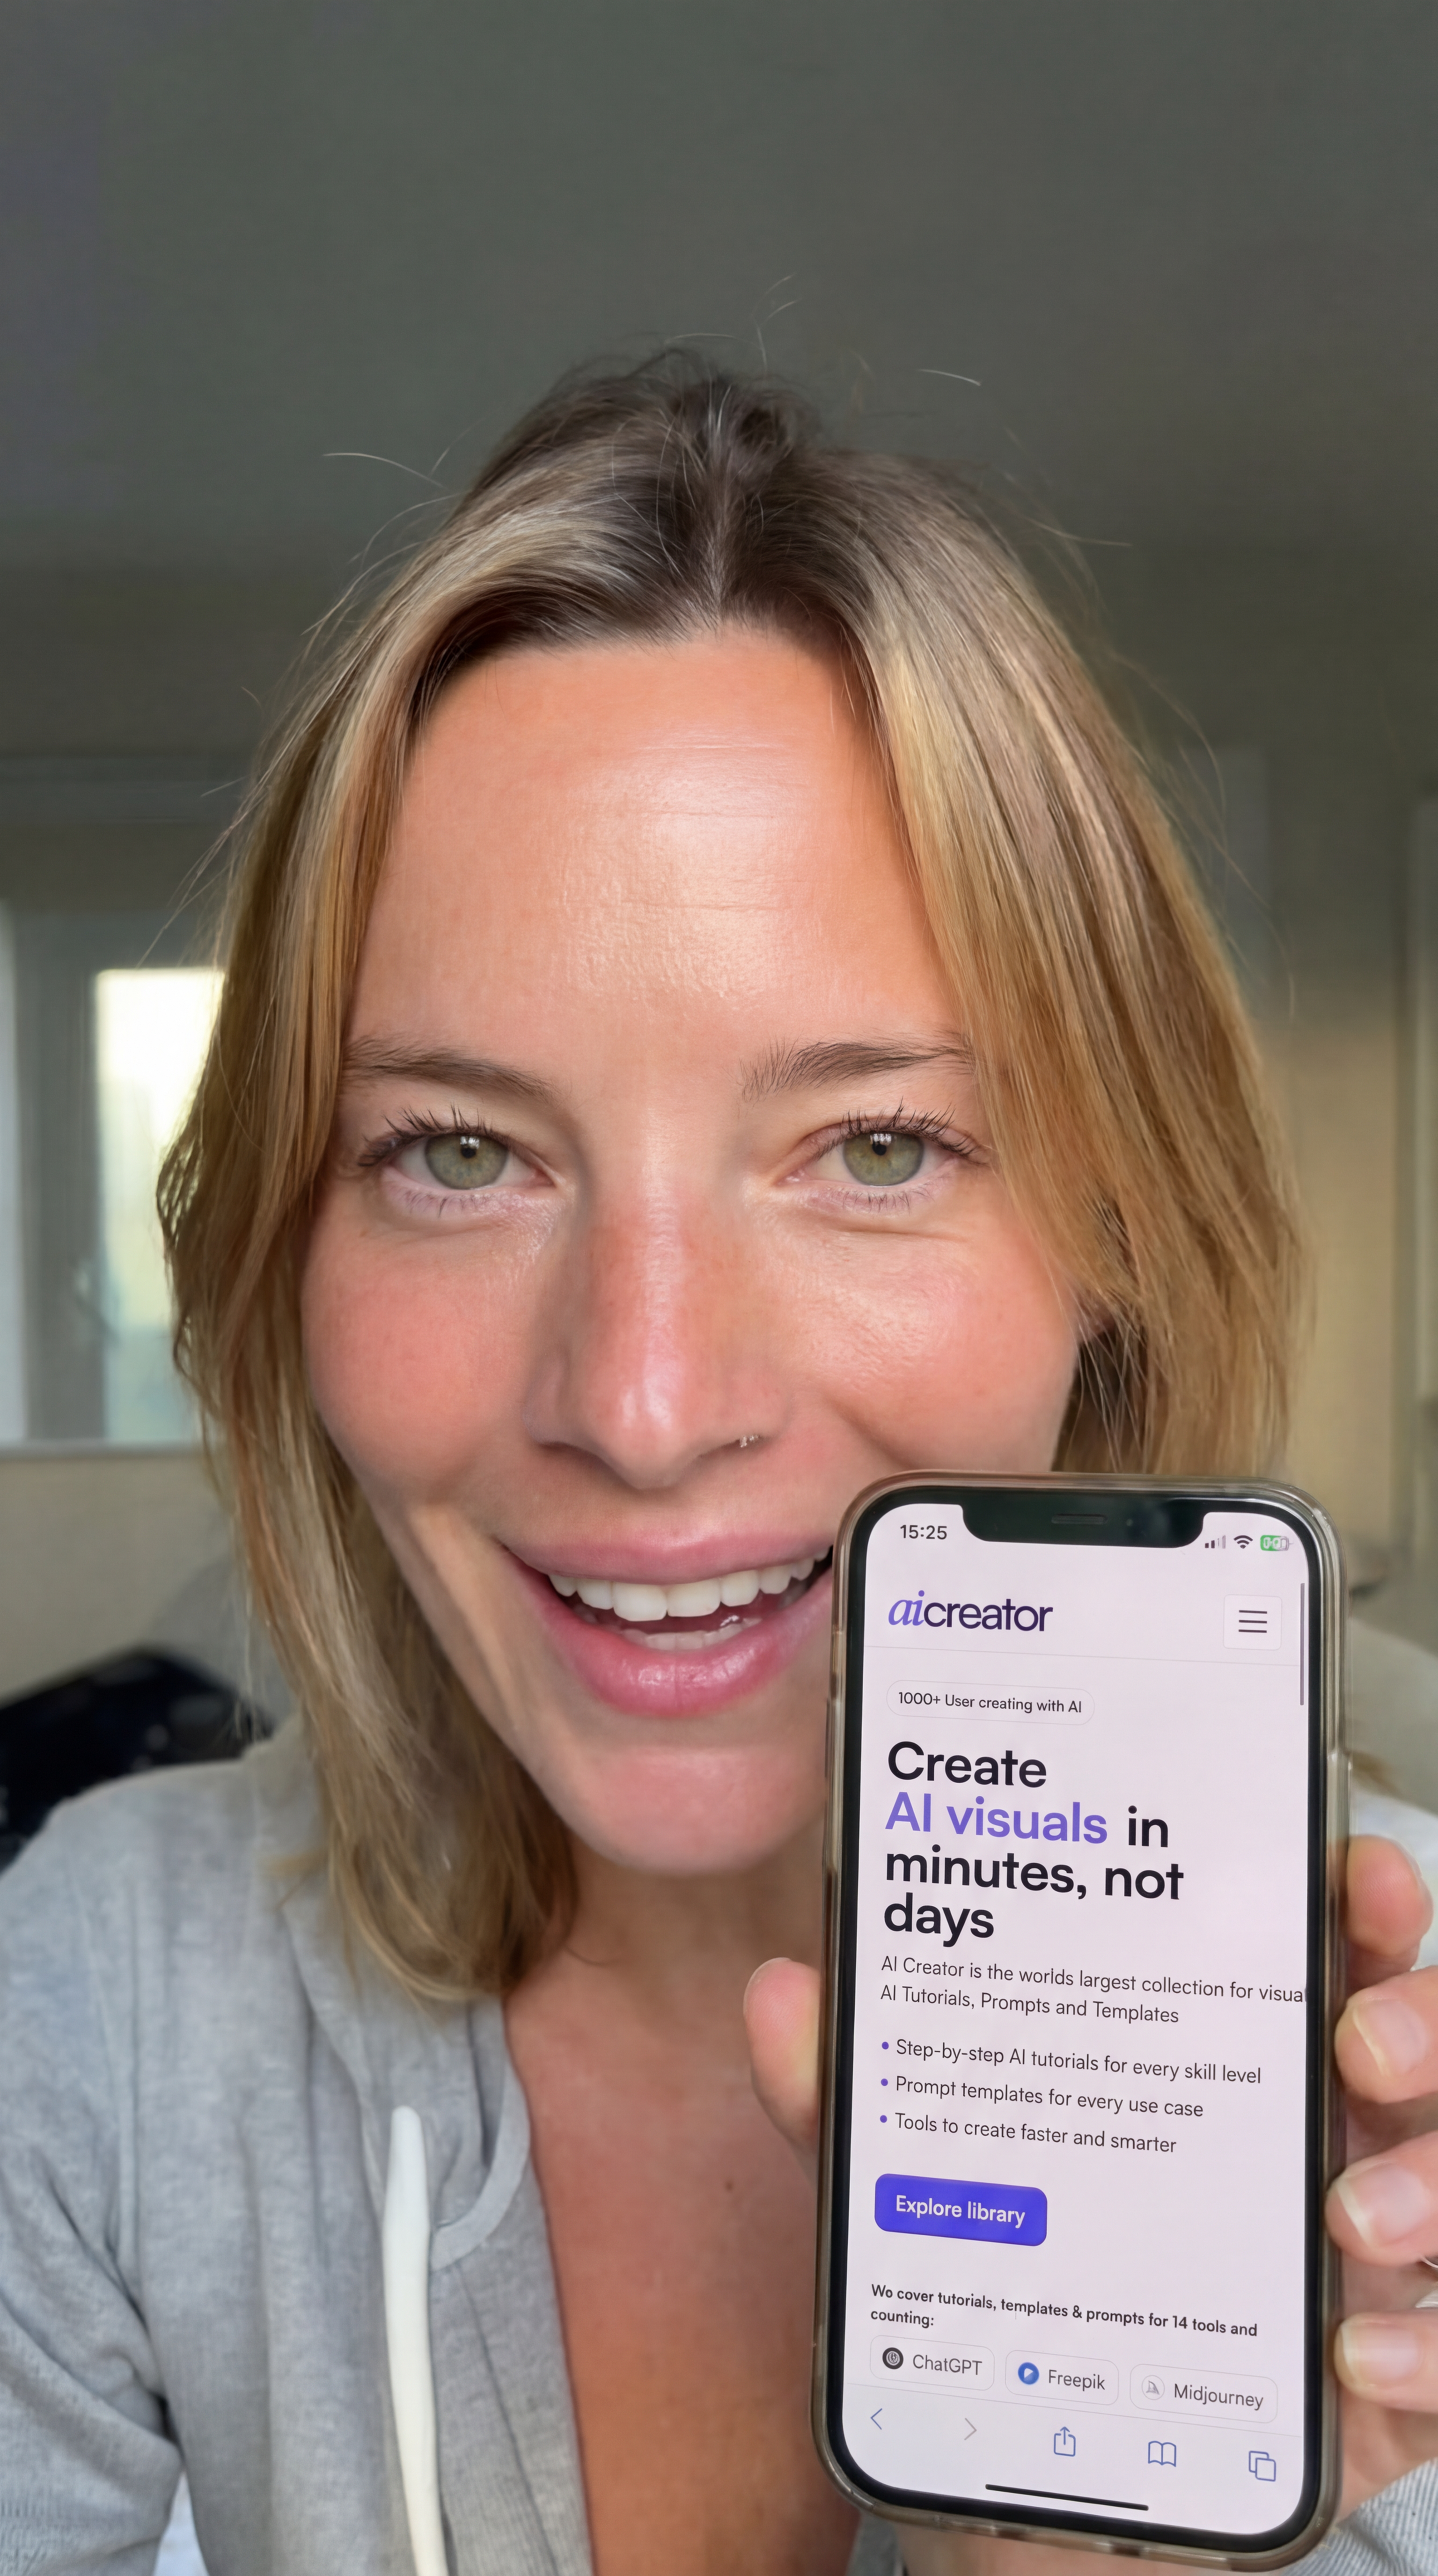
Replace the Green Screen With Your Content
Now bring the content you want to show.
Example:
Choose Nano Banana 2
Upload two images:
- the iPhone green screen image
- the screenshot you want on the phone
Use this prompt:
Generate a few versions and pick the cleanest screen replacement.
Example:
Turn It Into a Talking Video (Veo 3.1)
Now you can turn it into a video.
Go to Video → Veo 3.1
Upload the final image with the real screen content
Prompt it like a natural iPhone selfie clip
Example prompt:
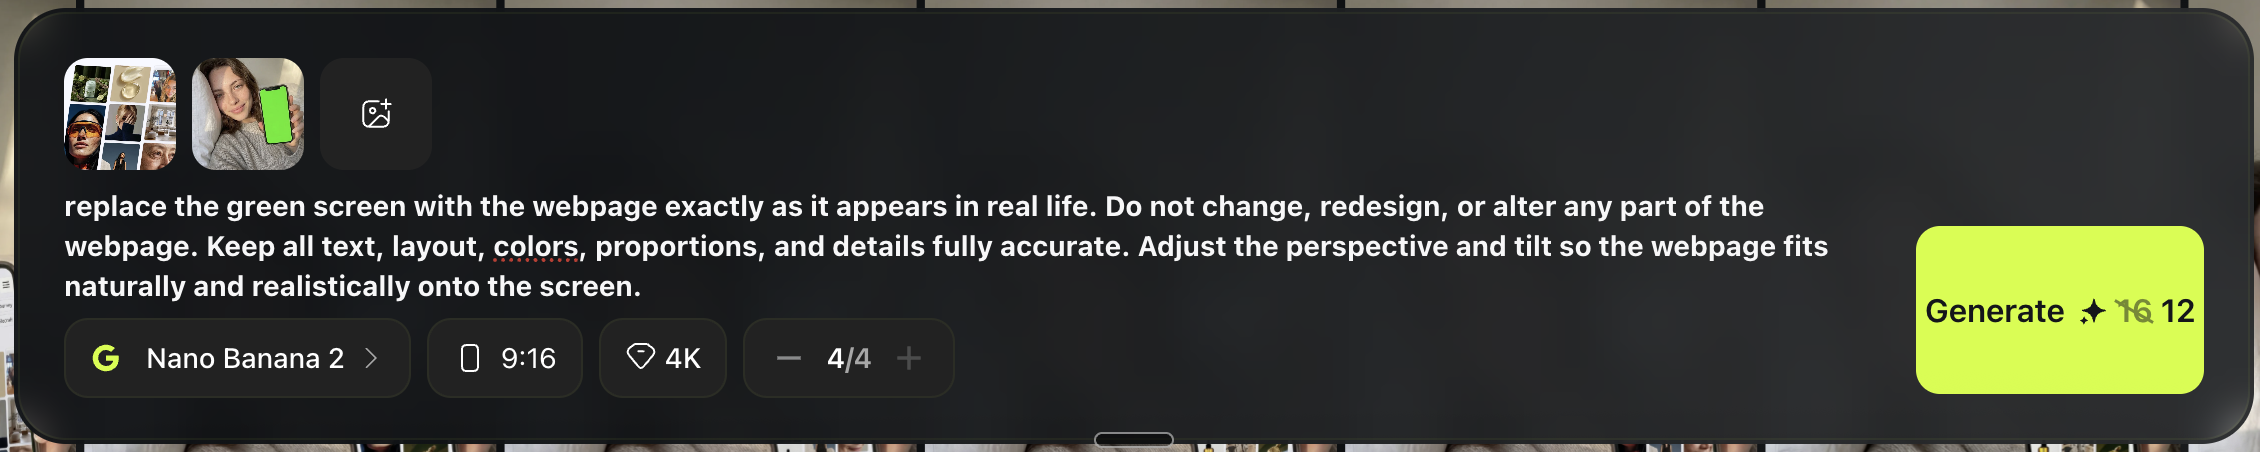
Example
“replace the green screen with the webpage exactly as it appears in real life. Do not change, redesign, or alter any part of the webpage. Keep all text, layout, colors, proportions, and details fully accurate. Adjust the perspective and tilt so the webpage fits naturally and realistically onto the screen.”
Pro Tips (So It Looks Real)
Make the phone screen fully visible. If the screen is partially cut off or angled too far away, the content becomes unreadable and the whole shot loses its purpose.
Match the brightness. The screen brightness should feel natural within the lighting of the room. A glowing bright screen in a dark moody scene will instantly look fake.
Keep movement small in video. Big hand movements often distort or break the phone shape during generation. Small, subtle motions feel more realistic and keep the screen content readable throughout the clip.
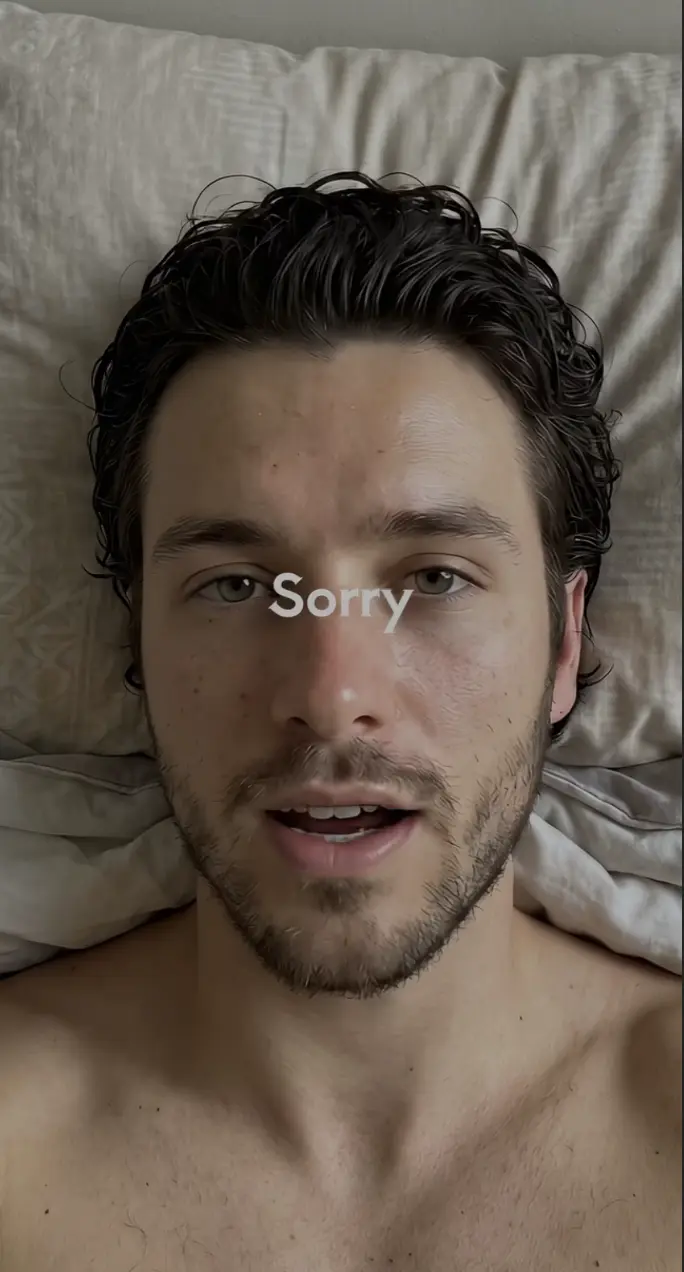
What You Are Making
In this chapter, you will learn the full pipeline for creating a longer, hyper realistic talking video. You will generate a perfect first frame, animate it into a short clip, then repeat the process to create additional clips and stitch them all together. The key is consistency: composition stays locked, face stays centered, and motion stays tiny so it feels like real front camera footage.
Step 1: Pick a Reference (Optional but Recommended)
Find a real selfie reference that matches your goal. You could use any apparoch that we covered in previous sections. Look for something that is:
- Vertical 9:16
- Shot from above, phone held over face
- White pillow background
- Tight crop (hair near top edge, shoulders at bottom)
Save it to your device. If you already know the exact look you want, you can skip the reference and just use your prompt.
Step 2: Get a Clean JSON Prompt in ChatGPT
The goal here is to produce a Nano Banana ready JSON prompt that contains only image generation instructions, no text overlays.
Open ChatGPT
Upload your reference image (if using one)
Paste this message:
Before moving on, do a quick check:
- Positive prompt describes the exact composition and realism
- Negative prompt bans text, UI, subtitles, logos, watermarks
- Aspect ratio is 9:16
Example output:
{
  "prompt": "Ultra photorealistic vertical 9:16 iPhone front-camera selfie. A young adult man lying on his back in bed, head resting on a white pillow, shot from above with the phone held directly over the face. Match the reference composition exactly: face centered, tight crop with hair near the top edge, shoulders and upper chest visible at the bottom, pillow filling the background. Soft natural daylight, neutral indoor tone, gentle shadows, no dramatic lighting. Expression: relaxed, slightly open mouth as if speaking mid-sentence, eyes looking straight into the camera. Hair: dark, slightly wet or freshly washed, wavy texture with realistic clumping and shine, individual strands and flyaways clearly visible. Beard: short stubble with natural density variation, crisp individual whiskers along jawline, cheeks, and upper lip. Skin: extremely realistic human skin with visible pores, fine vellus hairs, subtle blemishes/acne marks, mild redness around the nose, natural unevenness and micro specular highlights, realistic under-eye texture, no smoothing, no beauty retouch. Background: white pillow with visible fabric weave and soft folds, off-white wall above the pillow. The final image must look like a real photo taken on a phone, zero AI look, zero artifacts.",
  "negative_prompt": "any text, captions, subtitles, UI, status bar, app interface, comment box, watermark, logo, timestamp, borders, frames, stickers, filters, beauty smoothing, plastic skin, waxy skin, airbrushed, uncanny face, asymmetrical eyes, deformed mouth, extra teeth, blurred beard, fake hair, helmet hair, banding, over-sharpened, HDR look, cartoon, illustration, anime, CGI, 3D render, unnatural lighting, weird shadows, noise patterns",
  "settings": {
    "aspect_ratio": "9:16",
    "style": "photoreal",
    "detail_level": "maximum",
    "skin_texture": "maximum realism",
    "camera": "phone front camera selfie",
    "lighting": "soft natural daylight",
    "composition_lock": "match reference exactly"
  }
}
Step 3: Generate the First Frame in Nano Banana (Higgsfield)
Open Higgsfield
Go to Nano Banana Pro
Paste your JSON prompt
Set:
- Aspect ratio: 9:16
- Highest quality available
- Photoreal or realistic mode if there is a toggle
Generate multiple outputs (at least 4 to 8)

How to pick the best image:
Choose the one where:
- Skin texture looks natural (pores, tiny imperfections), not waxy
- Hair strands look real, not clumped like plastic
- Beard stubble is crisp with individual whiskers visible
- Pillow fabric texture looks real (weave and folds)
- No artifacts around lips, nostrils, hairline, or jaw
Save the best image in high resolution.
Example:

Step 4: Animate in Veo 3.1
On Higgsfield, select Veo 3.1
Set First Frame to your chosen Nano Banana image
Paste your Veo prompt
Set:
- Resolution: 1080 x 1920 vertical
- Length: 4 seconds first for testing, then 6 or 8 seconds once it looks right
- Quality: highest you can afford for the final version
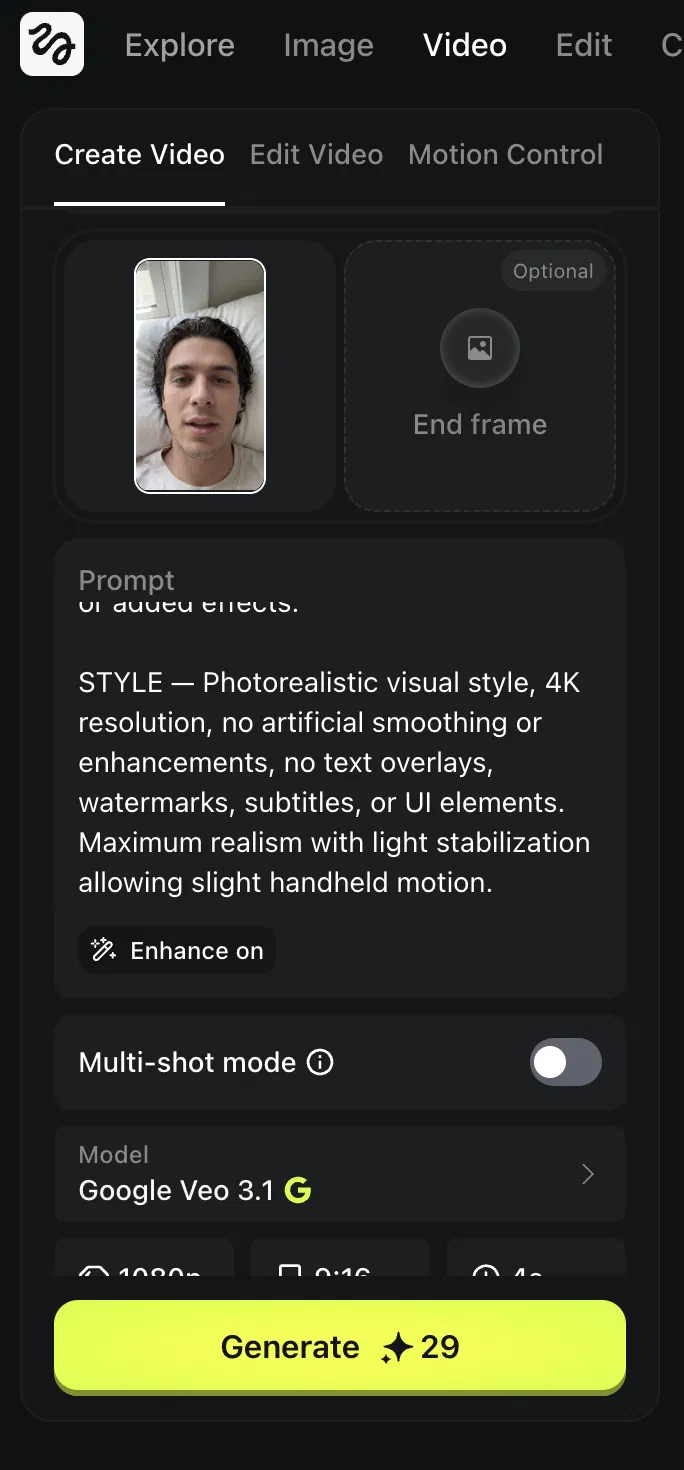
Generate
Example prompt:
Example output:
Step 5: Make Additional Clips With the Same Character
Now you create another scene. The most important thing here is keeping the character, the vibe, and the environment the same across clips. To do this, upload the first image you generated with the JSON prompt. That becomes your core identity reference.
Open Nano Banana Pro
Upload your original first frame as the identity reference
Write a prompt that keeps the identity locked but changes the scene slightly
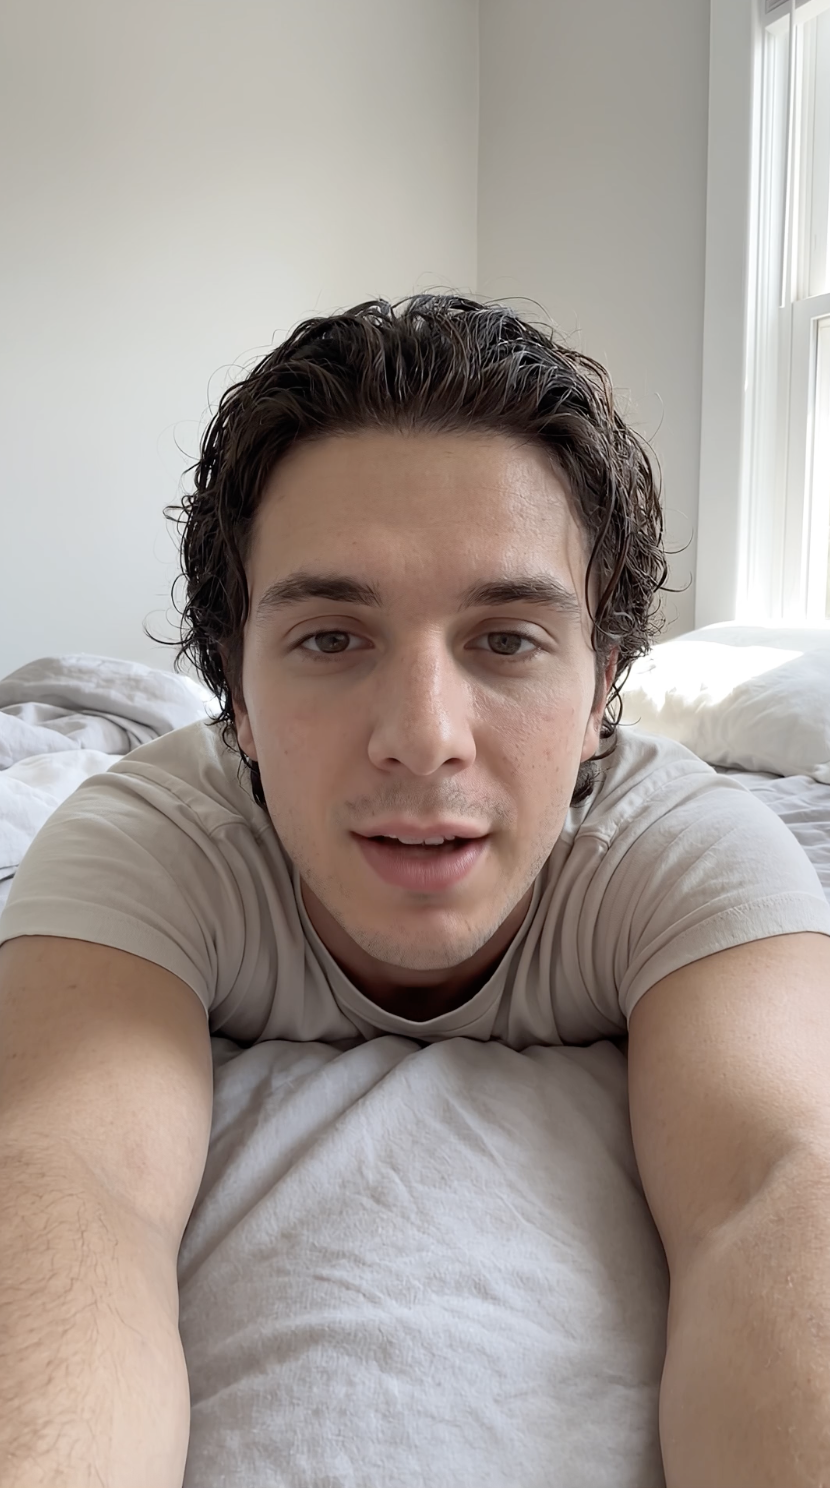
Adjust the prompt depending on the scene you want to create, but always keep the core identity details the same: face, hair, skin, clothing, and room.
Generate multiple variations and pick the best one. Then animate it with Kling 3.0 or Veo 3.1 using the same approach from Step 4.
Example:
Step 6: Edit and Combine in CapCut
Import all clips into CapCut (or your preferred editor)
Put them in order
Match the pacing:
- Trim dead space at the start of each clip
- Keep micro pauses between lines for realism
Put subtittles or effects if needed
Export in 9:16 at high bitrate
Why a Visual Workflow Matters
By now you have learned how to generate images, create characters, animate them, and stitch clips together. But as your projects grow, keeping track of everything gets messy fast. Which reference image did you use for that character? Which prompt produced the best result? What was the exact settings combo that worked?
This is where a node-based workflow tool changes the game. Instead of managing files across folders and tabs, you lay everything out on a single visual canvas. Every generation, every reference, every connection between steps is visible at a glance. You can see your entire project the way a director sees a storyboard.
What Flora Does
Flora is a node-based creative platform where you connect your AI generations visually on an infinite canvas. Think of it as a whiteboard where each node is an image, a video, a prompt, or a generation step. You drag connections between them to show how one output feeds into the next.
Everything we covered in this book (character creation, editing, fixing, product ads, talking videos, animations) can be recreated inside Flora. The difference is that you see the full pipeline at once instead of jumping between browser tabs.
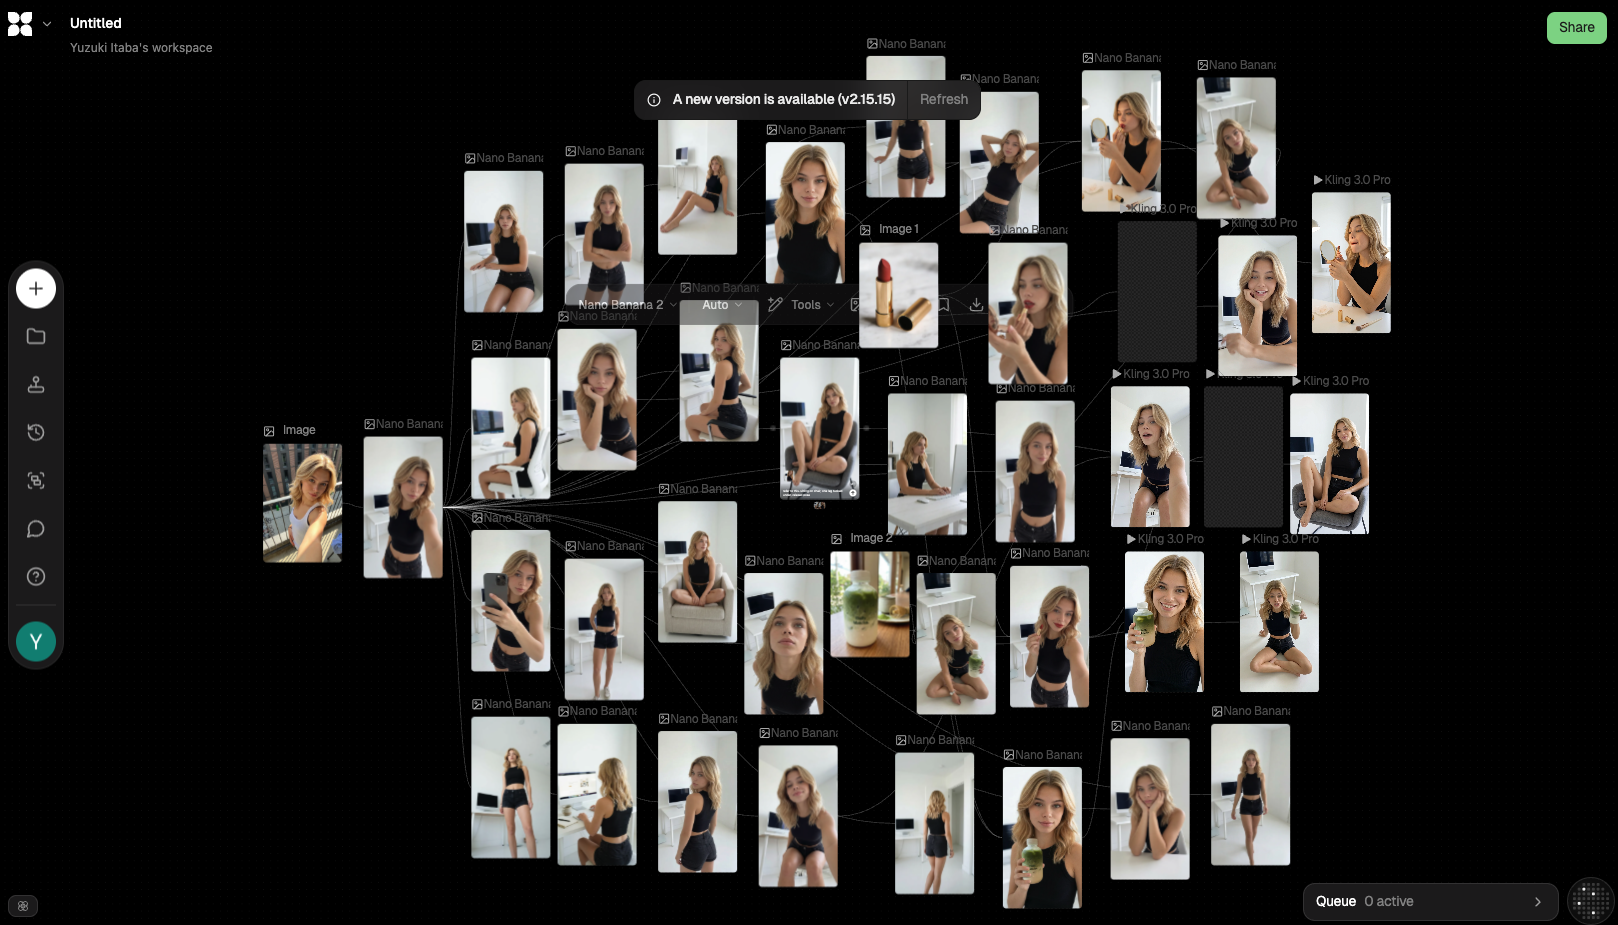
Above is a real Flora project for an AI influencer. Every image you see is a generation node, and the connections between them show exactly how the character was built, edited, and iterated. You can zoom in on any step and see the prompt, settings, and result.
Higgsfield vs Flora
Both platforms let you generate AI content, but they work very differently. Here is how they compare:
| Higgsfield | Flora | |
|---|---|---|
| Interface | Linear, one generation at a time | Visual canvas, everything on one board |
| Workflow style | Step-by-step, tab-based | Node-based, connected visually |
| Seeing the full picture | Scroll through history | Zoom out and see everything at once |
| Organizing iterations | Manual folder management | Drag and connect on canvas |
| Character consistency | Upload references each time | Link reference nodes, always visible |
| Collaboration | Single user | Share projects with a link |
| Best for | Quick single generations, beginners | Complex projects, visual thinkers |
| Built-in models | Nano Banana, Veo, Kling, Soul | Multiple models via integrations |
Neither tool is "better." Higgsfield is faster for quick one-off generations. Flora is better when you are building a full character system or managing a project with many connected outputs. Many creators use both: Higgsfield for the actual generation, Flora for organizing and planning the pipeline.
When to Use Flora
Flora makes the most sense when your project gets complex. If you are creating a single talking head video, Higgsfield alone is fine. But when you are building an AI influencer with a consistent look across 20+ scenes, or managing a product ad campaign with multiple characters and variations, Flora keeps everything visible and connected.
Here are the situations where Flora shines:
- Character development. Lay out your anchor sheet, face close-ups, and scene variations on one canvas. See which references produce the best results without scrolling through folders.
- Multi-step workflows. Connect your image generation to your video generation to your editing. The entire pipeline is one visual flow.
- A/B testing. Generate multiple variations side by side. Compare them visually without opening separate tabs.
- Client projects. Share a Flora project link with your client so they can see the full creative process and approve specific outputs.
If you are the kind of person who thinks visually and likes to see how everything connects, Flora will feel natural. If you prefer a simpler, more linear workflow, stick with Higgsfield and come back to Flora when your projects grow.
Now Go Make Something Real
If you have made it this far, you now have something most people do not: a complete, working system for creating AI UGC from scratch. You know how to generate realistic images, build consistent characters, animate them with real motion, put products in their hands, make them talk, and even show content on a phone screen. That is not beginner knowledge anymore. That is a real skill set.
But here is the thing. The tools will keep changing. New models will launch every month. Features will get better, interfaces will shift, and what feels cutting edge today will feel basic six months from now. That is fine. Because what you learned in this book is not about any specific tool. It is about the workflow, the thinking, and the ability to iterate until something looks real. Those skills transfer to any tool, any model, and any platform that comes next.
The biggest mistake you can make now is to stop after reading. The difference between someone who "knows about AI UGC" and someone who is actually good at it is simple: reps. Generate more images. Make more videos. Fail more. Every bad output teaches you something if you pay attention to what went wrong and make one small adjustment.
Start with one workflow from this book. Get comfortable with it. Then stack the next one on top. Before you know it, you will be combining techniques without even thinking about it. You have the system. Now go use it.